
What is an email account?
Email is a service that allows users to send and receive messages through electronic communication networks, such as the Internet. Its operation is based on a store-and-forward model, meaning that the sender and the recipient do not need to be connected at the same time. In this process, the mail server plays a key role, as it temporarily stores the messages before delivering them to their recipients.
How does email work?
Currently, the sending and receiving of emails is carried out following a series of steps:
-
The user drafts the message using an email client. When sending it, the program communicates with the sender's SMTP server (Simple Mail Transfer Protocol), which stores the message while it is pending to be sent.
-
The sending SMTP server determines which server the message should be sent to. To do this, it consults the destination server, verifying the MX record of the recipient's email domain.
-
Once the destination server is identified, the SMTP server emits the message using the SMTP protocol. The receiving server stores the email until the recipient reads or deletes it.
Email Alias
An email alias is an email address that redirects all the messages it receives to another account(s). It can have one or several recipients. Unlike a normal account, an alias does not occupy storage space, as it does not save the messages but forwards them directly to the destination account.
Email Lists
An email list is a tool that allows sending a message to multiple users simultaneously.
When an email is sent to the list address, it is automatically distributed to all the email accounts registered in it. These lists are also known as distribution lists.
It is important not to confuse them with whitelists or blacklists, which are used to allow or block, respectively, the reception of certain emails.
Email at SW Hosting
At SW Hosting, we offer email services designed to guarantee maximum security and reliability in all your communications. Our service is always available and accessible from anywhere, whether through Webmail or via your preferred email client.
Create Email Account with SWPanel
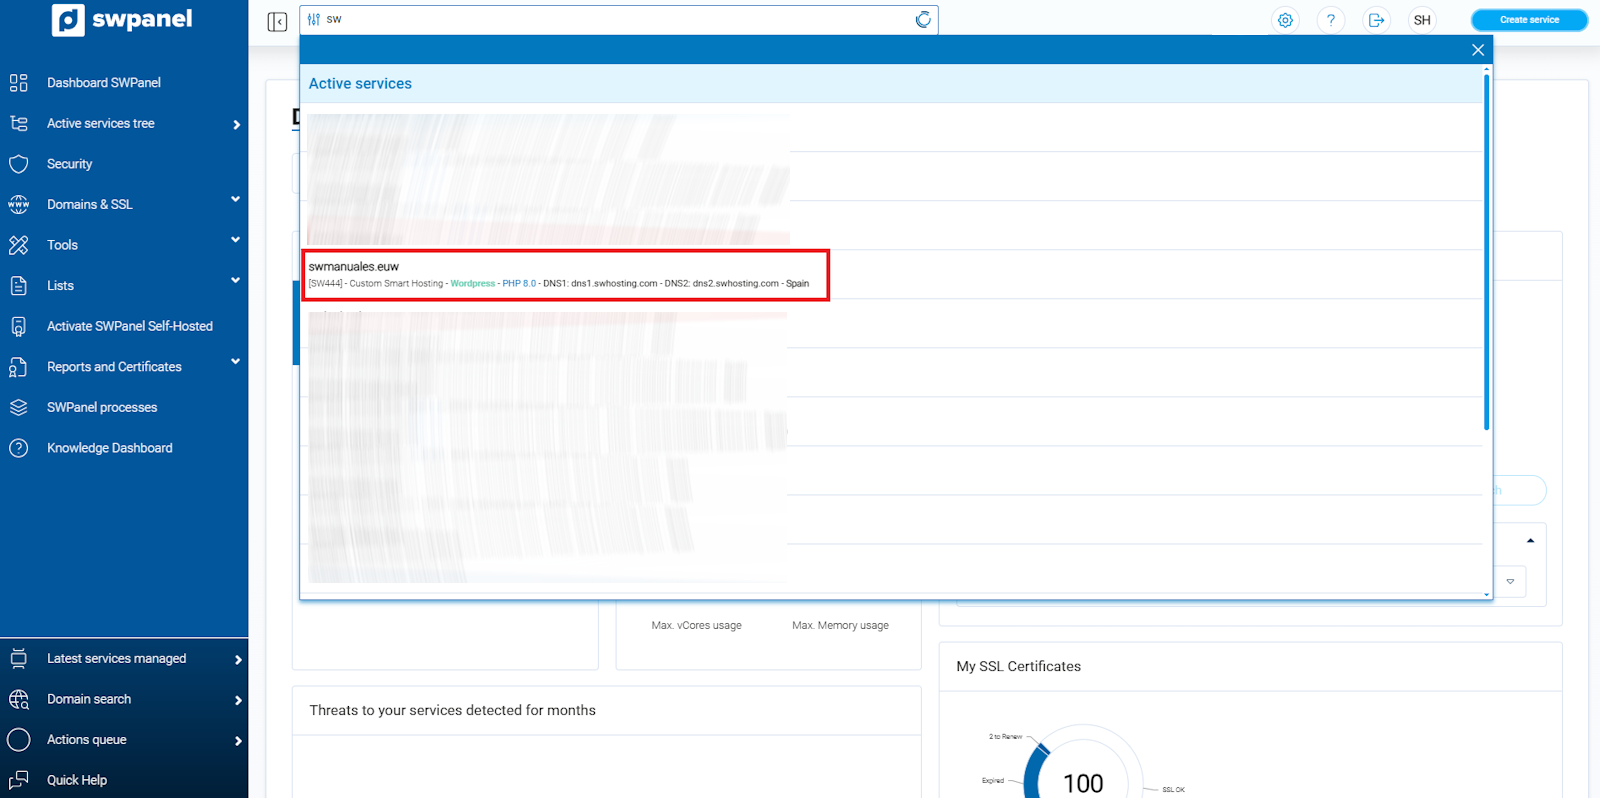
Step 1: Access the Dashboard of the service for which you wish to create an email account. To do this, click on Active services tree (left menu) and click on the corresponding service (for example, the hosting swmanuales.euw).
You can also locate the service in the SWPanel general search, if you prefer a faster search.
info_capture ℹ️ Note: The capture is for guidance purposes, taken from version 2026.000.0001 dated 02/15/2026. It may differ from the current version of SWPanel.
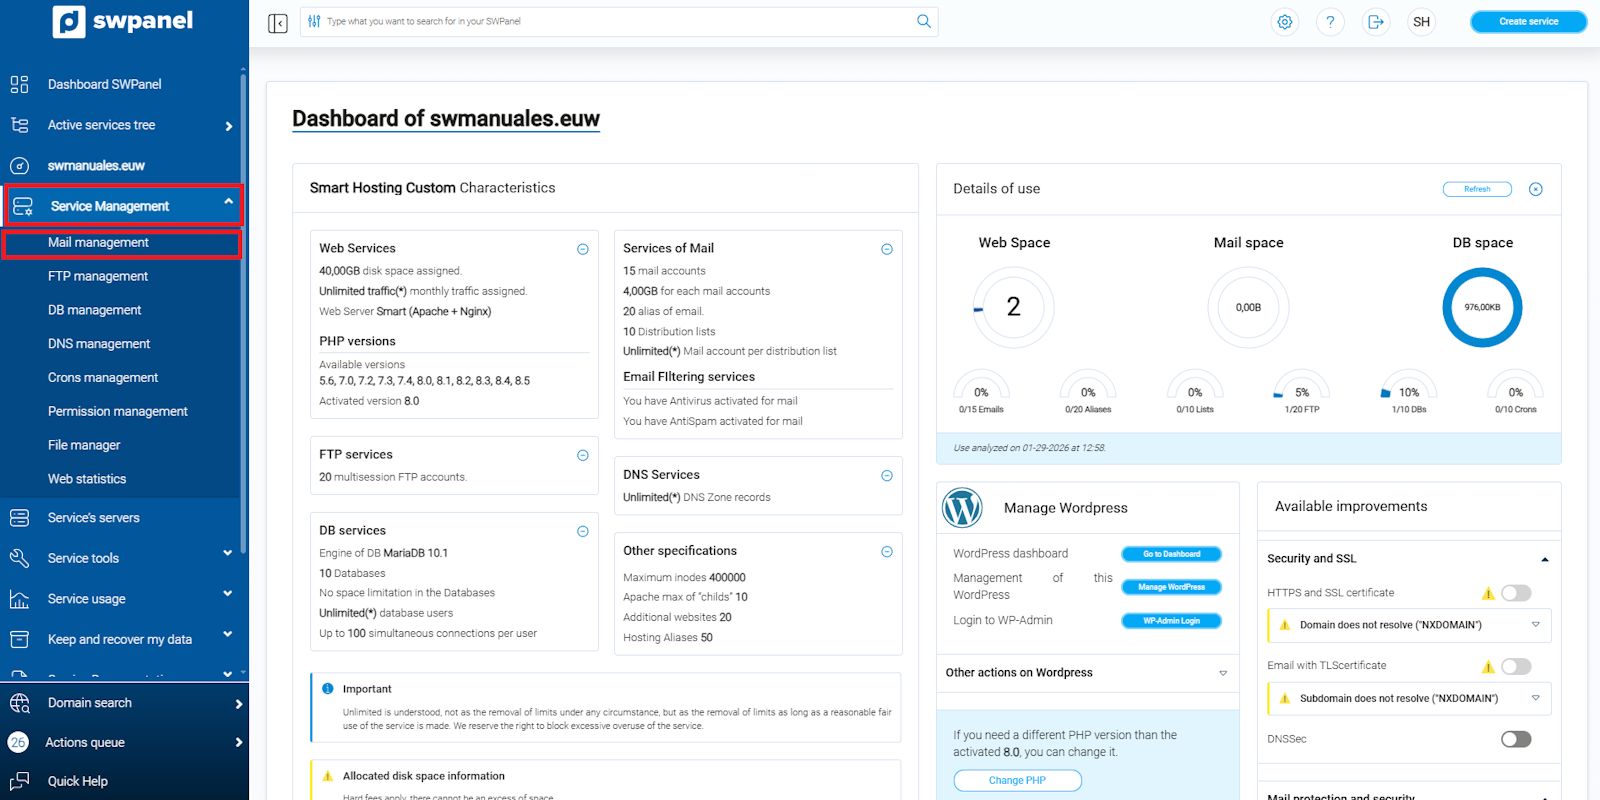
Step 2: Once the service is selected, go to the blue menu on the left and select: Service management → Email management.
info_capture ℹ️ Note: The capture is for guidance purposes, taken from version 2026.000.0001 dated 02/15/2026. It may differ from the current version of SWPanel.
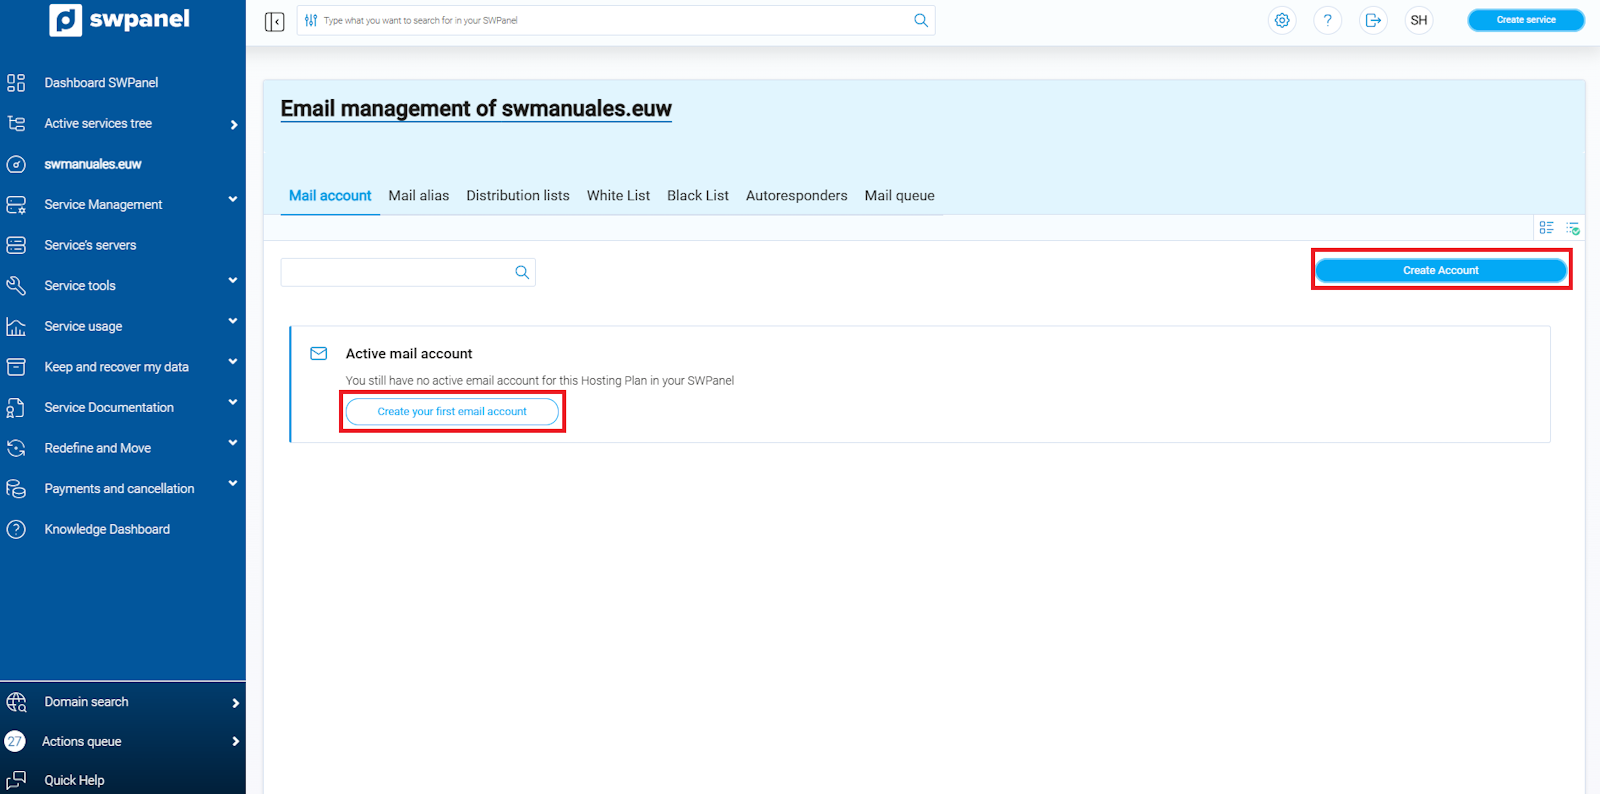
Step 3: In the Email management menu of your service, click on the blue 'Create Account' button, located in the upper right part of the tab.
info_capture ℹ️ Note: The capture is for guidance purposes, taken from version 2026.000.0001 dated 02/15/2026. It may differ from the current version of SWPanel.
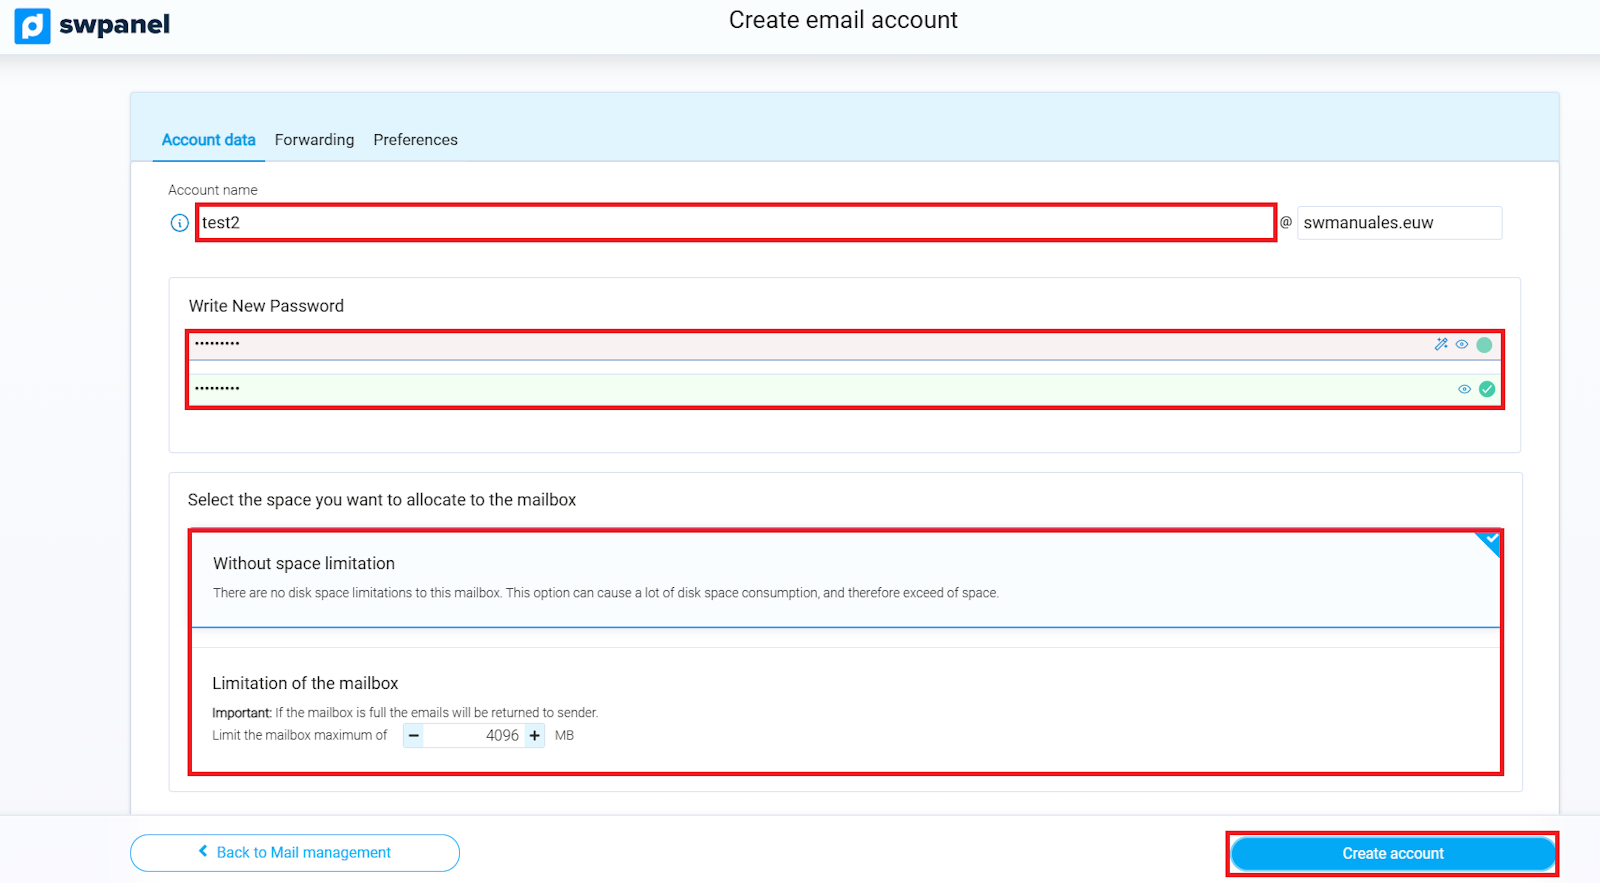
Step 4: Complete the details of the new email account:
- Account name and password that you will use to access it.
- Additional options:
- Limit the maximum size of the mailbox.
- Redirect all messages to another email account.
- Configure an automatic response for received emails.
info_capture ℹ️ Note: The capture is for guidance purposes, taken from version 2026.000.0001 dated 02/15/2026. It may differ from the current version of SWPanel.
Pay attention to password security. At SW Hosting, we take the protection of your data very seriously, so it is mandatory to set a password considered secure. In the password field, you will find indications of the minimum requirements necessary to guarantee the security of your account.
To finalize the creation of the email account, click on the 'Create Account' button. This will confirm all the entered data and activate the new account in the system.
Email account management with SWPanel
In this section, you can manage and administer your email accounts, as well as perform other important configurations:
- Add email aliases.
- Create distribution lists.
- Configure whitelists or blacklists to filter mailboxes or domains.
- Activate a Catch-All mailbox, if necessary.
Create Email Alias with SWPanel
Step 1: In the Email management menu of your service, select the 'Email aliases' section and click on the blue 'Create Alias' button, located in the upper right.
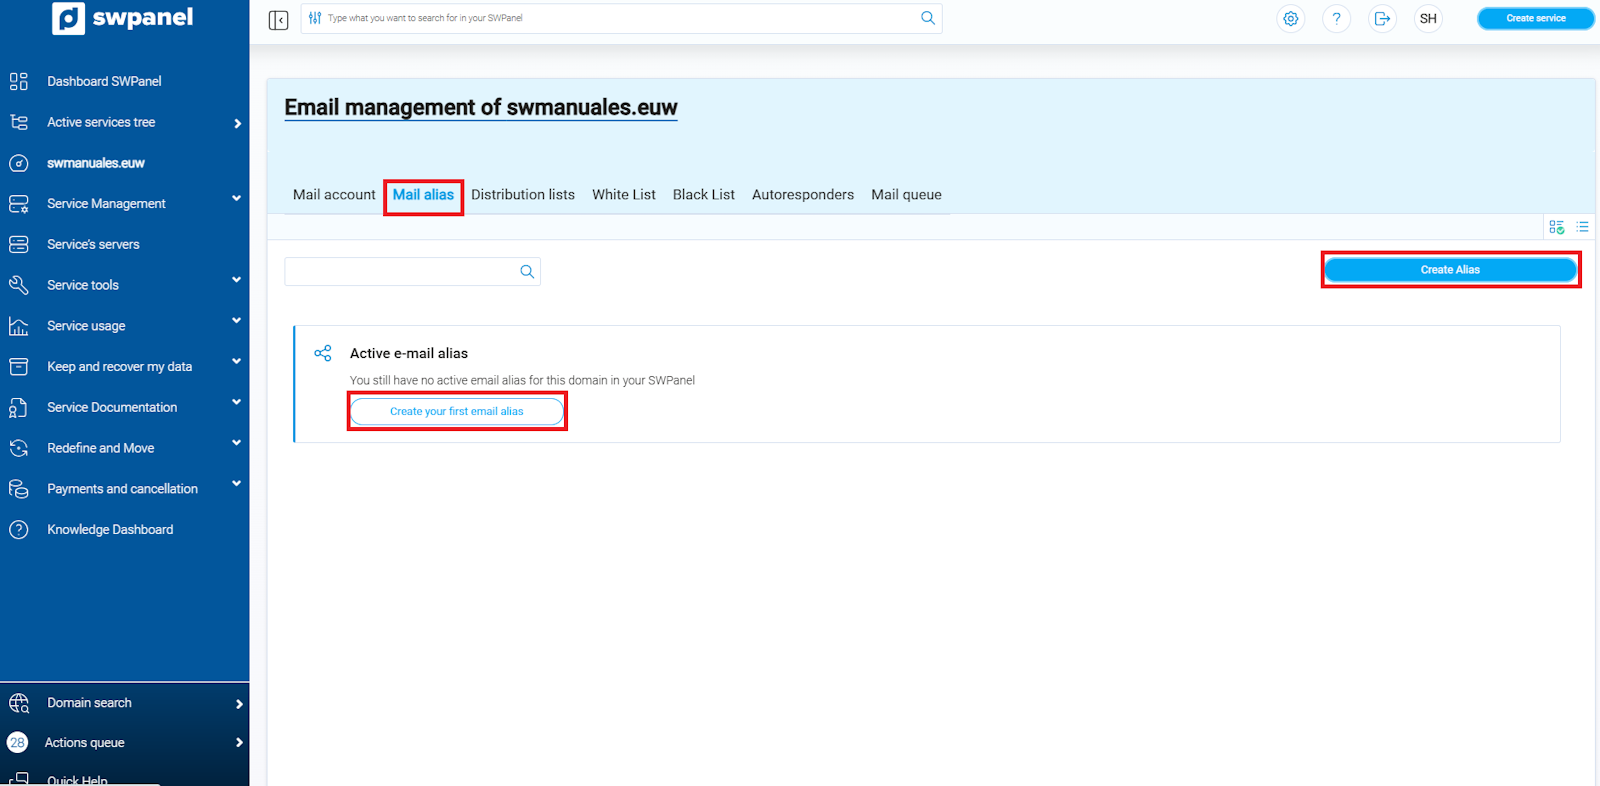
info_capture ℹ️ Note: The capture is for guidance purposes, taken from version 2026.000.0001 dated 02/15/2026. It may differ from the current version of SWPanel.
Step 2: Enter the alias account name and specify to which account(s) the received mail will be redirected.
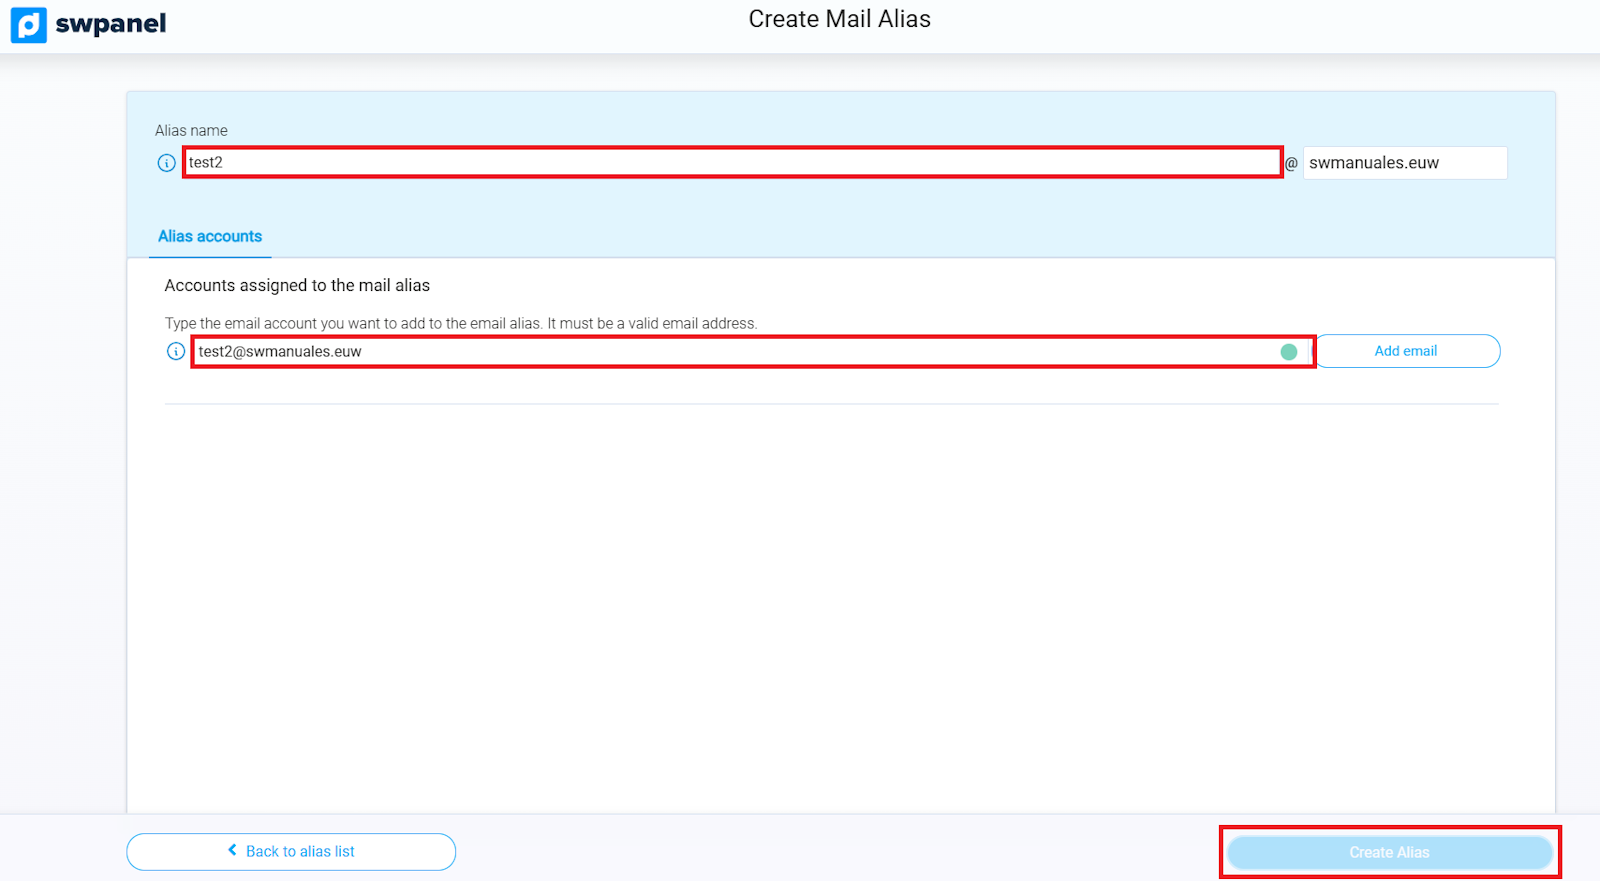
info_capture ℹ️ Note: The capture is for guidance purposes, taken from version 2026.000.0001 dated 02/15/2026. It may differ from the current version of SWPanel.
To finalize the creation of the email alias, click on the 'Create' button. This will confirm the entered data and activate the alias in the system.
Distribution lists
Step 1: In the Email management menu of your service, select the 'Distribution lists' section and click on the blue 'Create List' button, located in the upper right.
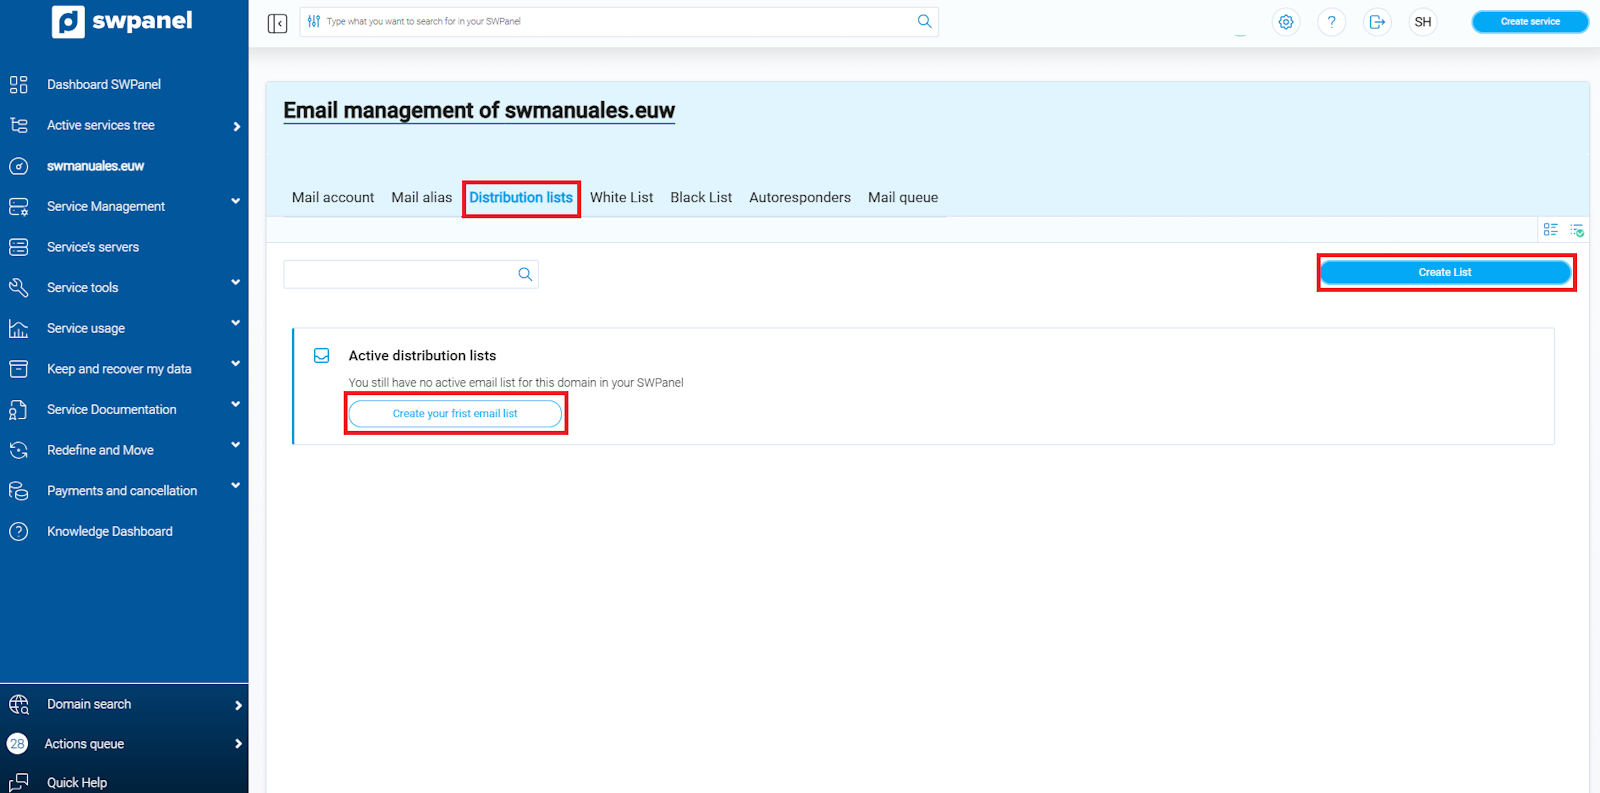
info_capture ℹ️ Note: The capture is for guidance purposes, taken from version 2026.000.0001 dated 02/15/2026. It may differ from the current version of SWPanel.
Step 2: Select the emails or recipients that you wish to add to the list, as well as the user in charge of managing said list.
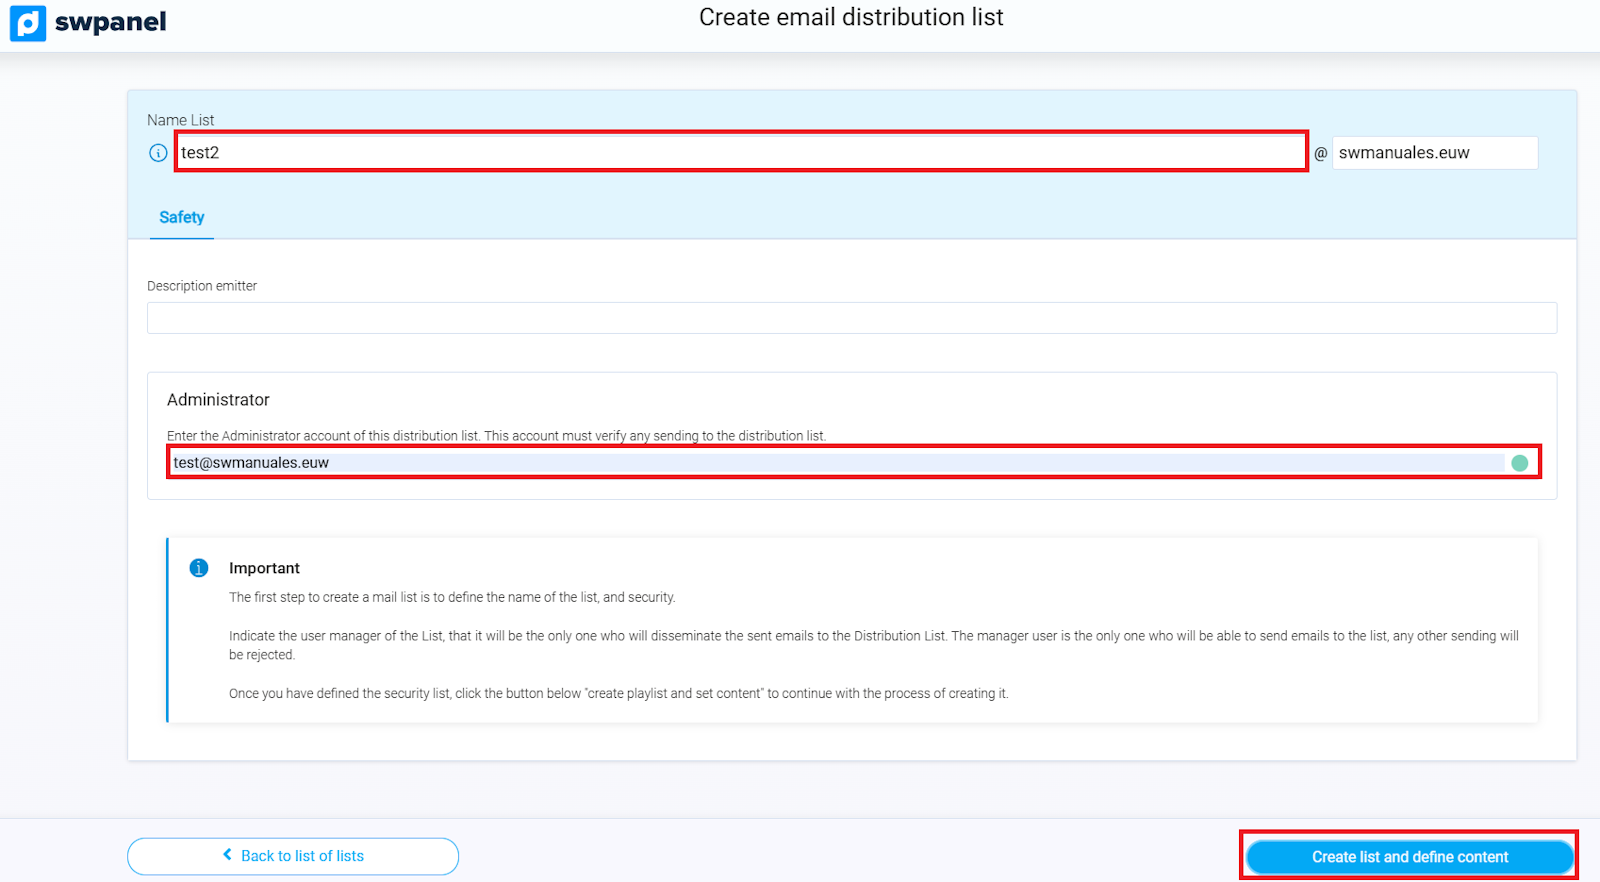
info_capture ℹ️ Note: The capture is for guidance purposes, taken from version 2026.000.0001 dated 02/15/2026. It may differ from the current version of SWPanel.
To finalize, press 'Create' and confirm the data to activate the distribution list.
Whitelist
Step 1: In the Email management menu of your service, select the 'Whitelist' section and click on the blue 'Add to Whitelist' button, located in the upper right.
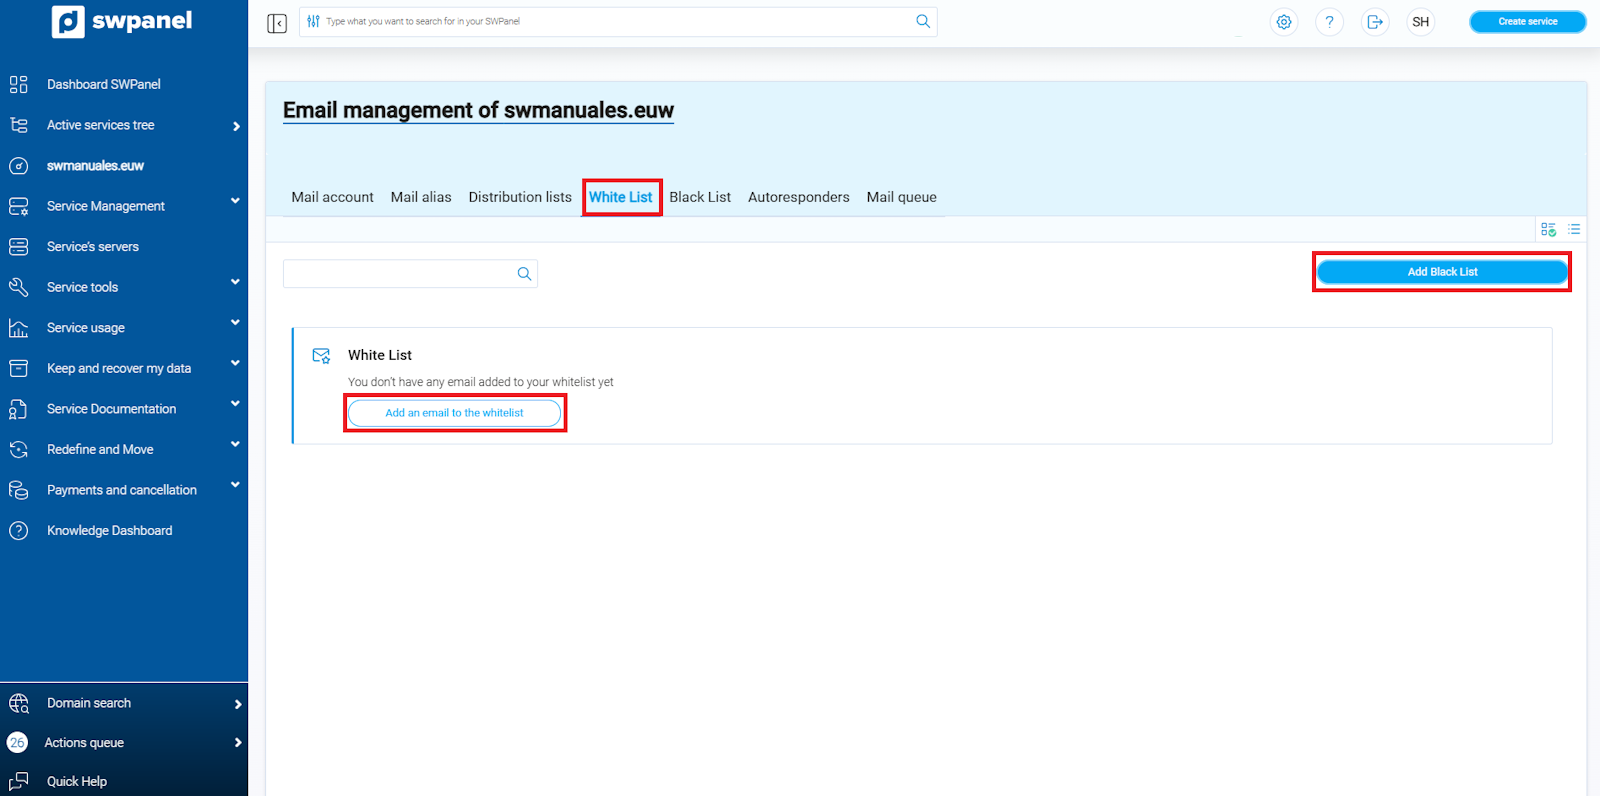
info_capture ℹ️ Note: The capture is for guidance purposes, taken from version 2026.000.0001 dated 02/15/2026. It may differ from the current version of SWPanel.
Step 2: Indicate what you wish to add to the whitelist:
- An entire domain
- An email account
Step 3: Select where you wish to add it:
- To the whitelist of my entire domain (e.g. swmanuales.euw)
- To the whitelist of a specific account among your mailboxes
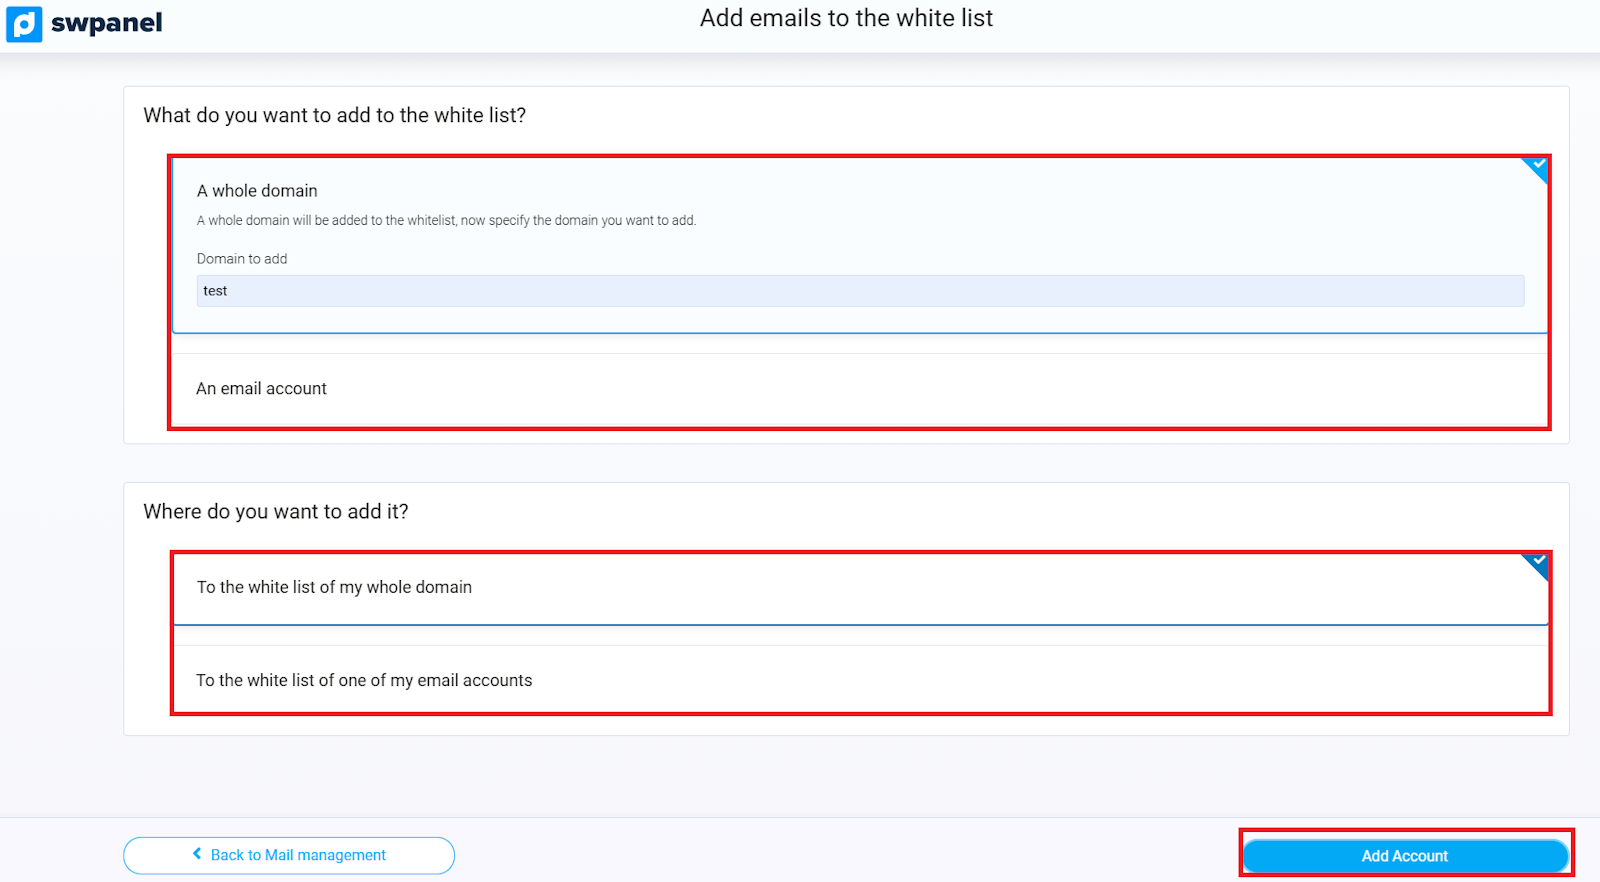
info_capture ℹ️ Note: The capture is for guidance purposes, taken from version 2026.000.0001 dated 02/15/2026. It may differ from the current version of SWPanel.
Step 4: To finalize, press 'Add Account' and confirm the data so that the selected mailbox or domain is correctly added to the whitelist.
Blacklist
Step 1: In the Email management menu of your service, select the 'Blacklist' section and click on the blue 'Add to Blacklist' button, located in the upper right.
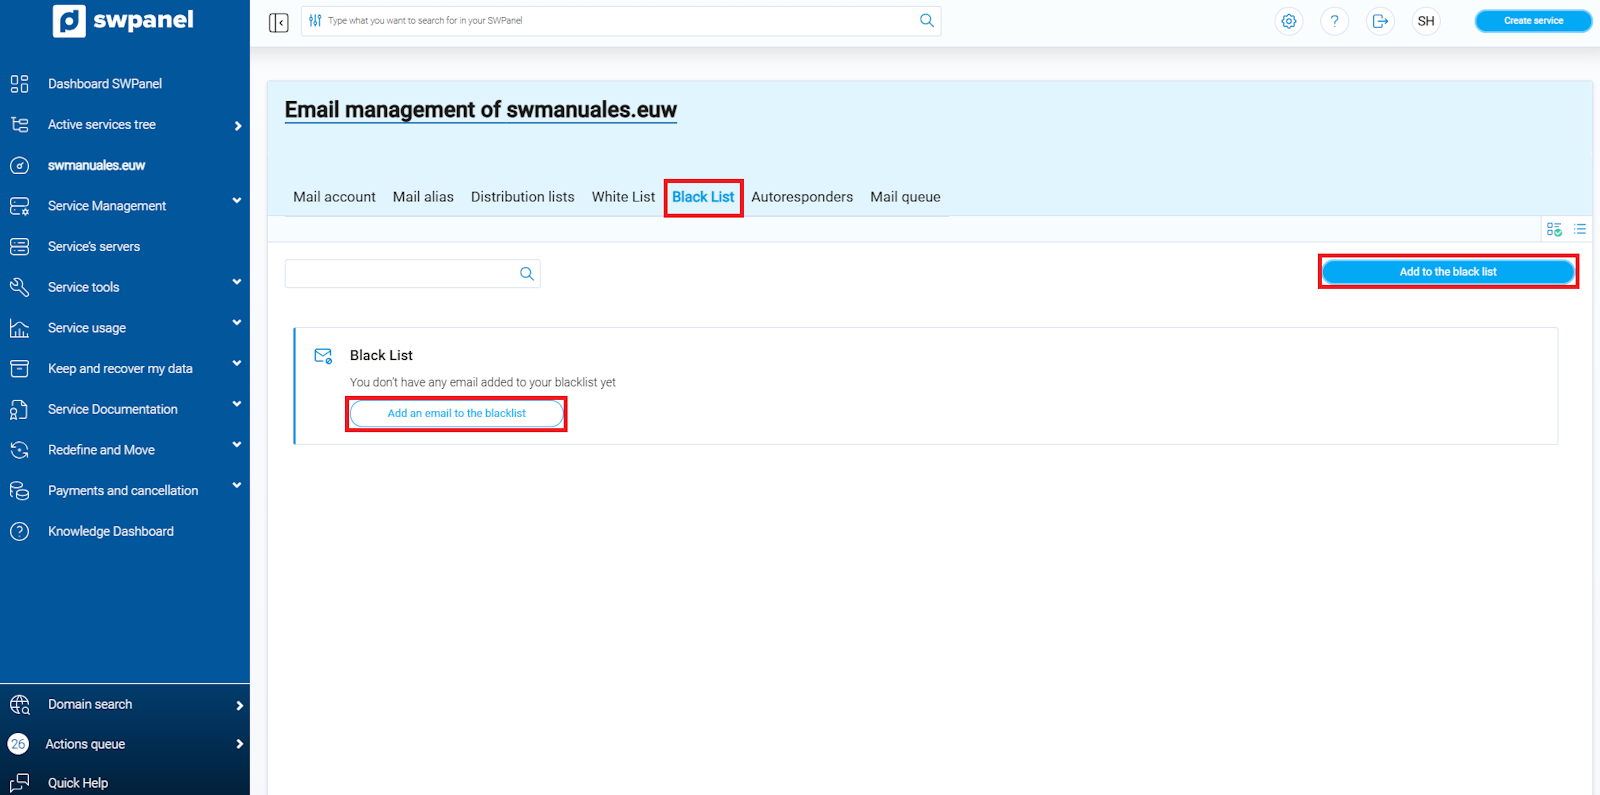
info_capture ℹ️ Note: The capture is for guidance purposes, taken from version 2026.000.0001 dated 02/15/2026. It may differ from the current version of SWPanel.
Step 2: Indicate what you wish to add to the blacklist:
- An entire domain
- An email account
Step 3: Select where you wish to add it:
- To the blacklist of my entire domain (e.g. swmanuales.euw)
- To the blacklist of a specific account among your mailboxes
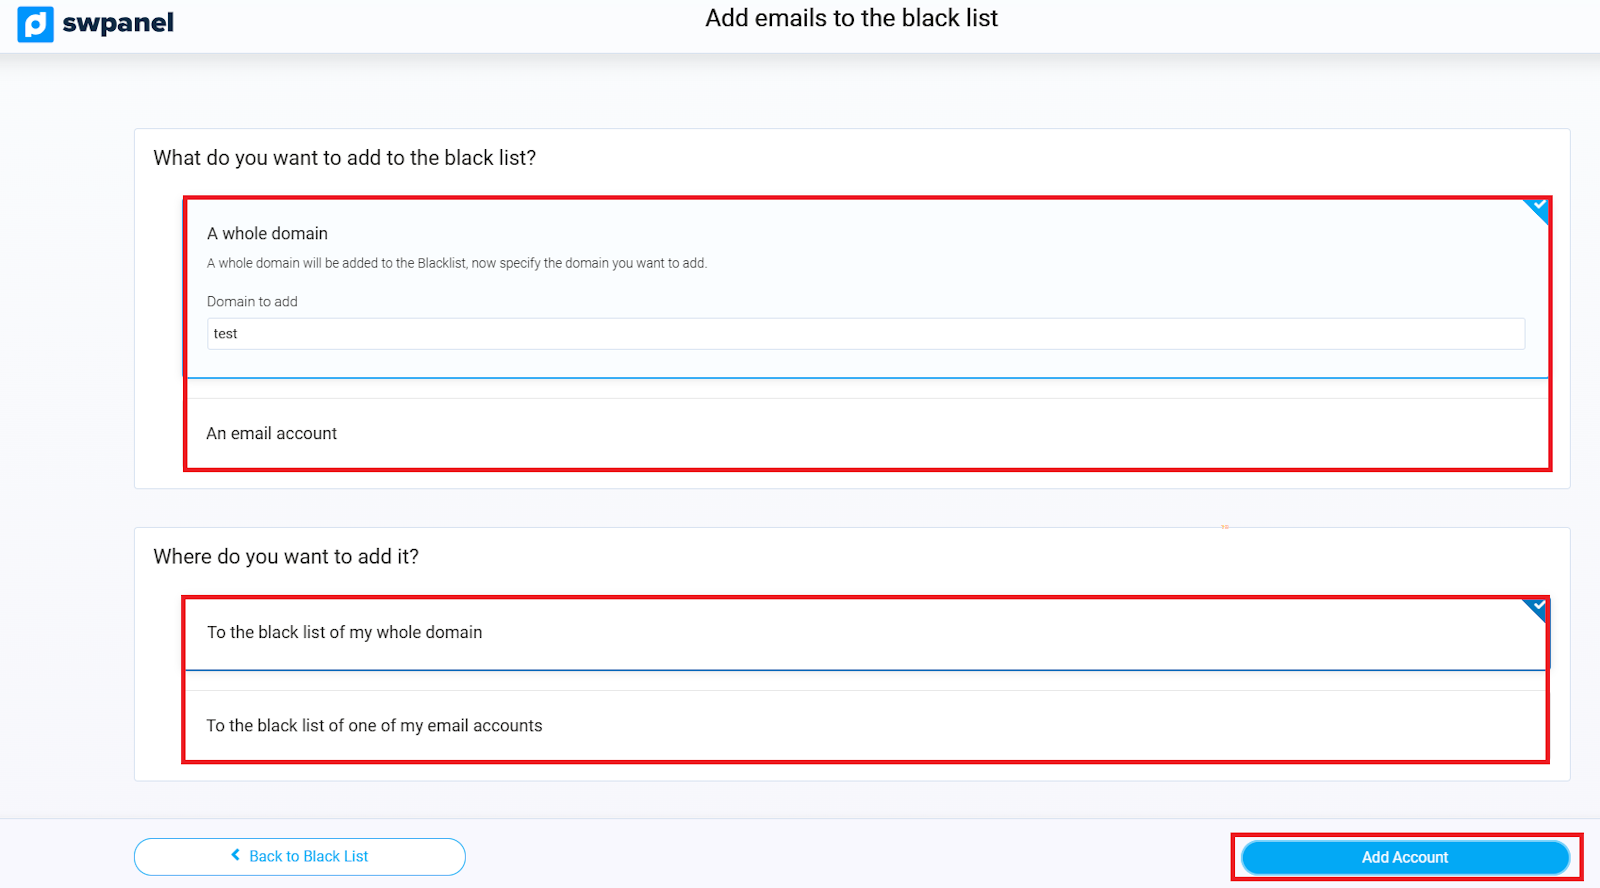
info_capture ℹ️ Note: The capture is for guidance purposes, taken from version 2026.000.0001 dated 02/15/2026. It may differ from the current version of SWPanel.
Step 4: To finalize, press 'Add Account' and confirm the data so that the selected mailbox or domain is correctly added to the blacklist.
Auto-replies
Step 1: In the Email management menu of your service, select the 'Auto-replies' section and click on the blue 'Create auto-reply' button, located in the upper right.
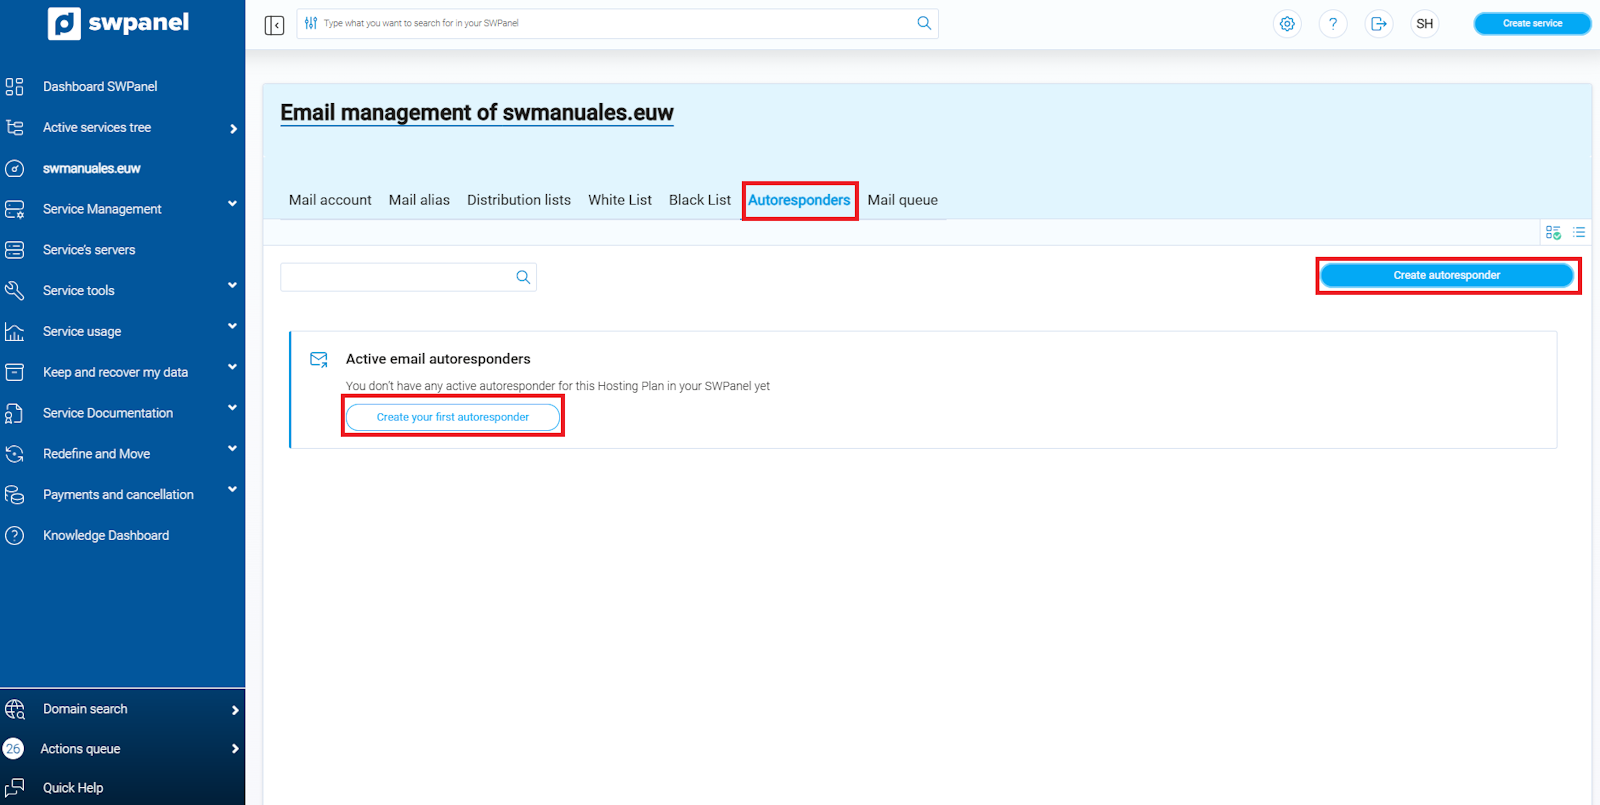
info_capture ℹ️ Note: The capture is for guidance purposes, taken from version 2026.000.0001 dated 02/15/2026. It may differ from the current version of SWPanel.
Step 2: Configure the automatic response message that will be sent upon receiving an email.
Step 3: Select how the auto-reply will be activated:
- Do not define activation period: The auto-reply will not have a defined period. It will be activated manually when you wish.
- Activate the auto-reply being created now: The auto-reply will be activated immediately. If another auto-reply is active, the previous one will be automatically deactivated.
- Define automatic activation period: You can indicate the start date and time and the end date and time using the available calendar and clock options.
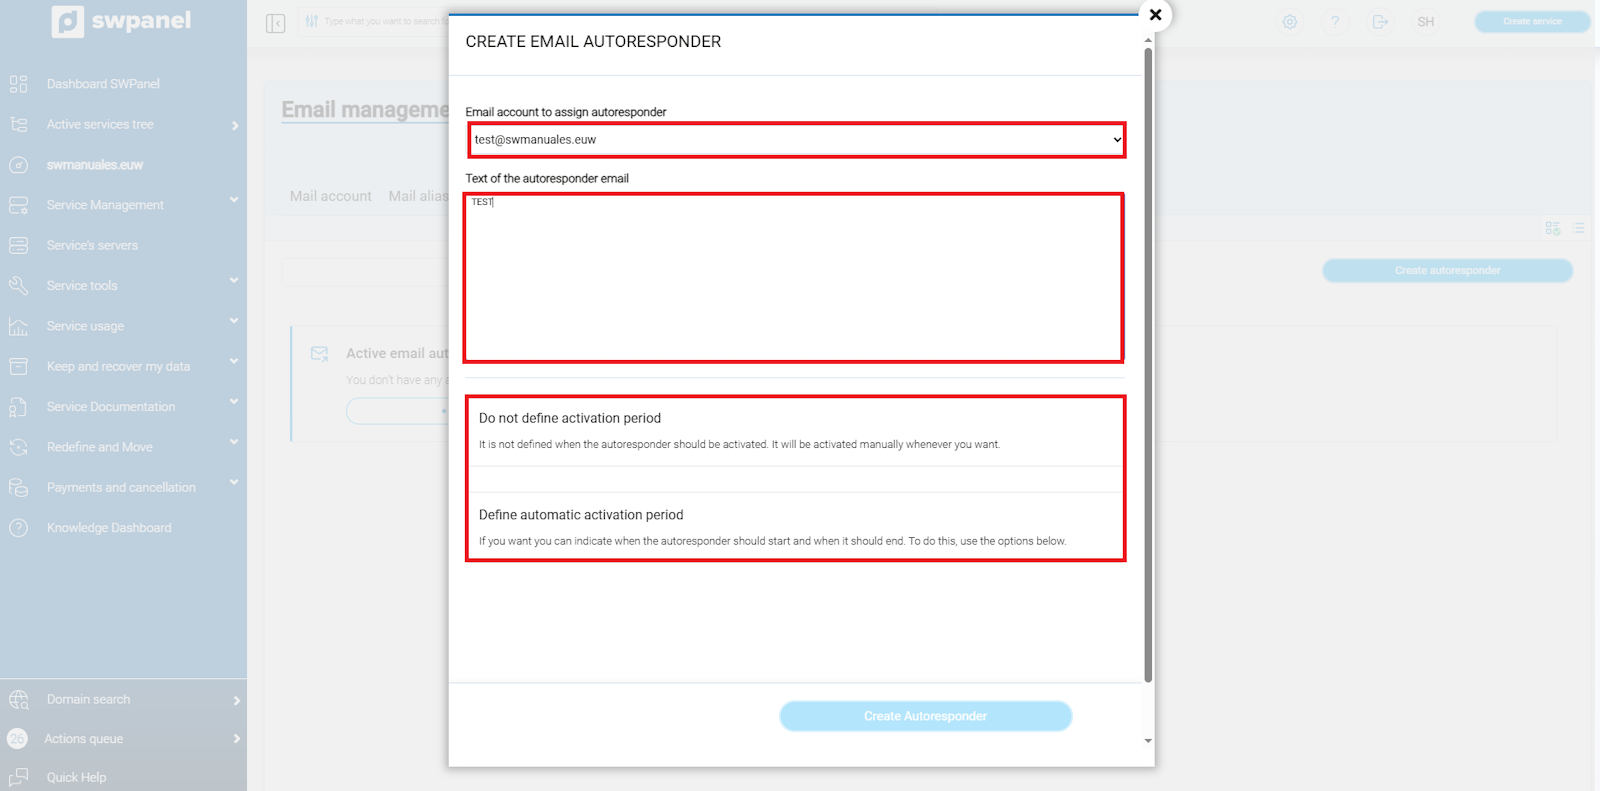
info_capture ℹ️ Note: The capture is for guidance purposes, taken from version 2026.000.0001 dated 02/15/2026. It may differ from the current version of SWPanel.
To finalize the creation of the auto-reply, click on the 'Create Auto-reply' button. This will confirm the entered data and leave the auto-reply configured according to the selected activation options.
Mail Queue
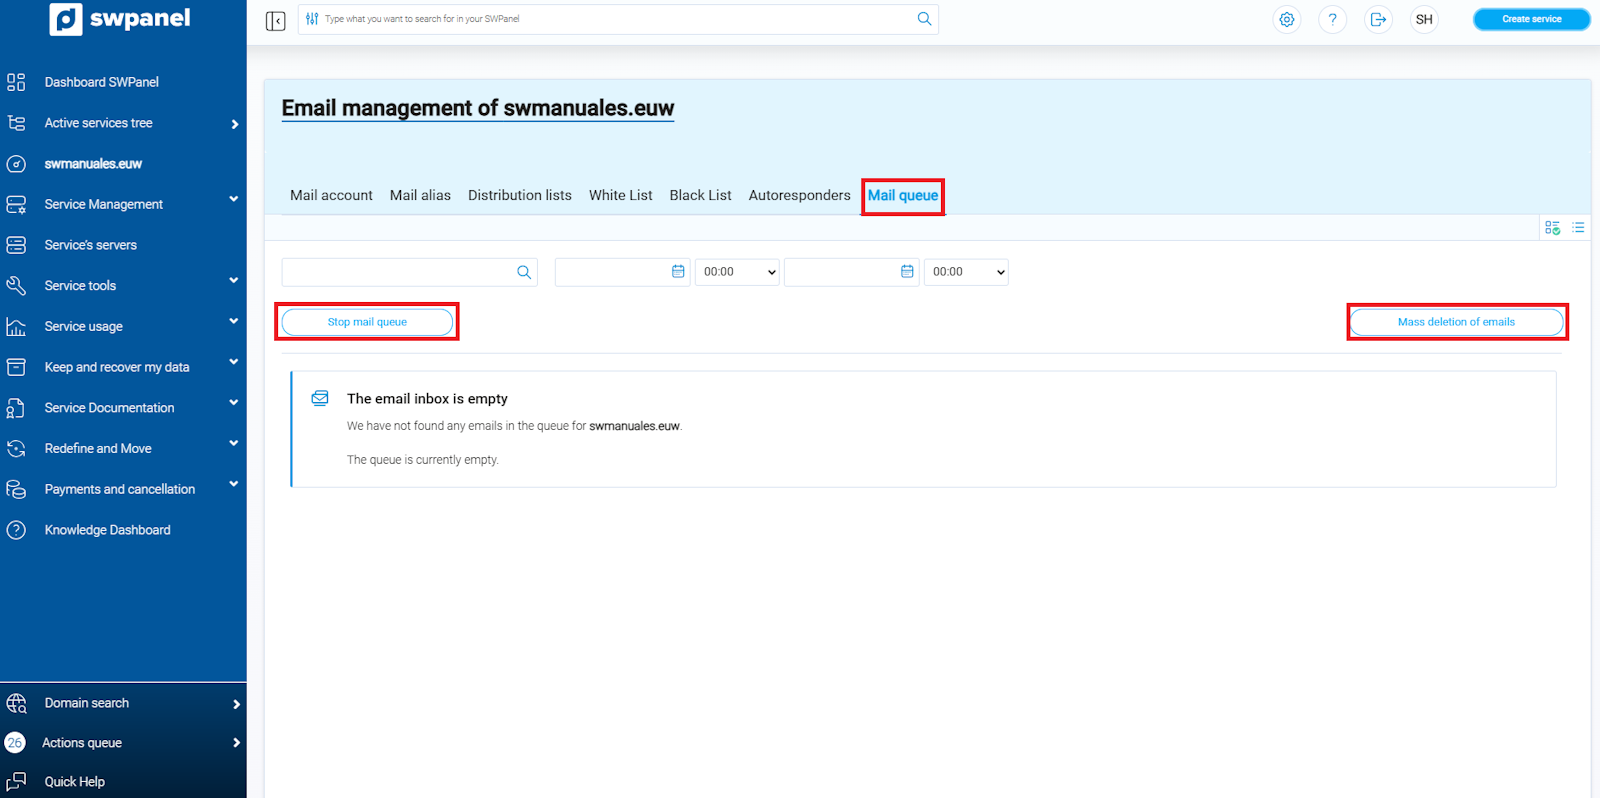
Step 1: In the Email management menu of your service, select the 'Mail Queue' section.
Step 2: From this section, you can consult the status of the domain's mail queue, view messages pending delivery, and perform management actions if necessary.
Step 3: If you wish to filter the results, you can use the search options by indicating a range of dates and times using the available calendar and time selector.
Step 4: You also have the following management options:
- Start search now: Performs an immediate search in the mail queue.
- Stop mail queue: Temporarily stops the processing of the queue.
- Mass deletion of emails: Allows deleting multiple pending emails simultaneously.
If there are no pending messages, the system will show a warning indicating that the mail queue is empty.
info_capture ℹ️ Note: The capture is for guidance purposes, taken from version 2026.000.0001 dated 02/15/2026. It may differ from the current version of SWPanel.
Once the email account is created, you can access its configuration to modify different parameters and adapt them to your needs.
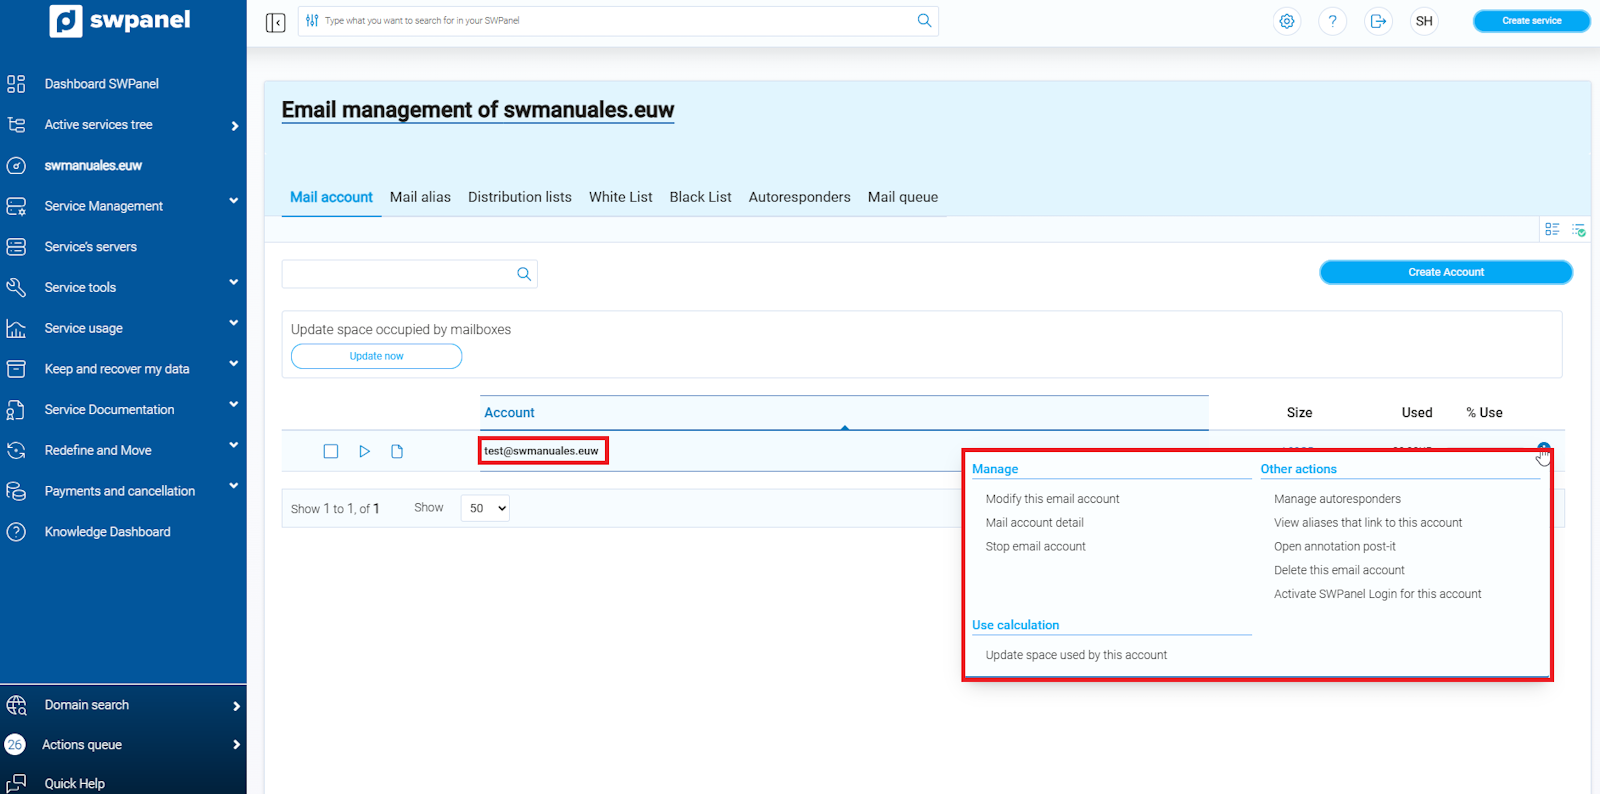
info_capture ℹ️ Note: The capture is for guidance purposes, taken from version 2026.000.0001 dated 02/15/2026. It may differ from the current version of SWPanel.
Below are the details of all available actions:
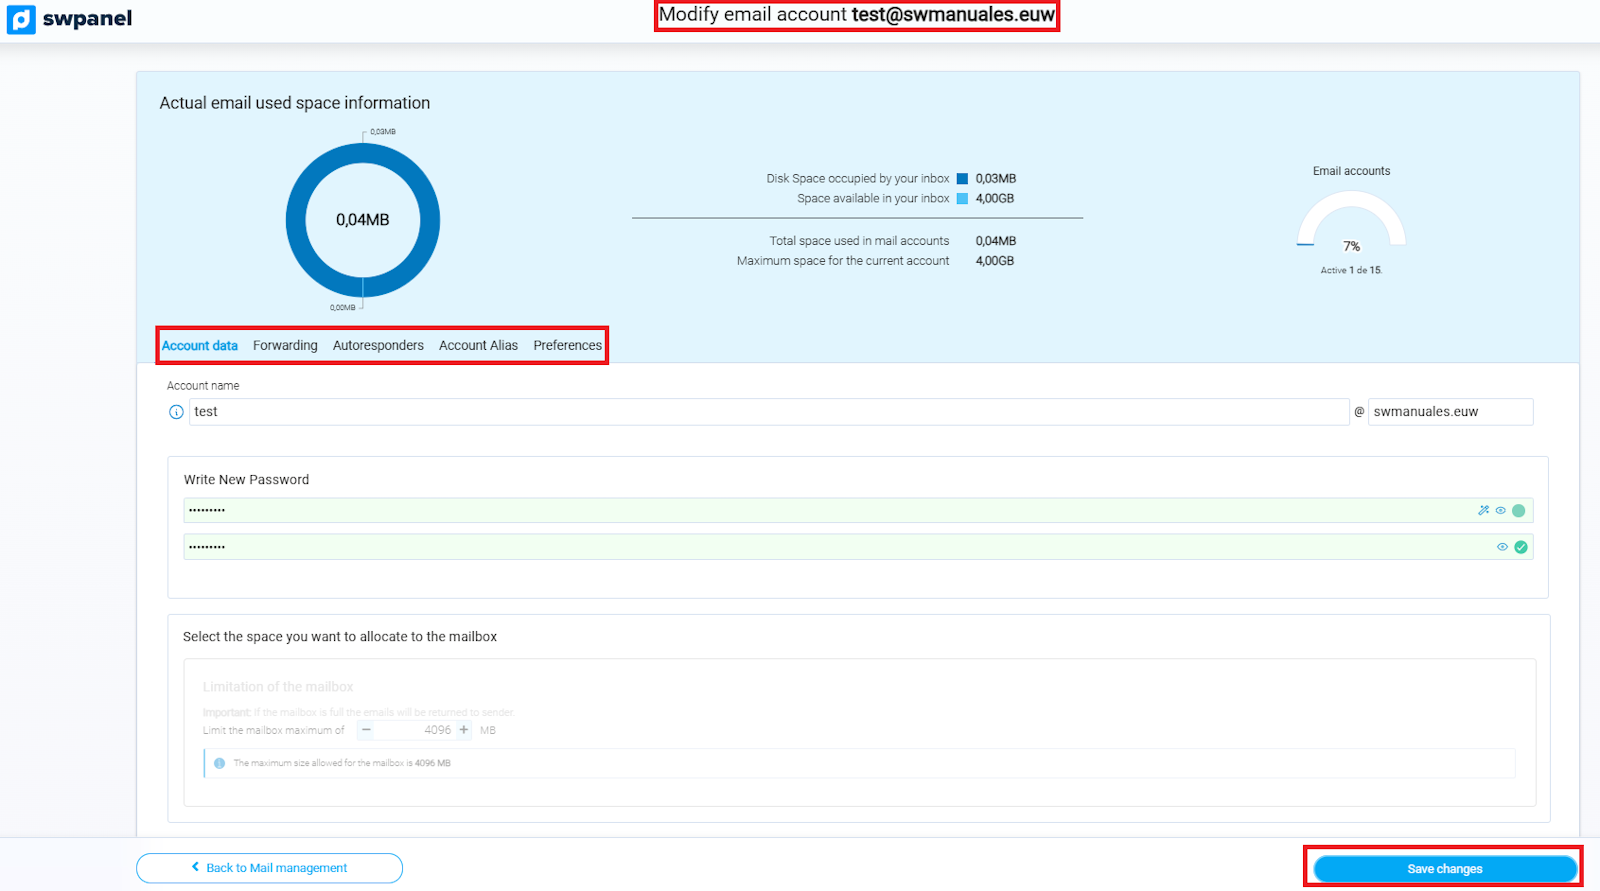
Modify this email account
In the Email management menu of your service, locate the account you wish to modify (for example, [email protected]) and access its configuration.
In this section, you can consult the mailbox usage information, such as:
- Currently occupied space.
- Available space.
- Maximum space assigned to the mailbox.
- Number of active accounts out of the total allowed.
Additionally, you can manage the following options:
- Account data: Modify the name or the password.
- Forwarding: Configure the forwarding of emails to another address.
- Auto-replies: Activate or modify automatic responses.
- Account aliases: Manage aliases associated with the account.
- Preferences: Adjust additional mailbox settings.
Once the changes are made, press 'Save changes' to apply the configuration.
info_capture ℹ️ Note: The capture is for guidance purposes, taken from version 2026.000.0001 dated 02/15/2026. It may differ from the current version of SWPanel.
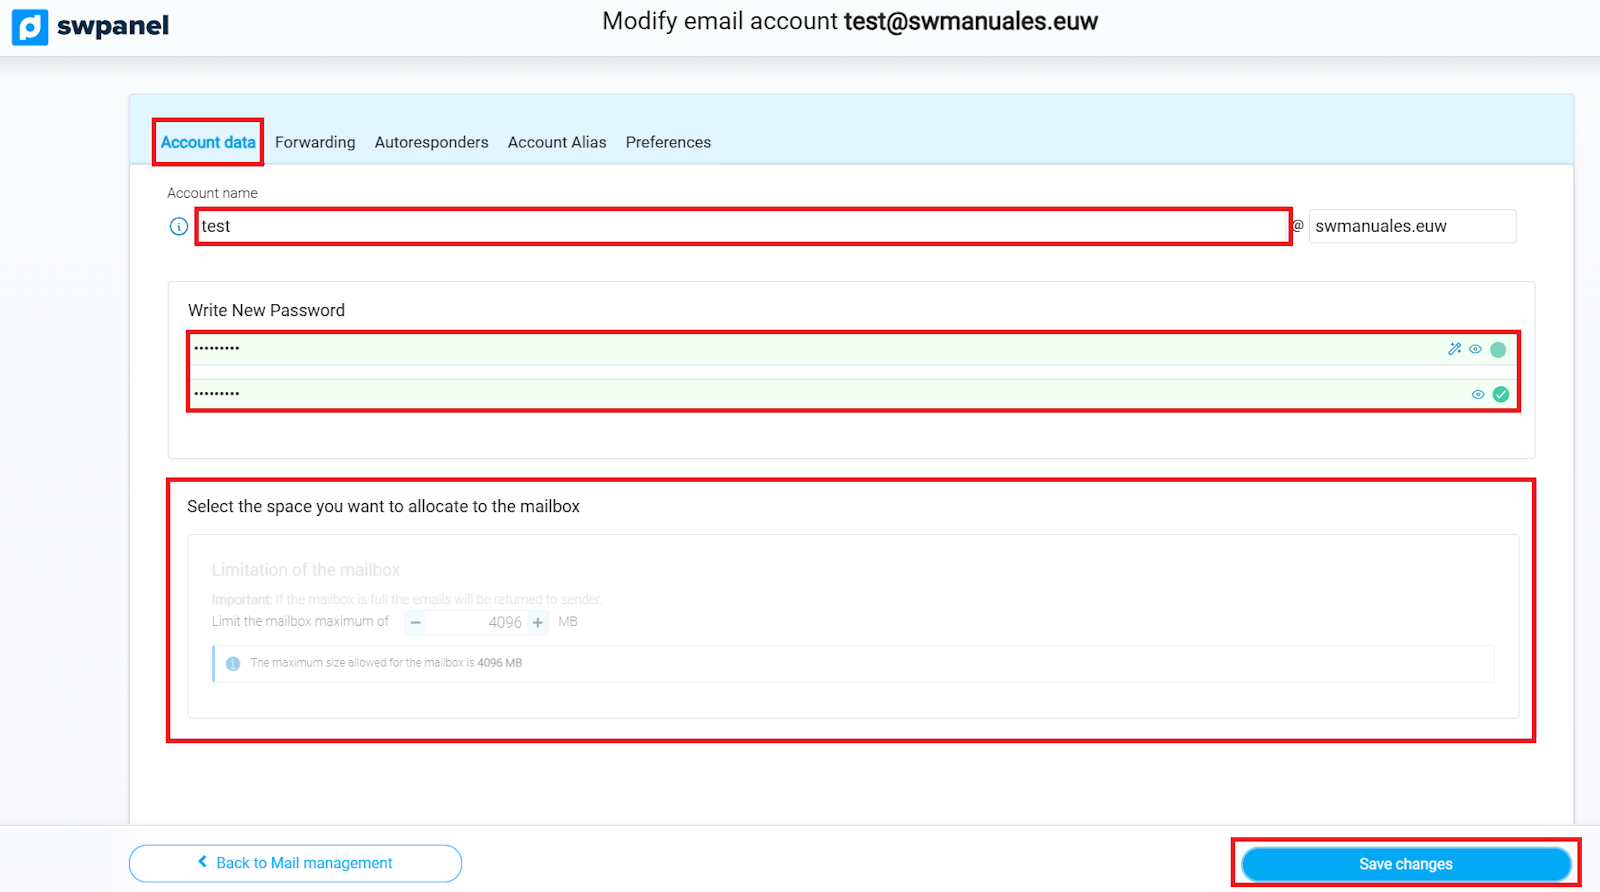
Account data
In this section, you can modify the access password for the account and configure the email mailbox limits.
- Account name:
- Password:
- Write the new password in the corresponding fields.
- Confirm the password by writing it again.
- Mailbox limitation:
- Select the maximum space you wish to assign to the mailbox.
- Important: If the mailbox reaches its limit, incoming emails will be returned to the sender.
- The maximum allowed size for the mailbox is 4096 MB.
info_capture ℹ️ Note: The capture is for guidance purposes, taken from version 2026.000.0001 dated 02/15/2026. It may differ from the current version of SWPanel.
Forwarding
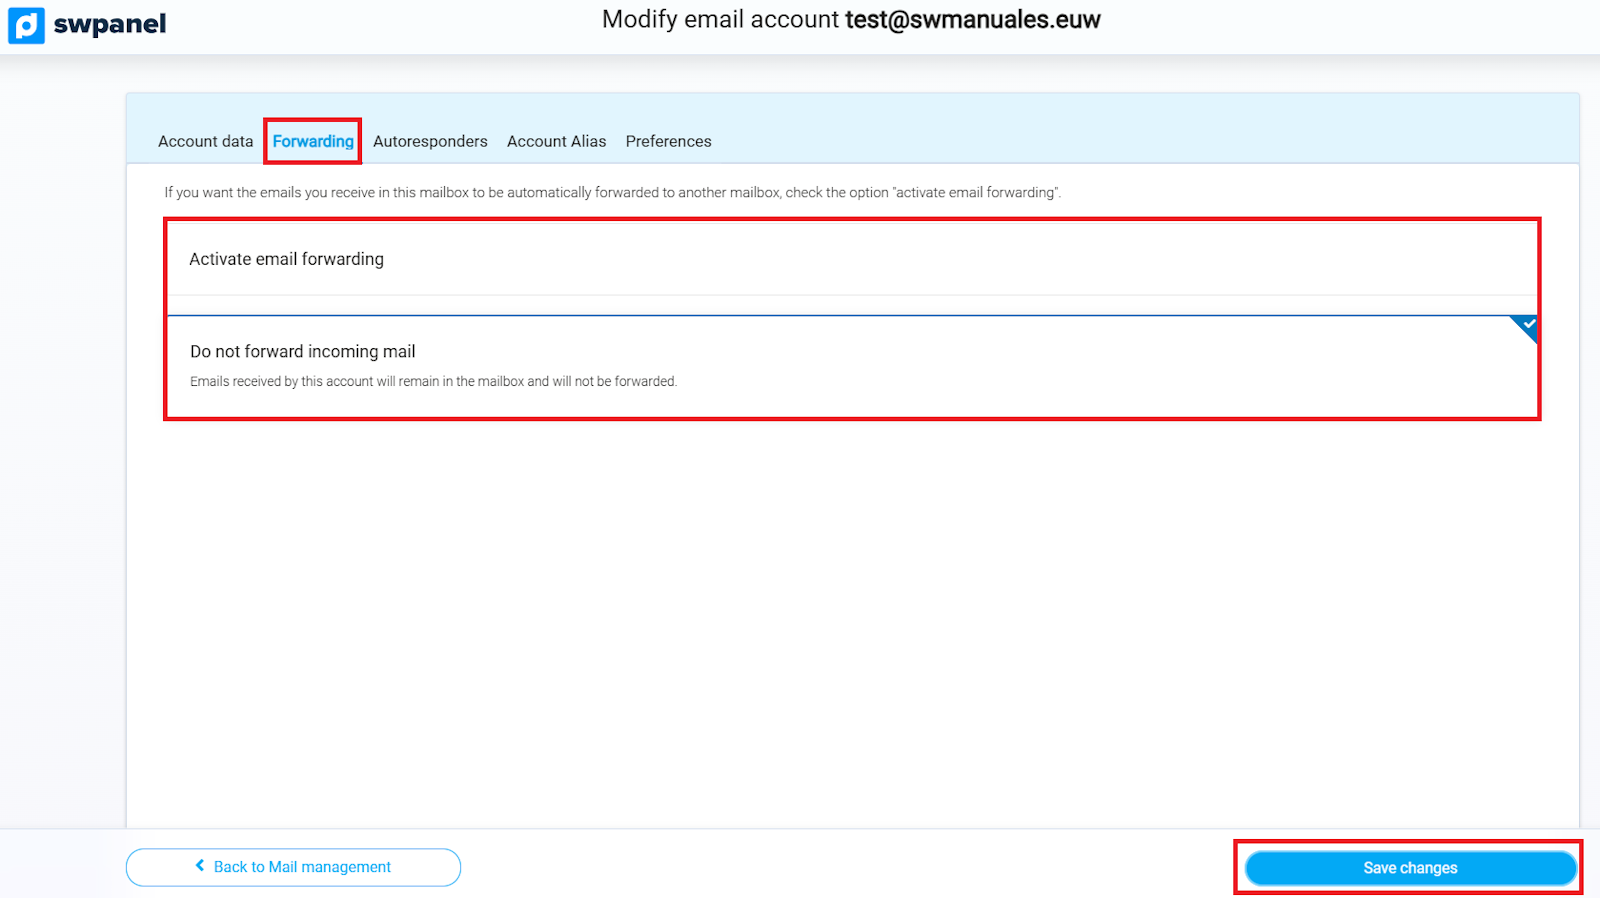
In this section, you can configure the automatic forwarding of emails received in the account to another email address.
- Activate email forwarding:
- Check this option so that received emails are automatically forwarded to the destination account you indicate.
- If you activate the additional option, the forwarded emails will also be saved in your original mailbox.
- Do not forward received emails:
- Select this option if you wish the emails to remain only in the mailbox and not be forwarded to another account.
info_capture ℹ️ Note: The capture is for guidance purposes, taken from version 2026.000.0001 dated 02/15/2026. It may differ from the current version of SWPanel.
Auto-replies
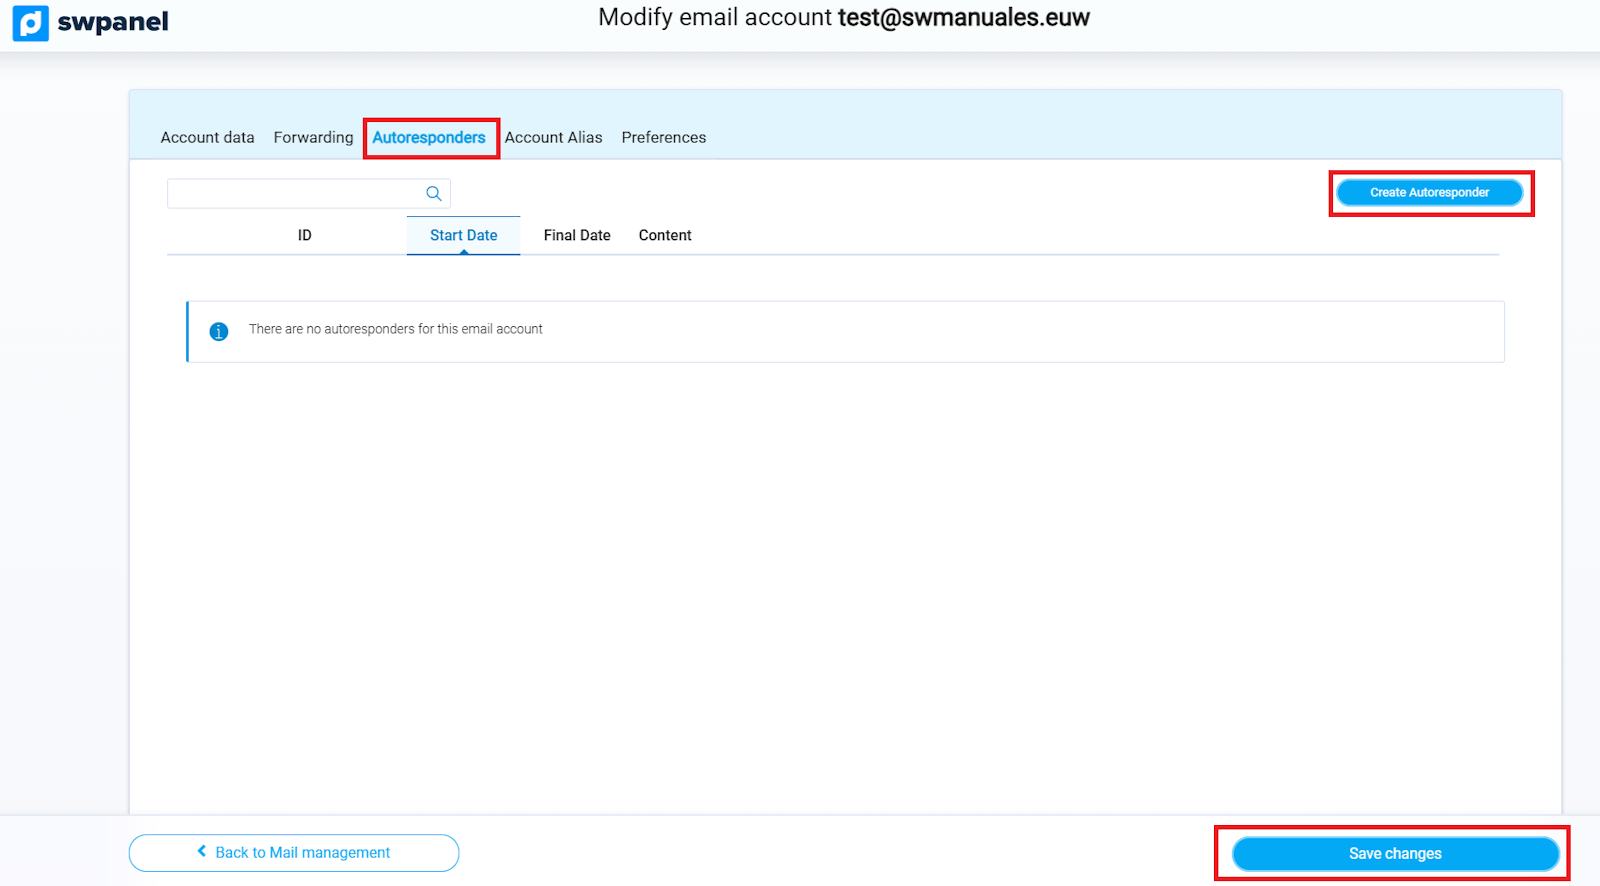
In this section, you can configure automatic responses to be sent upon receiving an email.
info_capture ℹ️ Note: The capture is for guidance purposes, taken from version 2026.000.0001 dated 02/15/2026. It may differ from the current version of SWPanel.
- You can create an auto-reply message that will be sent automatically to anyone who writes to you.
- It is possible to define activation periods, so that the auto-reply is only sent during a specific range of dates.
- You can also choose to activate the response manually without defining a period, so that the response is sent only when you decide.
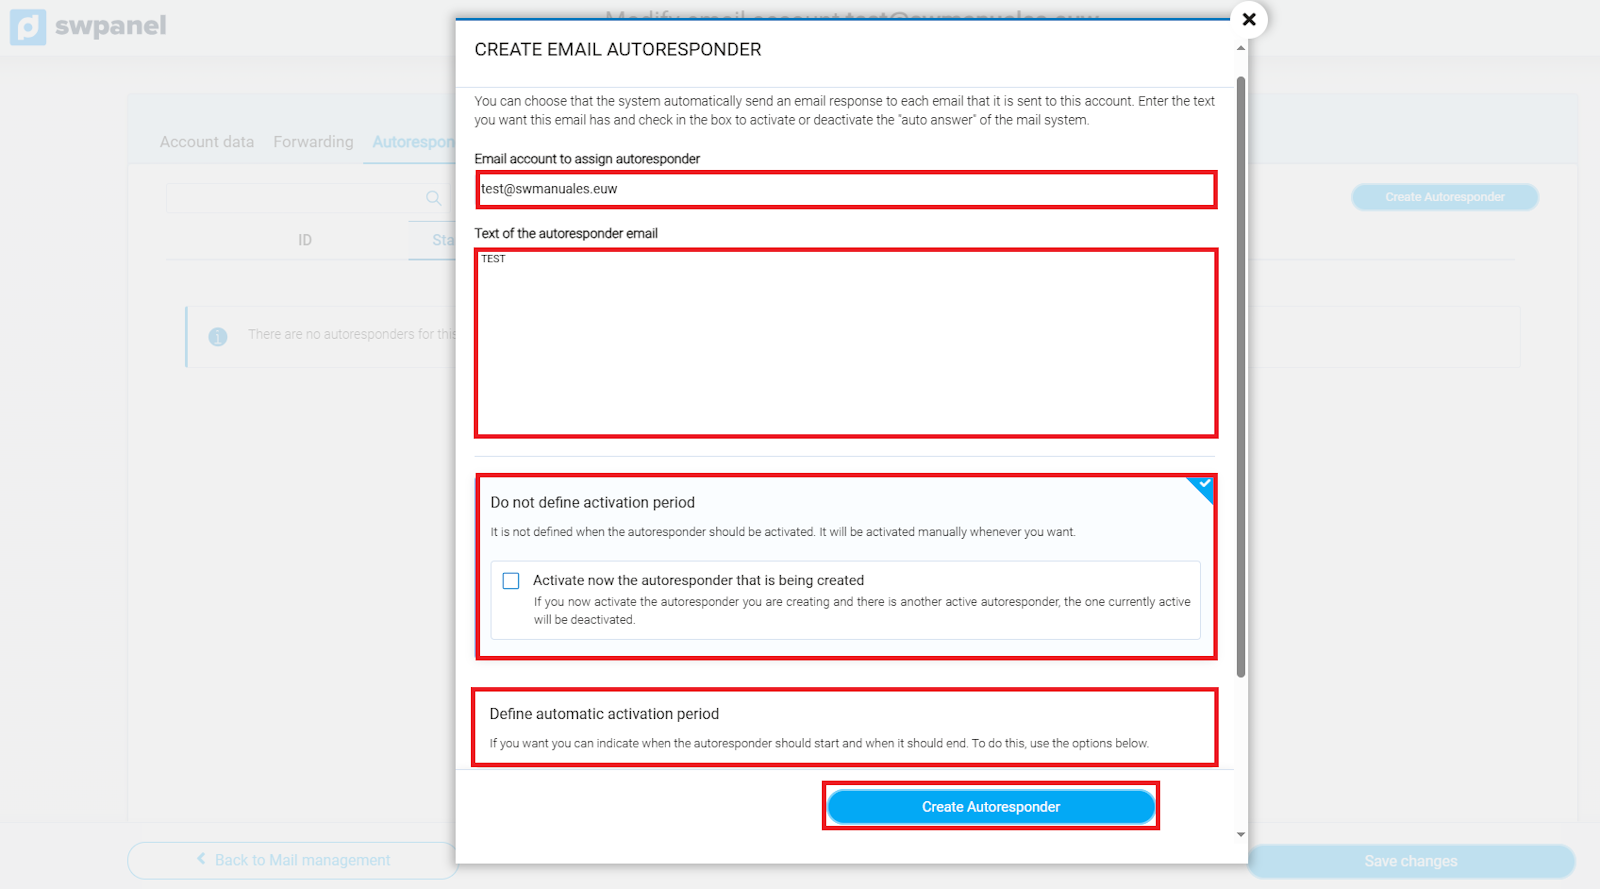
info_capture ℹ️ Note: The capture is for guidance purposes, taken from version 2026.000.0001 dated 02/15/2026. It may differ from the current version of SWPanel.
Email aliases
In this section, you can view and manage the aliases associated with your email account.
- You will be able to see all the existing aliases of the account.
- You will also have the option to delete any alias that you no longer need.
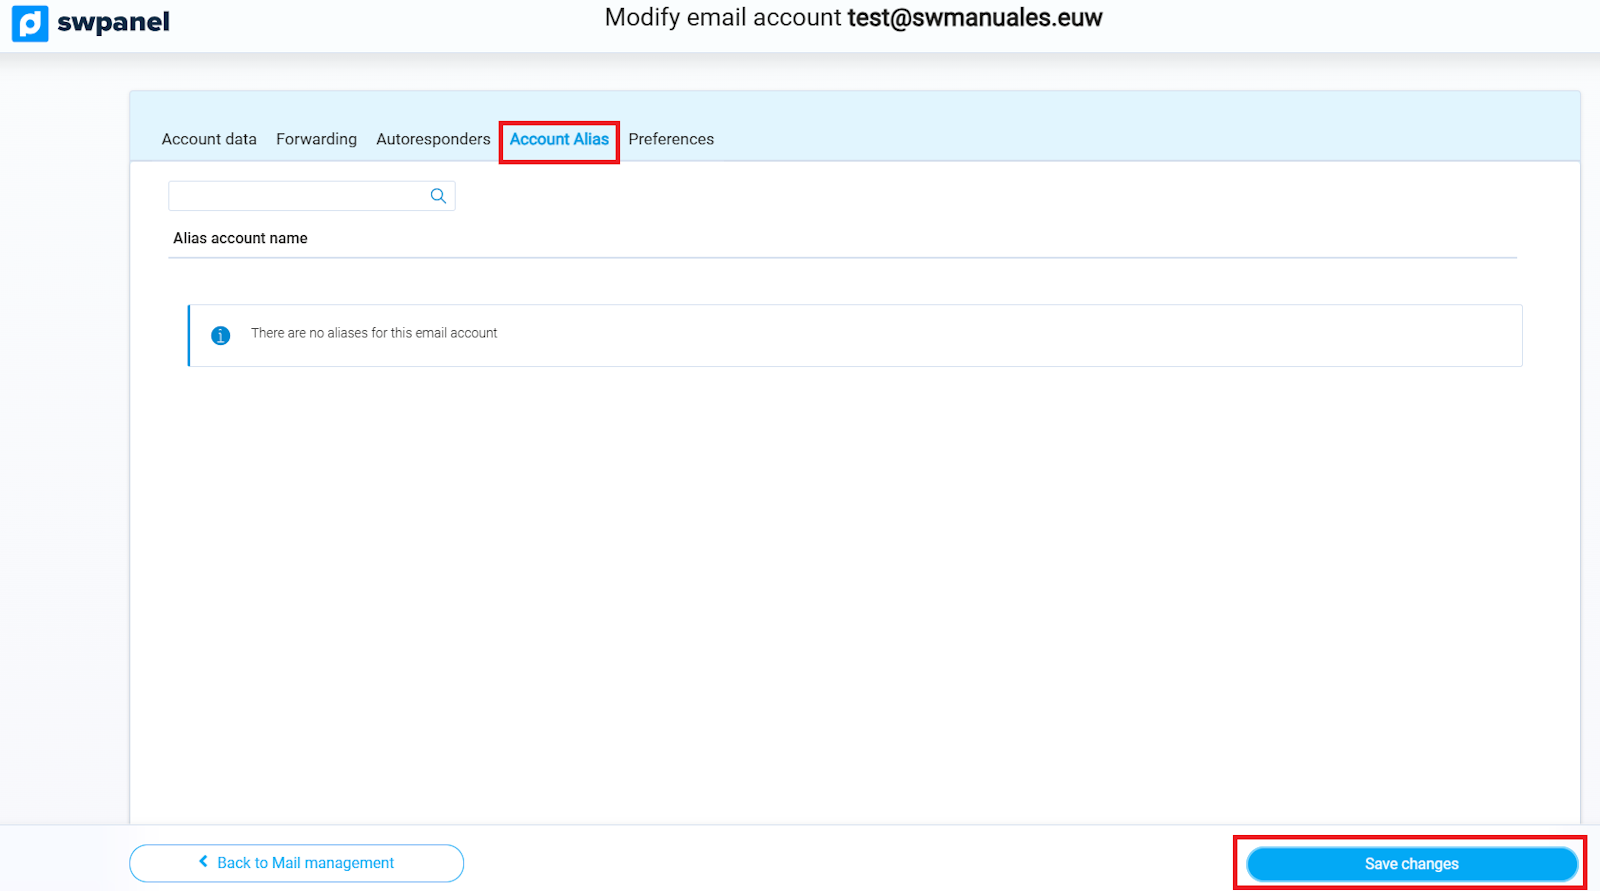
info_capture ℹ️ Note: The capture is for guidance purposes, taken from version 2026.000.0001 dated 02/15/2026. It may differ from the current version of SWPanel.
Preferences
In this section, you can configure additional options for your email account.
- You can set automatic notifications that alert you when the used space in the mailbox exceeds a determined percentage of the total assigned.
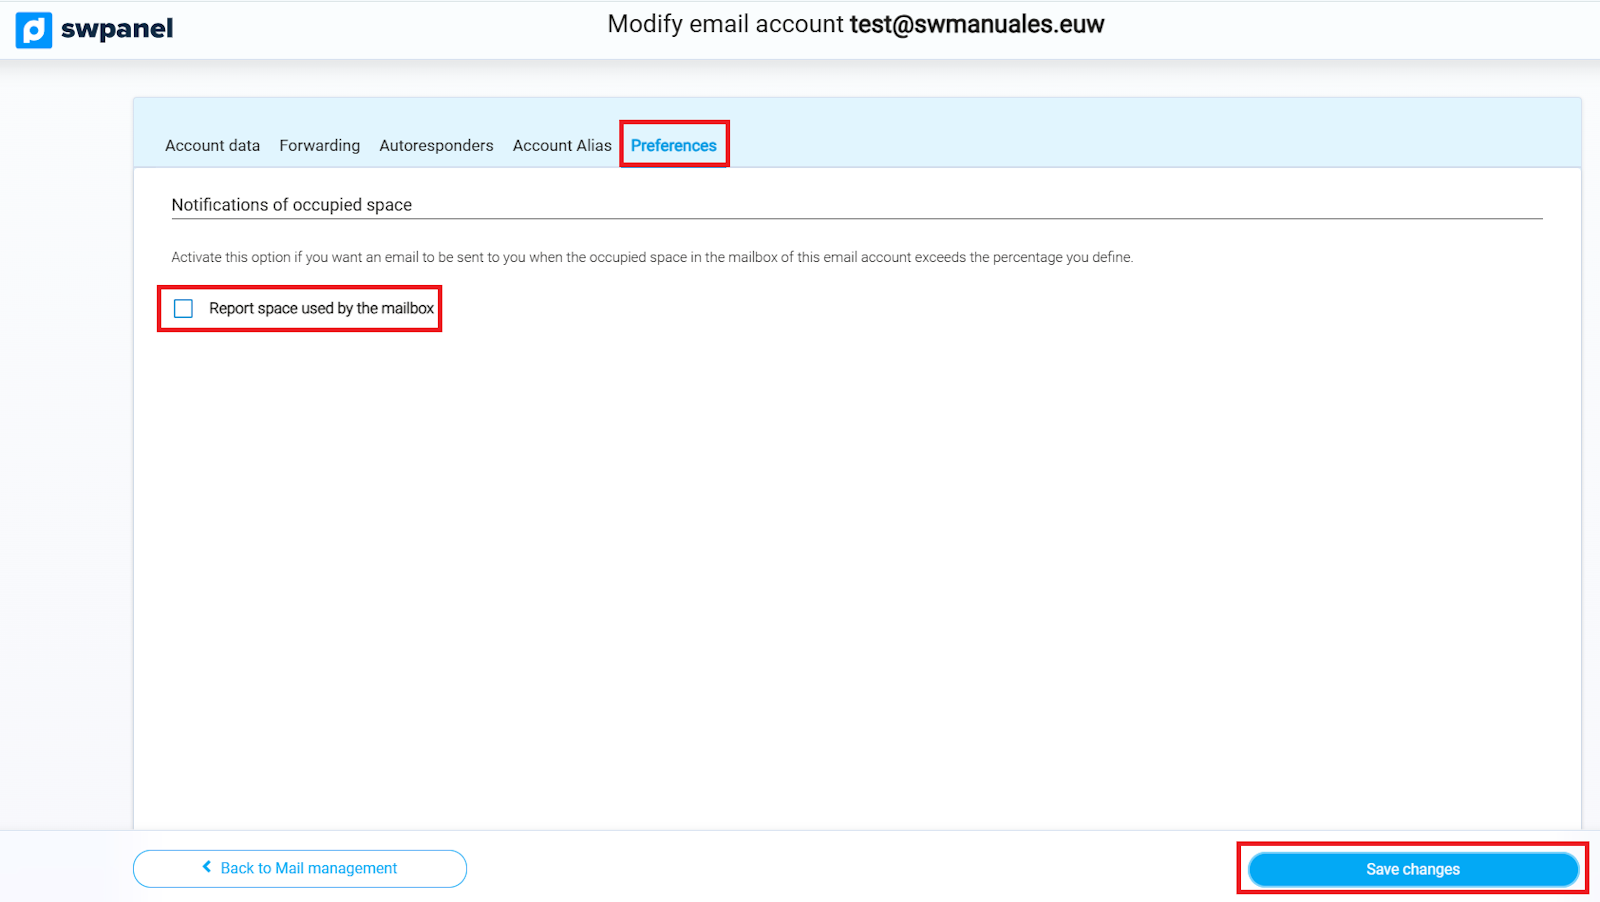
info_capture ℹ️ Note: The capture is for guidance purposes, taken from version 2026.000.0001 dated 02/15/2026. It may differ from the current version of SWPanel.
Email account details
In this section, you can view all relevant information about your email account, including space usage, configuration parameters, and the link to Webmail, among others.
Space usage information
- Currently occupied space in your mailbox: 0.03 MB
- Available space in your mailbox: 4.00 GB
- Total space used in all email accounts: 0.00 MB
- Maximum space assigned to the current mailbox: 4.00 GB
Email account configuration
- Email type: Web-based mail (Webmail)
- Webmail URL: http://mail.swmanuales.euw/webmail
- Email type: POP3 / IMAP4
- Incoming mail server: mail.swmanuales.euw
- Outgoing mail server: mail.swmanuales.euw
Connection ports
- SMTP Connection: Port 25 – plaintext authentication
- IMAP Connection: Port 143 – plaintext authentication
- POP3 Connection: Port 110 – plaintext authentication
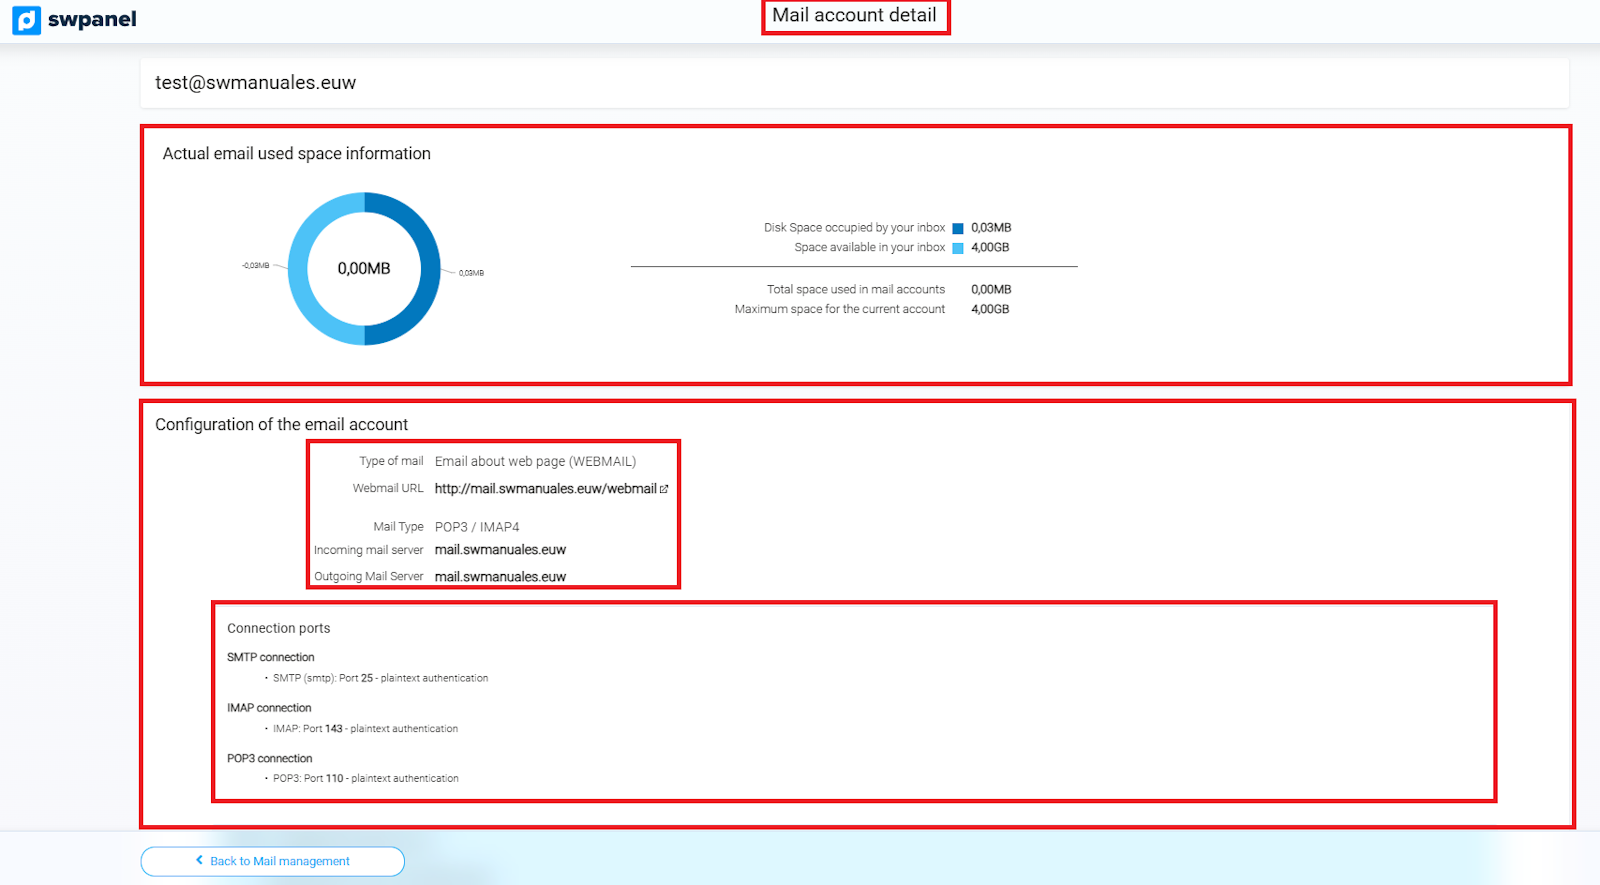
info_capture ℹ️ Note: The capture is for guidance purposes, taken from version 2026.000.0001 dated 02/15/2026. It may differ from the current version of SWPanel.
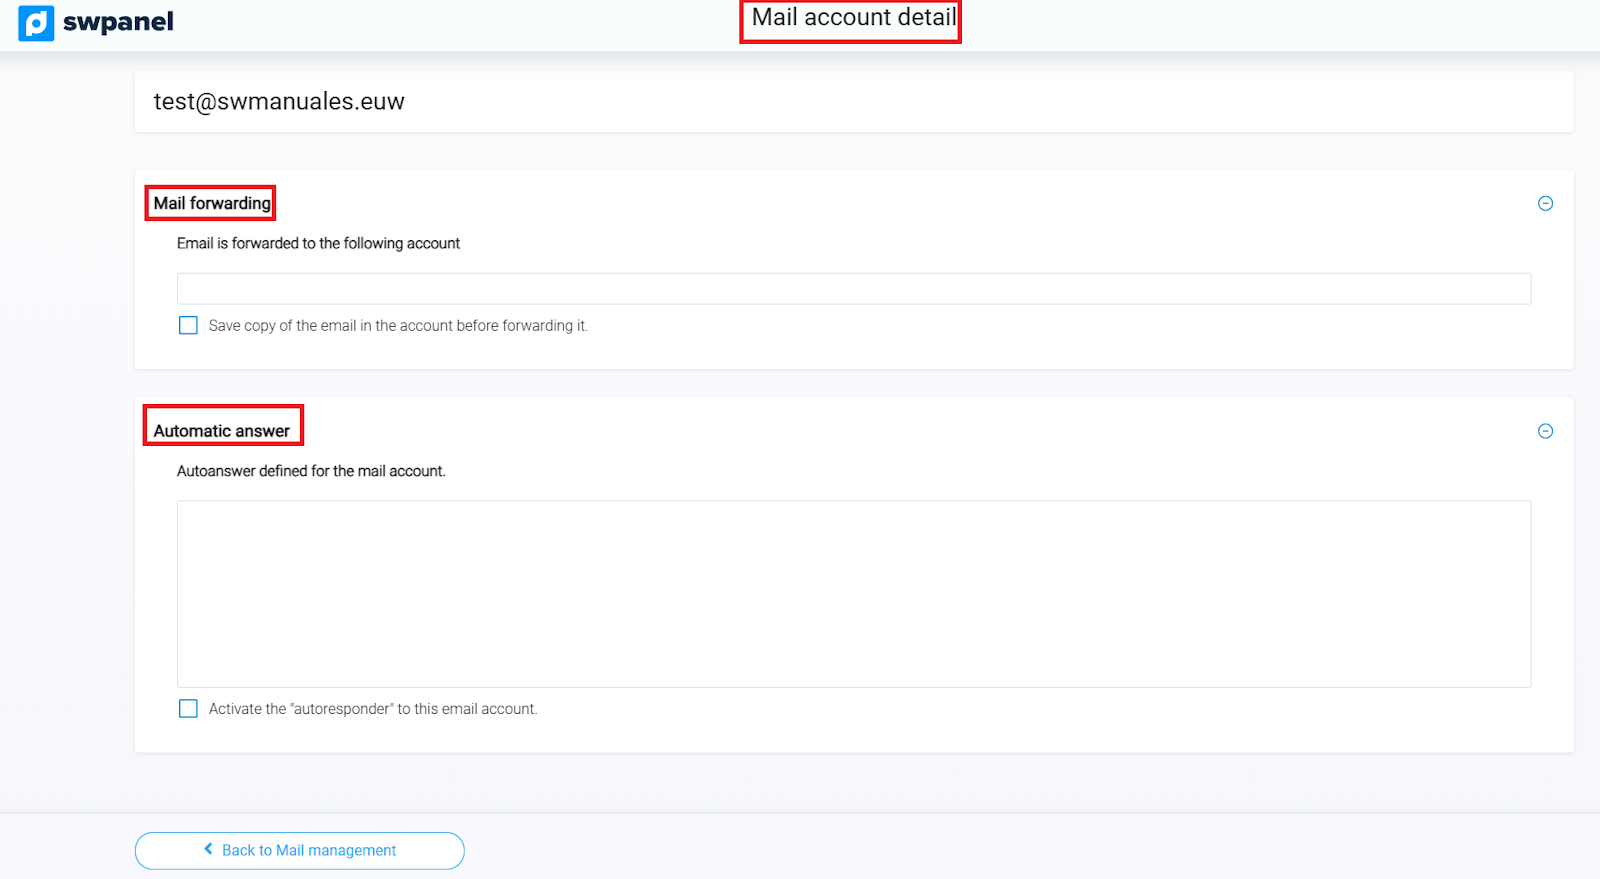
Additional options
- Email forwarding: Activate if you wish the emails to be forwarded to another account.
- Automatic response: Configure automatic messages.
info_capture ℹ️ Note: The capture is for guidance purposes, taken from version 2026.000.0001 dated 02/15/2026. It may differ from the current version of SWPanel.
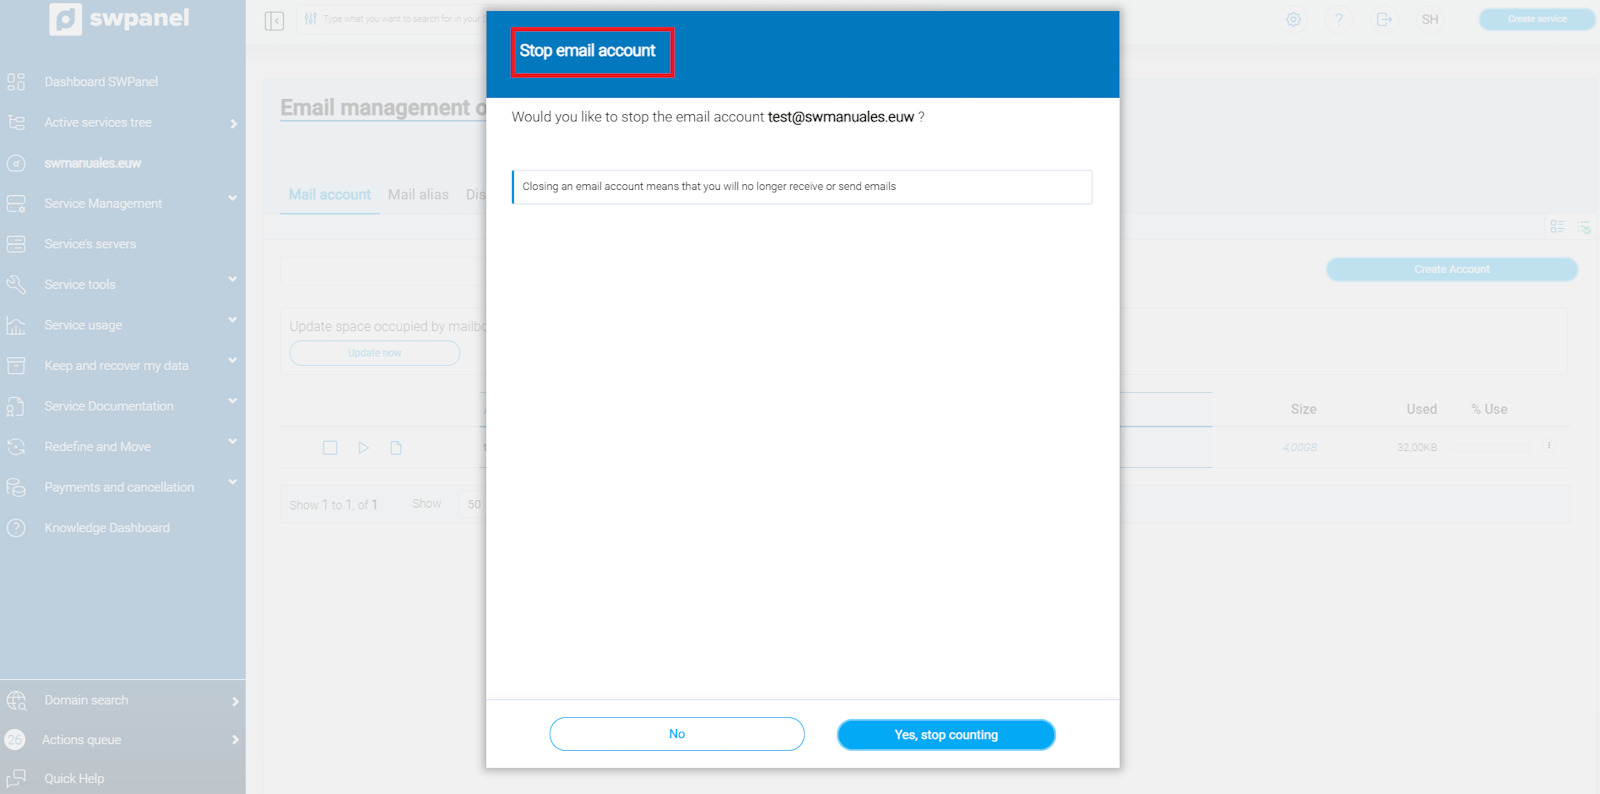
Stop email account
In this section, you can temporarily stop an email account, which means it will stop sending and receiving messages until it is reactivated.
- Action confirmation:
- A warning message will be displayed:
Do you wish to stop the email account [email protected]?
- A warning message will be displayed:
- Available options:
- No: Cancel the action and keep the account active.
- Yes, stop account: Stop the account, preventing the sending and receiving of emails.
info_capture ℹ️ Note: The capture is for guidance purposes, taken from version 2026.000.0001 dated 02/15/2026. It may differ from the current version of SWPanel.
Update account occupied space
In this section, you can update the information of the space used by the email account.
- By pressing the 'Update' button, the system will automatically recalculate the occupied space and show the most recent values for:
- Currently used space in the mailbox.
- Available space.
- Total space used in all email accounts.
This action does not modify account data, it only updates the information displayed on the screen.
Manage auto-replies
In this section, you can administer all automatic responses previously created for your email accounts.
- Upon accessing, you will be redirected to the Auto-replies section where you can:
- Activate or deactivate an existing auto-reply.
- Modify the message of the automatic response.
- Define or adjust the activation periods, if applicable.
- Delete auto-replies that you no longer need.
This section facilitates the centralized management of all your automatic responses without the need to create new ones from scratch.
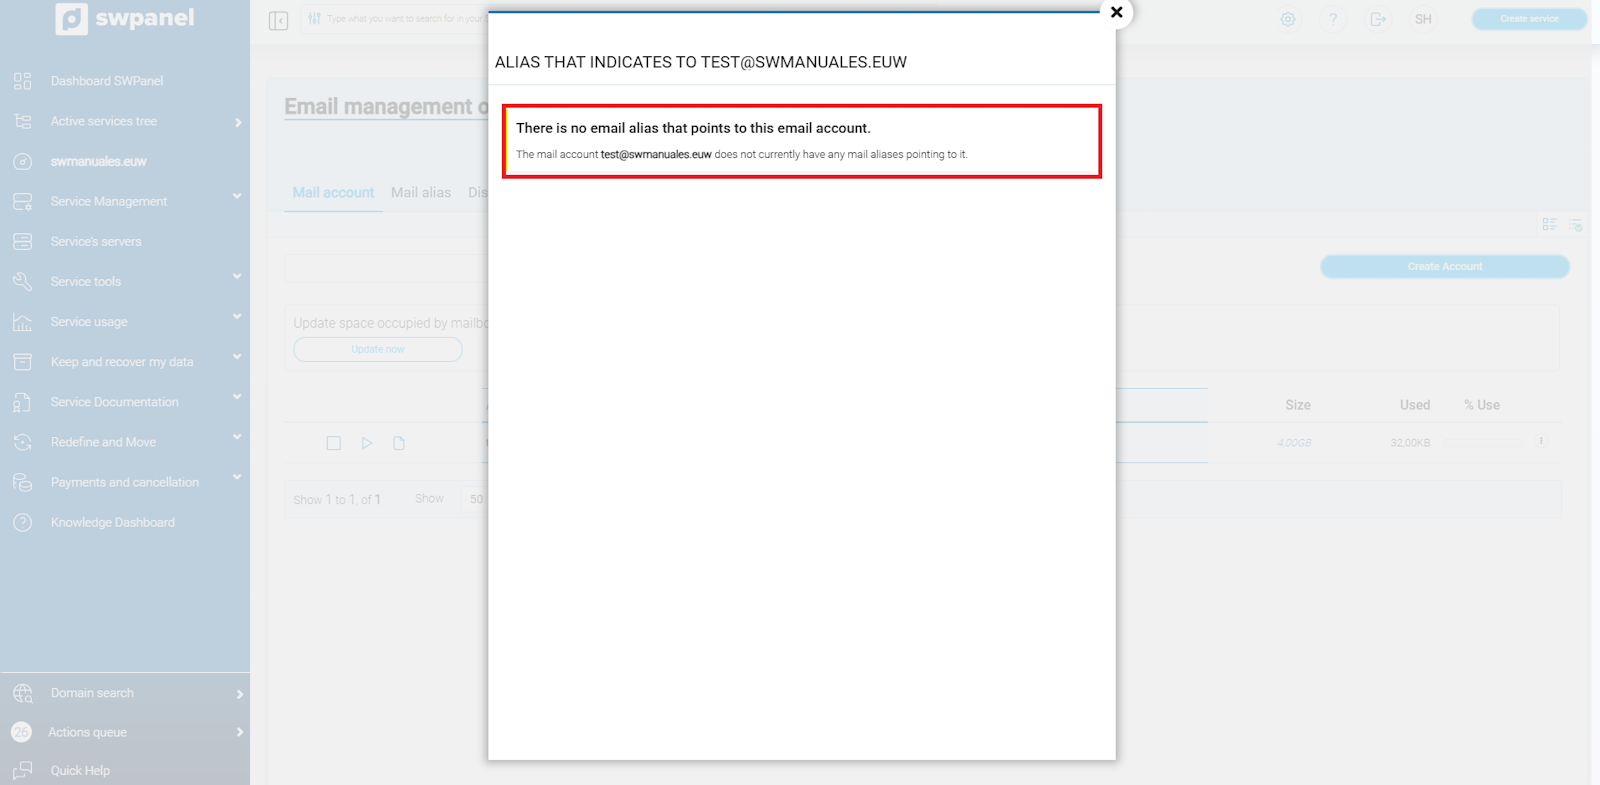
View aliases pointing to this account
In this section, you can view all the aliases that are associated with the selected email account.
- You will be able to see each active alias and its correspondence with the main account.
- This information allows you to control and manage the aliases in a centralized manner.
info_capture ℹ️ Note: The capture is for guidance purposes, taken from version 2026.000.0001 dated 02/15/2026. It may differ from the current version of SWPanel.
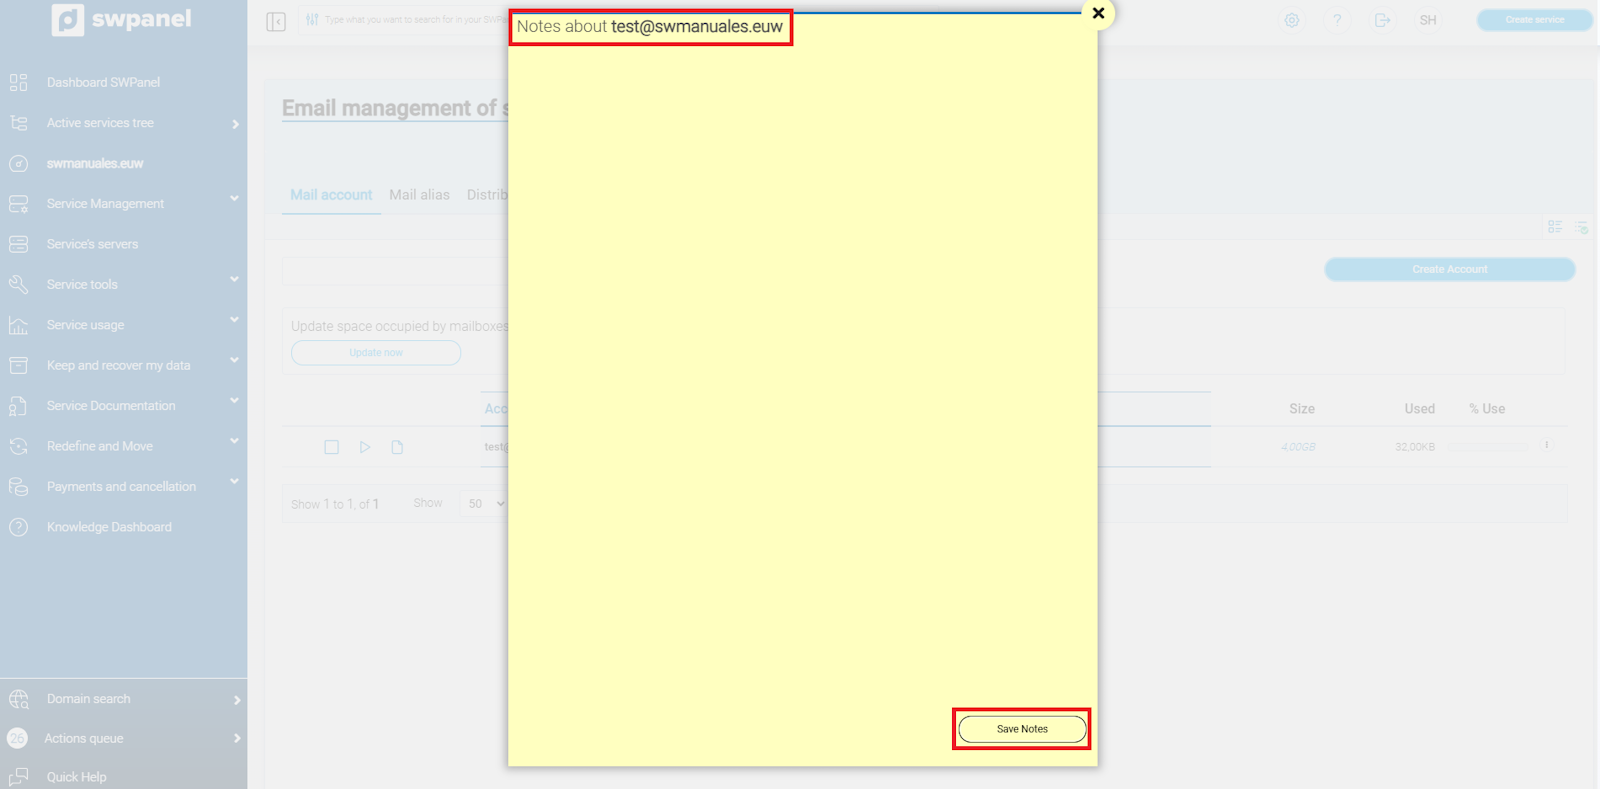
Open Notes Post-It
In this section, you can use the Notes Post-It to record any observation or comment related to the email account.
- You can note important information, reminders, or specific details of the account.
- This tool allows maintaining an internal record that will only be visible within the email management panel.
info_capture ℹ️ Note: The capture is for guidance purposes, taken from version 2026.000.0001 dated 02/15/2026. It may differ from the current version of SWPanel.
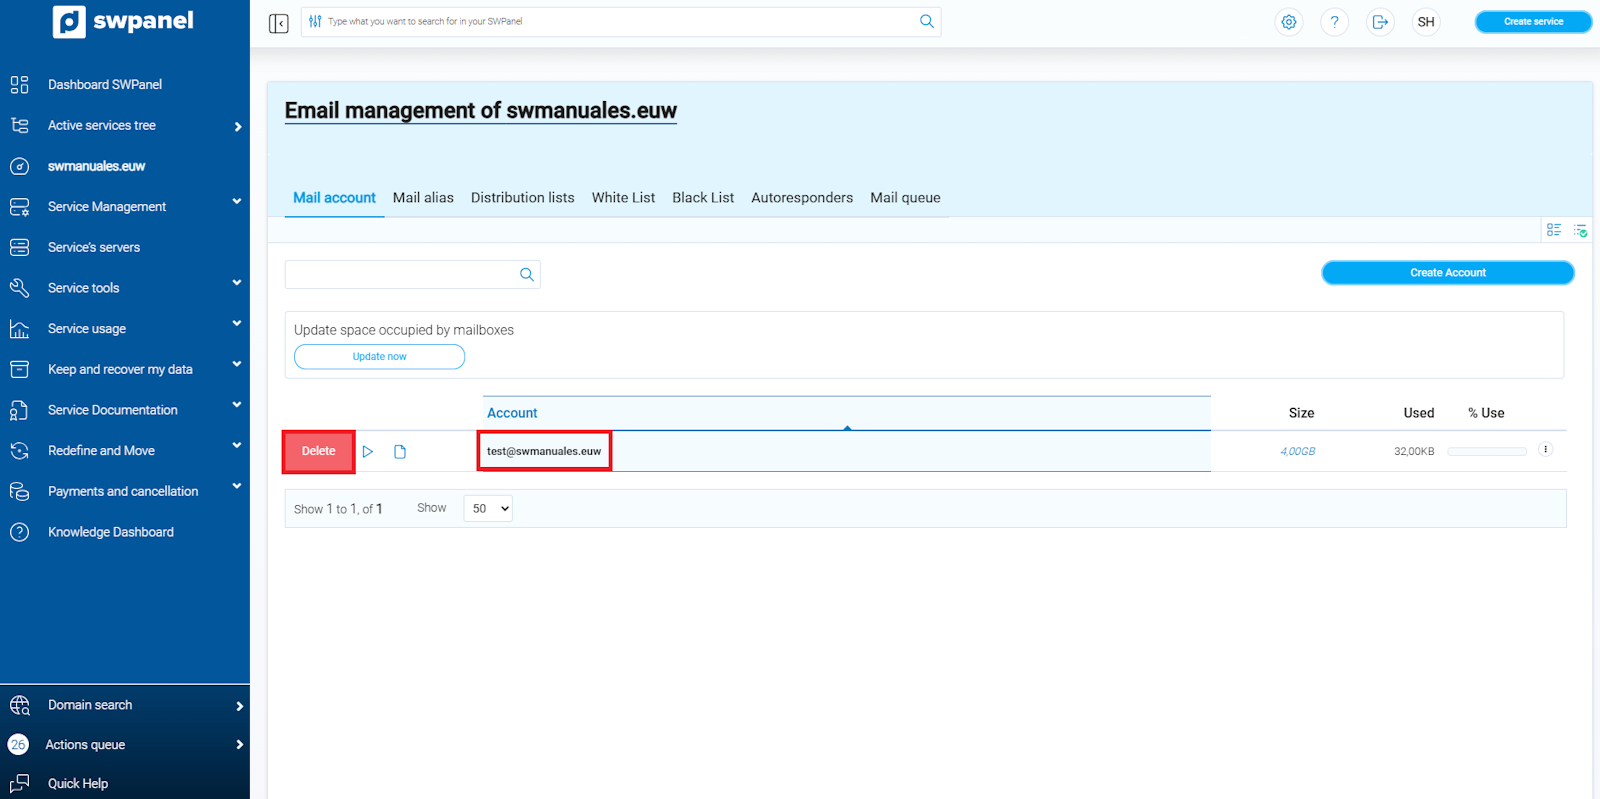
Delete this email account
With this option, you can completely delete the selected email account.
- When selecting this action, a warning icon (a red button) will be displayed next to the account name, indicating that the operation is irreversible.
- Important: This process will delete all messages and data from the account, with no possibility of recovery.
- It is recommended to previously download the emails to your email client if you wish to keep some or all messages before proceeding with the deletion.
info_capture ℹ️ Note: The capture is for guidance purposes, taken from version 2026.000.0001 dated 02/15/2026. It may differ from the current version of SWPanel.
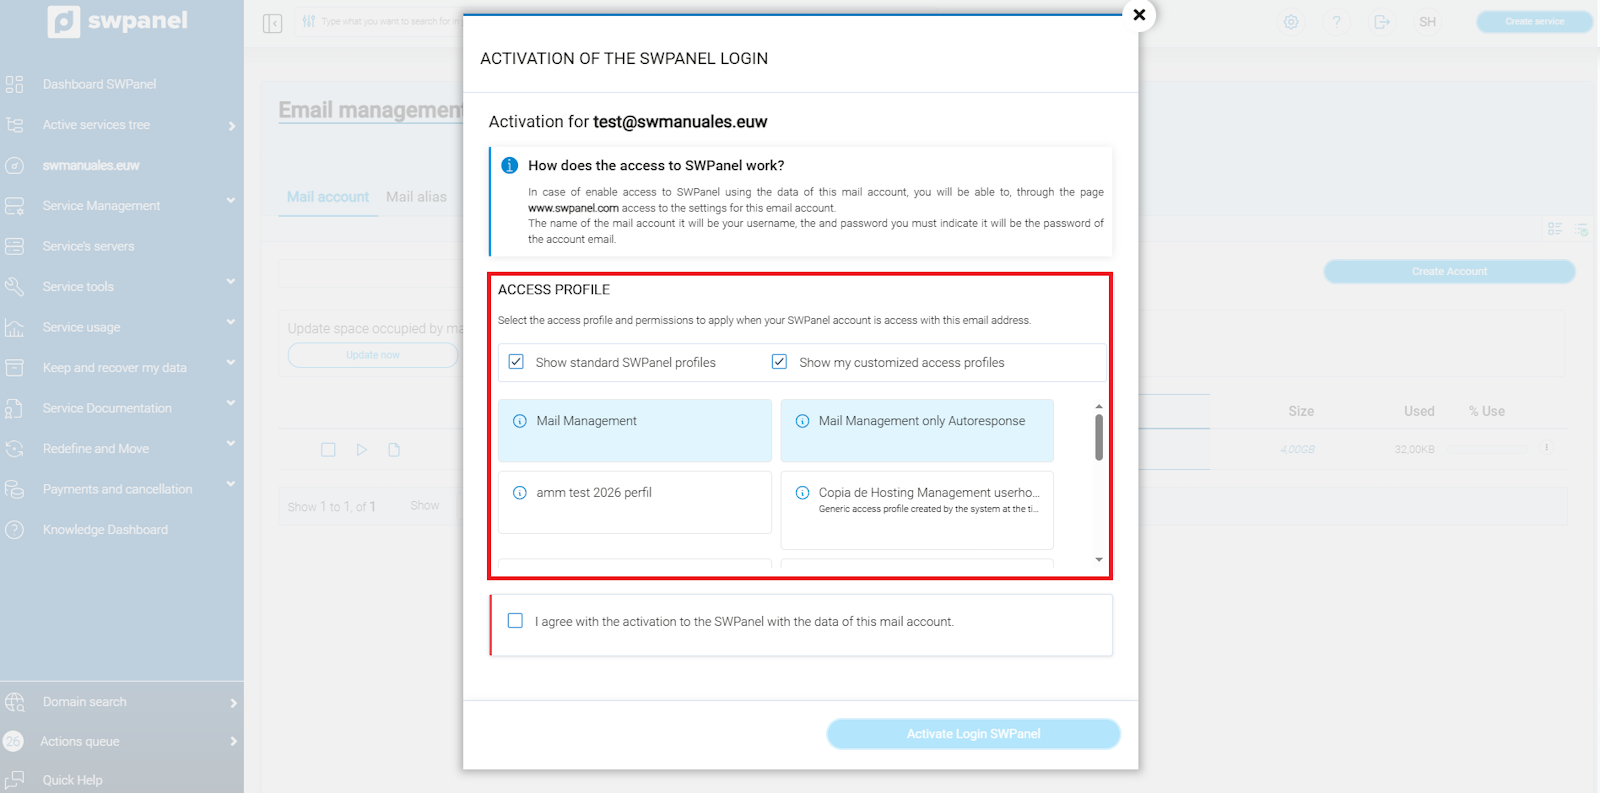
Activate SWPanel Login for this account
With this option, you can create a specific SWPanel access profile for the selected email account.
- The created user will be able to manage and modify the details of this account, but will not be able to change the space limitation of the email mailbox.
- This functionality allows granting restricted and secure access to users who need to administer the account without compromising other panel resources.
info_capture ℹ️ Note: The capture is for guidance purposes, taken from version 2026.000.0001 dated 02/15/2026. It may differ from the current version of SWPanel.
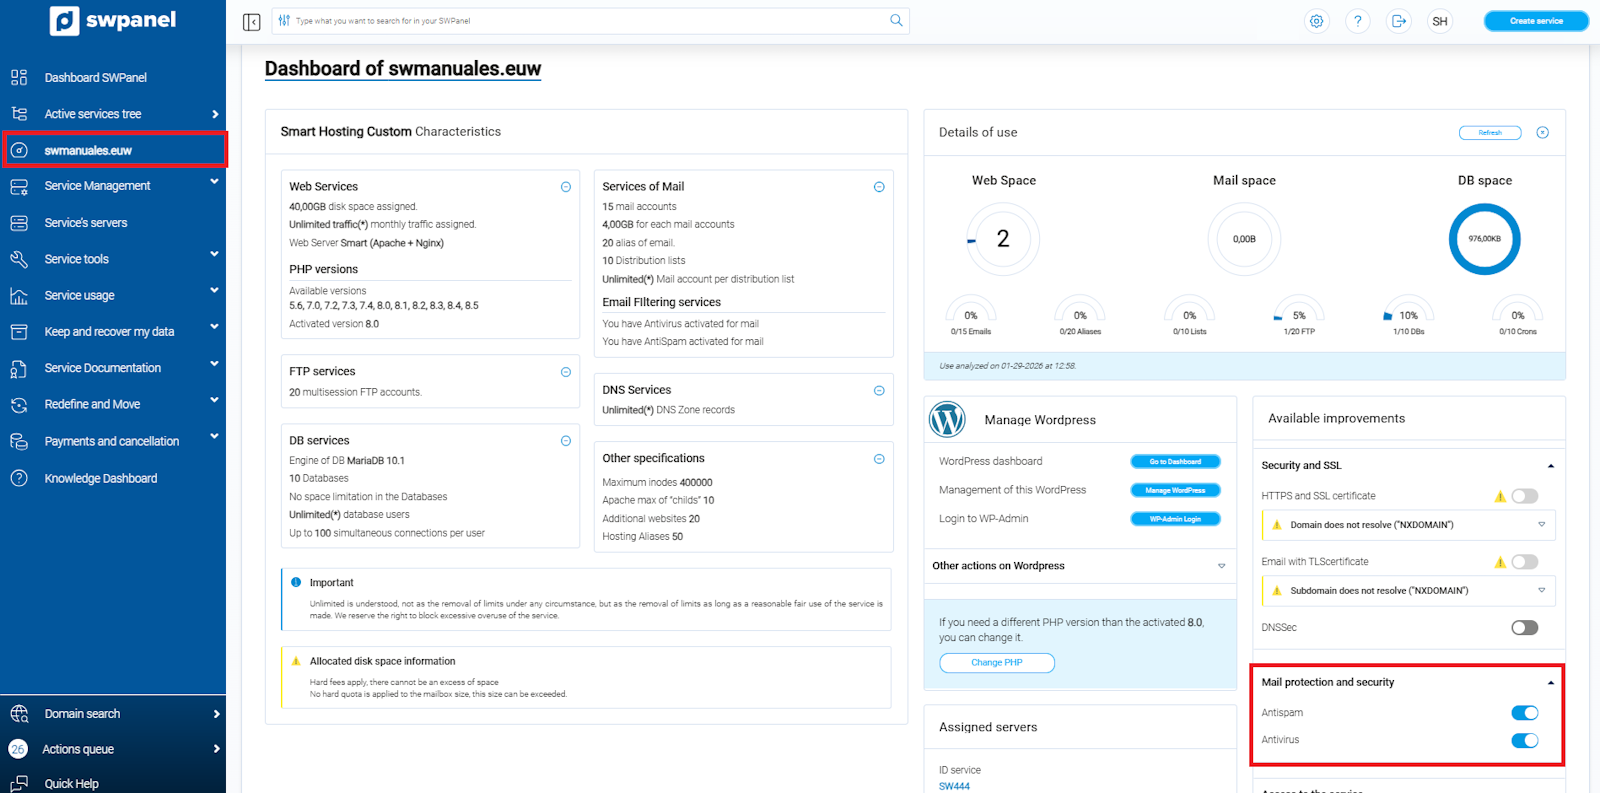
Security (Antispam / Antivirus)
With Antispam and Antivirus services activated, you can increase the security level of your email account and protect your communications against external threats.
info_capture ℹ️ Note: The capture is for guidance purposes, taken from version 2026.000.0001 dated 02/15/2026. It may differ from the current version of SWPanel.
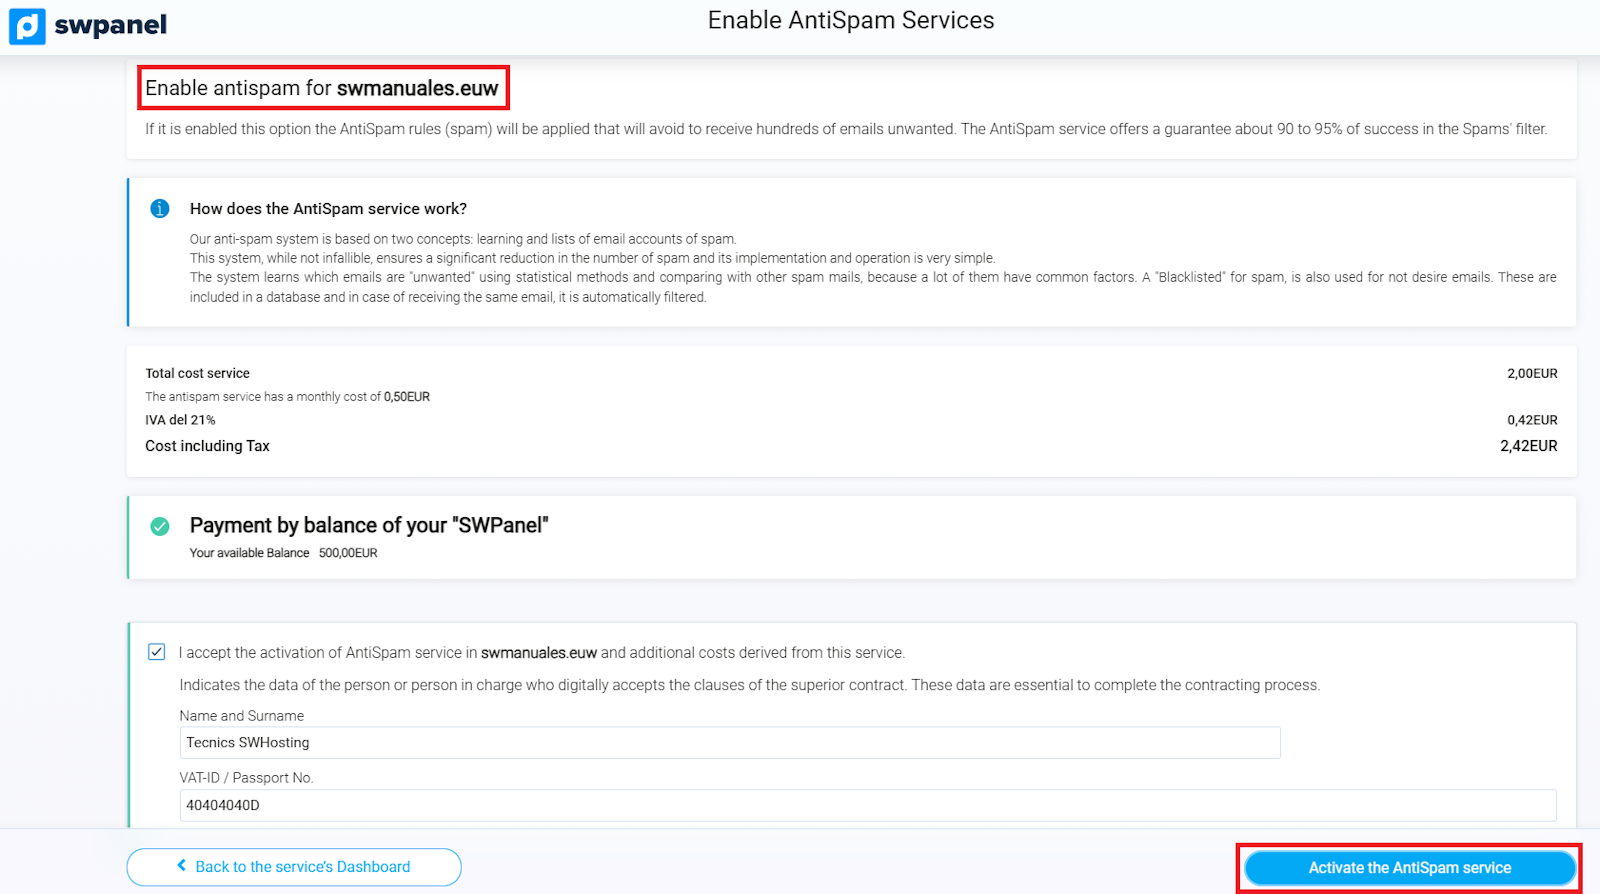
Our Antispam system automatically detects senders with signs of mass email sending or suspicious content (spam), blocking these messages before they reach your inbox.
info_capture ℹ️ Note: The capture is for guidance purposes, taken from version 2026.000.0001 dated 02/15/2026. It may differ from the current version of SWPanel.
For its part, the Antivirus system analyzes incoming emails for possible threats, such as malicious files or infected attachments, blocking them preventively to avoid risks or infections on your devices.
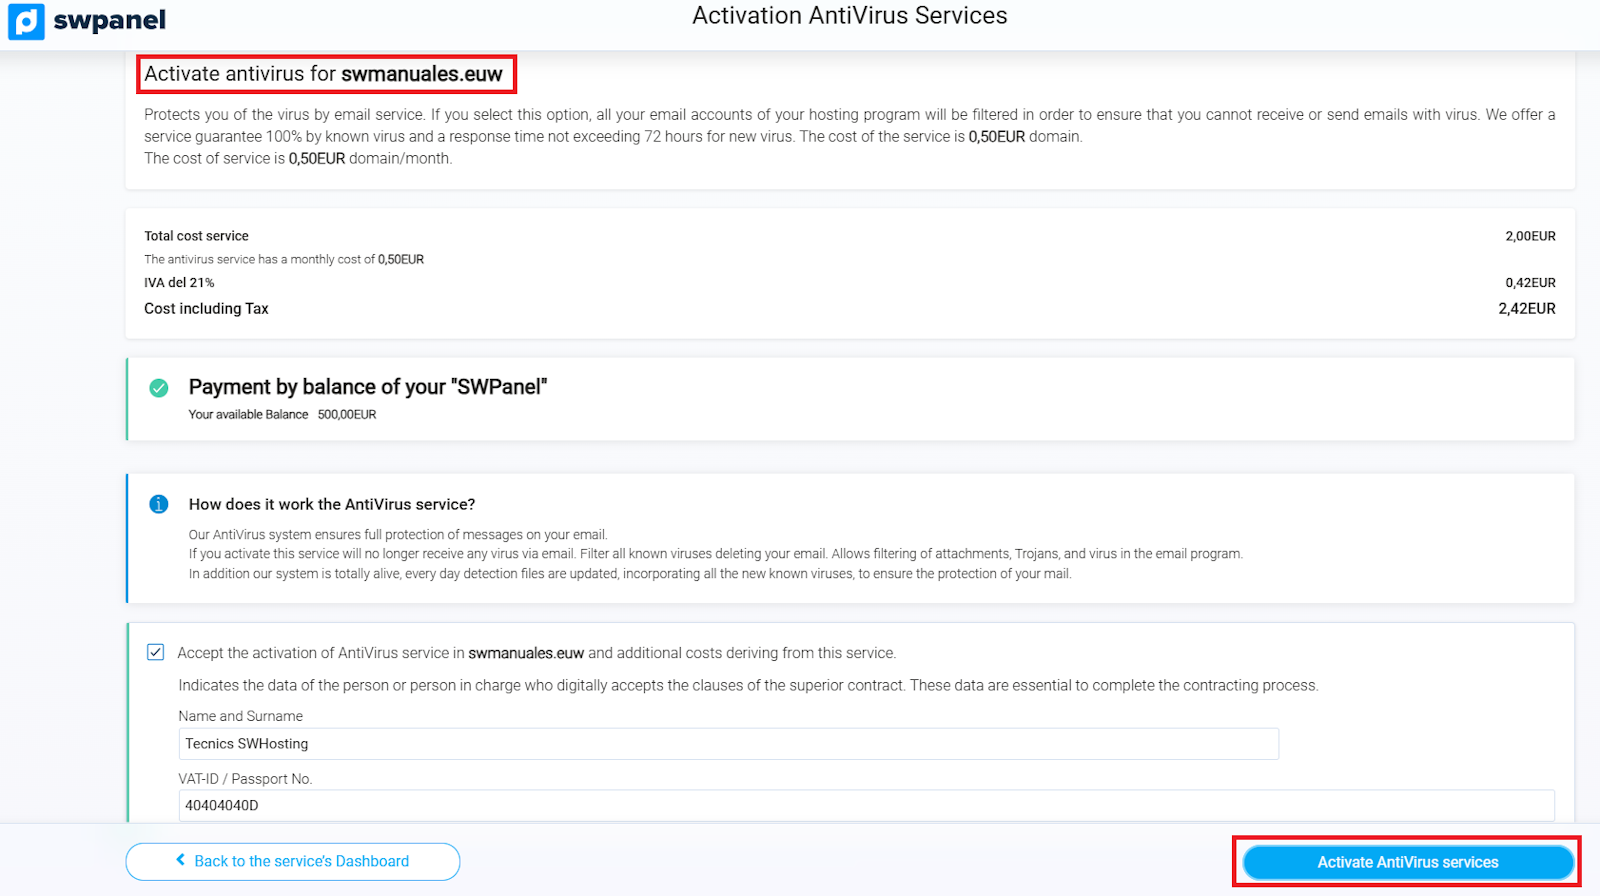
info_capture ℹ️ Note: The capture is for guidance purposes, taken from version 2026.000.0001 dated 02/15/2026. It may differ from the current version of SWPanel.