
Activate SWPanel Self-Hosted license
SWPanel Self-Hosted Installation and Activation Manual
1. Summary and Introduction
This manual provides a detailed, step-by-step guide to installing and activating SWPanel in Self-Hosted mode, allowing the user to deploy their own web hosting administration environment on external servers, whether Cloud, VPS or dedicated, as long as they are based on Debian 12 or higher operating systems.
What is SWPanel?
SWPanel is a hosting service administration platform developed for Debian Linux environments. It provides tools to manage:
- Websites.
- Content management systems (CMS) such as WordPress, Joomla, etc.
- Email accounts.
- MariaDB databases.
- FTP access.
- DNS records.
SWPanel is characterized by its intuitive interface, which facilitates the control and administration of servers without the need for advanced technical knowledge.
What does “Self-Hosted” mean?
The Self-Hosted mode allows you to install SWPanel on a server that does not belong directly to the SWPanel infrastructure, but which is managed from its centralized panel. It is ideal if you already have an external server and want to integrate its management with SWPanel.
What will you learn in this manual?
This document details the process for:
- Accessing and registering with SWPanel.
- Activating the Self-Hosted functionality from the control panel.
- Choosing the installation mode (assisted or manual).
- Entering a Token ID to activate the license.
- Selecting and adding the license type.
- Complete the activation of SWPanel Self-Hosted.
2. Access to SWPanel
Unregistered user
In order to use SWPanel in Self-Hosted mode, it is essential to have an active client account. If you do not yet have an account, follow this manual to register: ? Handbuch: How to register in SWPanel.
Registered user
If you already have an account on SWPanel, access the system from this link: https://go.swpanel.com/activate/
Once inside the main panel (Dashboard), go to the blue side menu and click on Activate SWPanel Self-Hosted:
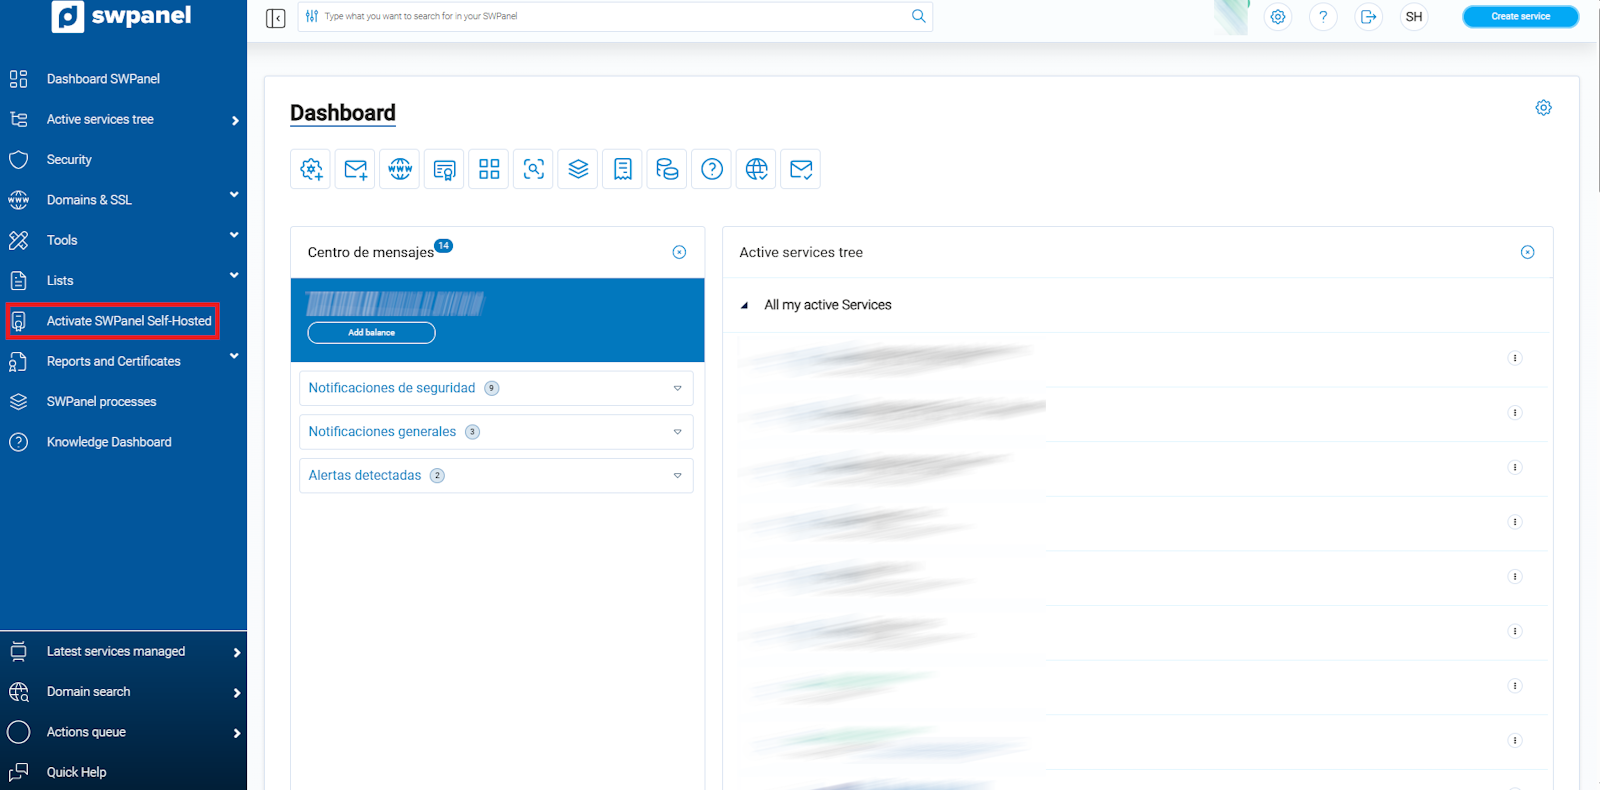
info_capture The screenshot is for guidance purposes. It was taken on version 2025.03.0003 dated 26/03/2025. It may differ from what the current version of SWPanel shows
3. Selecting the installation mode for Self-Hosted SWPanel
After accessing the activation section, three methods for installing SWPanel will be presented:
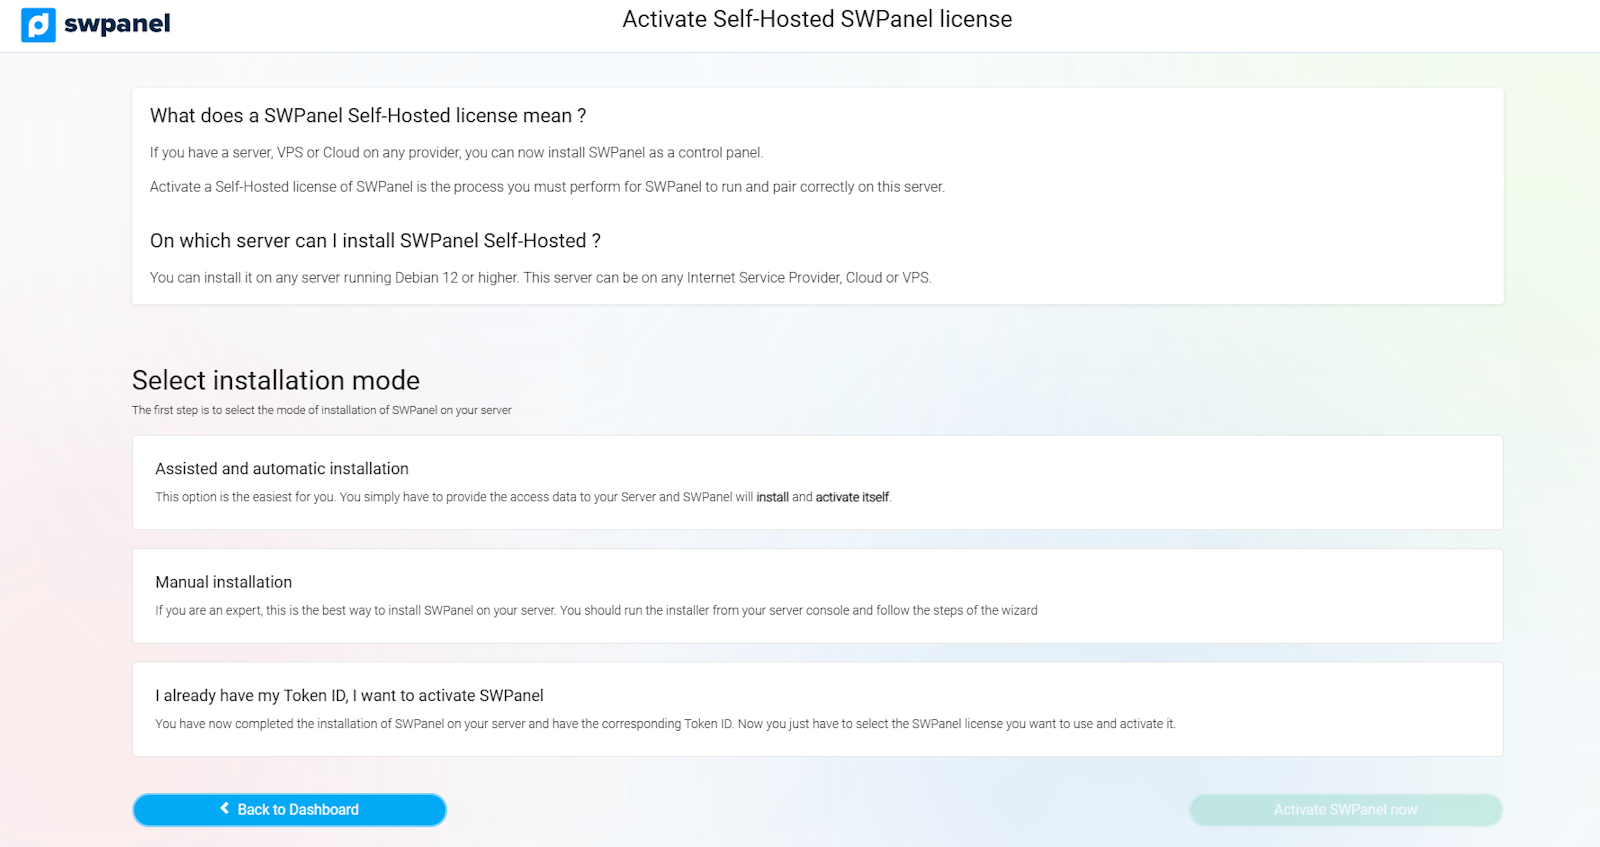
info_capture The screenshot is for guidance purposes. It was taken on version 2025.03.0003 dated 26/03/2025. It may differ from what the current version of SWPanel shows
3.1 Assisted and automatic installation
Recommended method for users without advanced technical knowledge. Prerequisites:
- Public IP address of the server.
- SSH port (by default it is usually 22).
- Password of the root user.
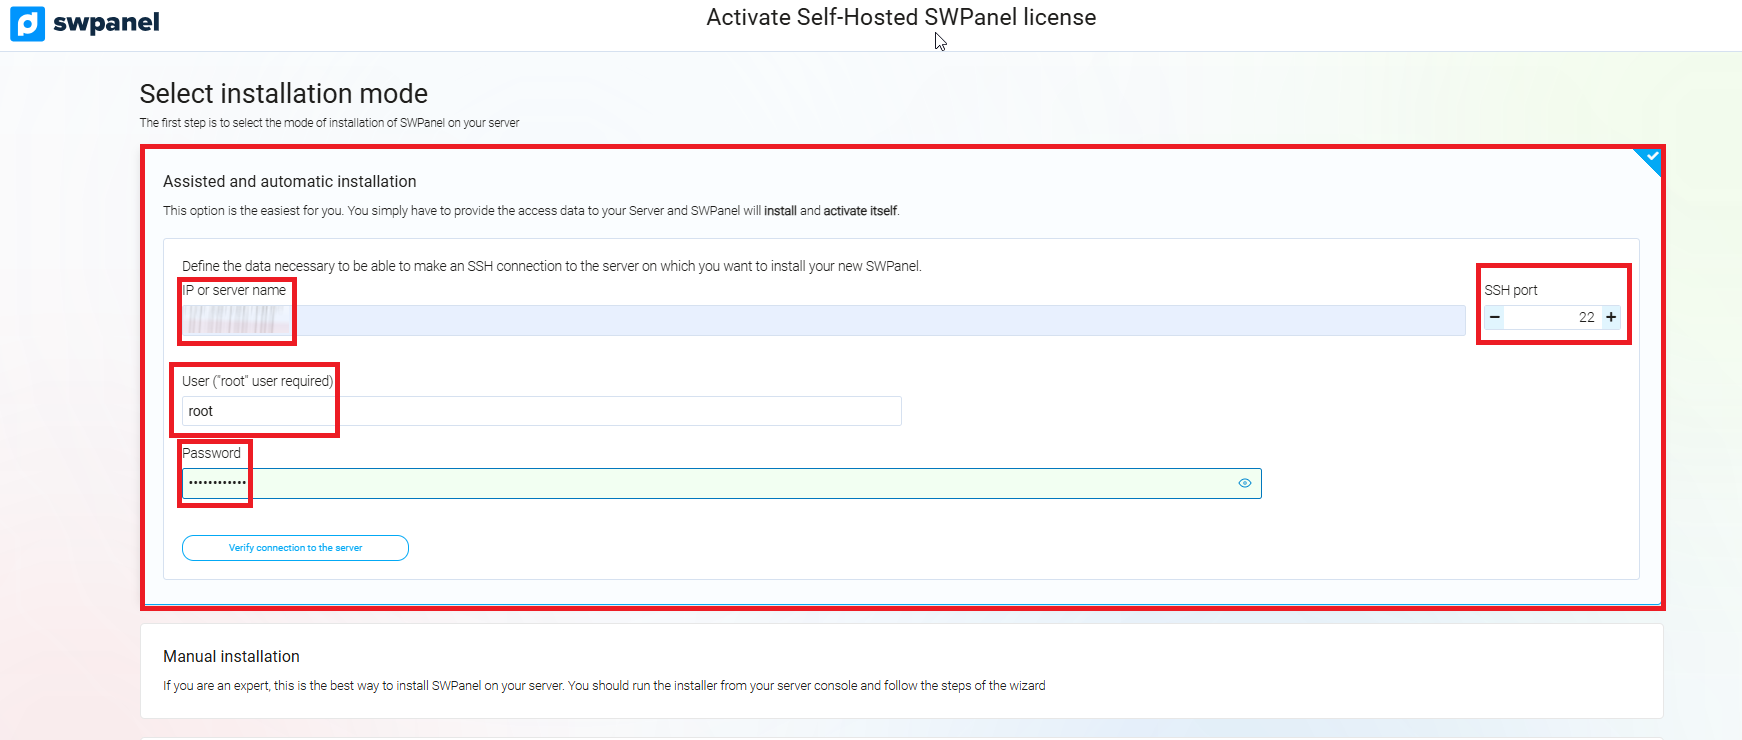
info_capture The screenshot is for guidance purposes. It was taken on version 2025.03.0003 dated 26/03/2025. It may differ from what the current version of SWPanel shows
Steps:
- Enter the server's IP address, the SSH port and the root password.
- Click on “Verify connection to the server”.
- Accept the disclaimer by checking the corresponding box:
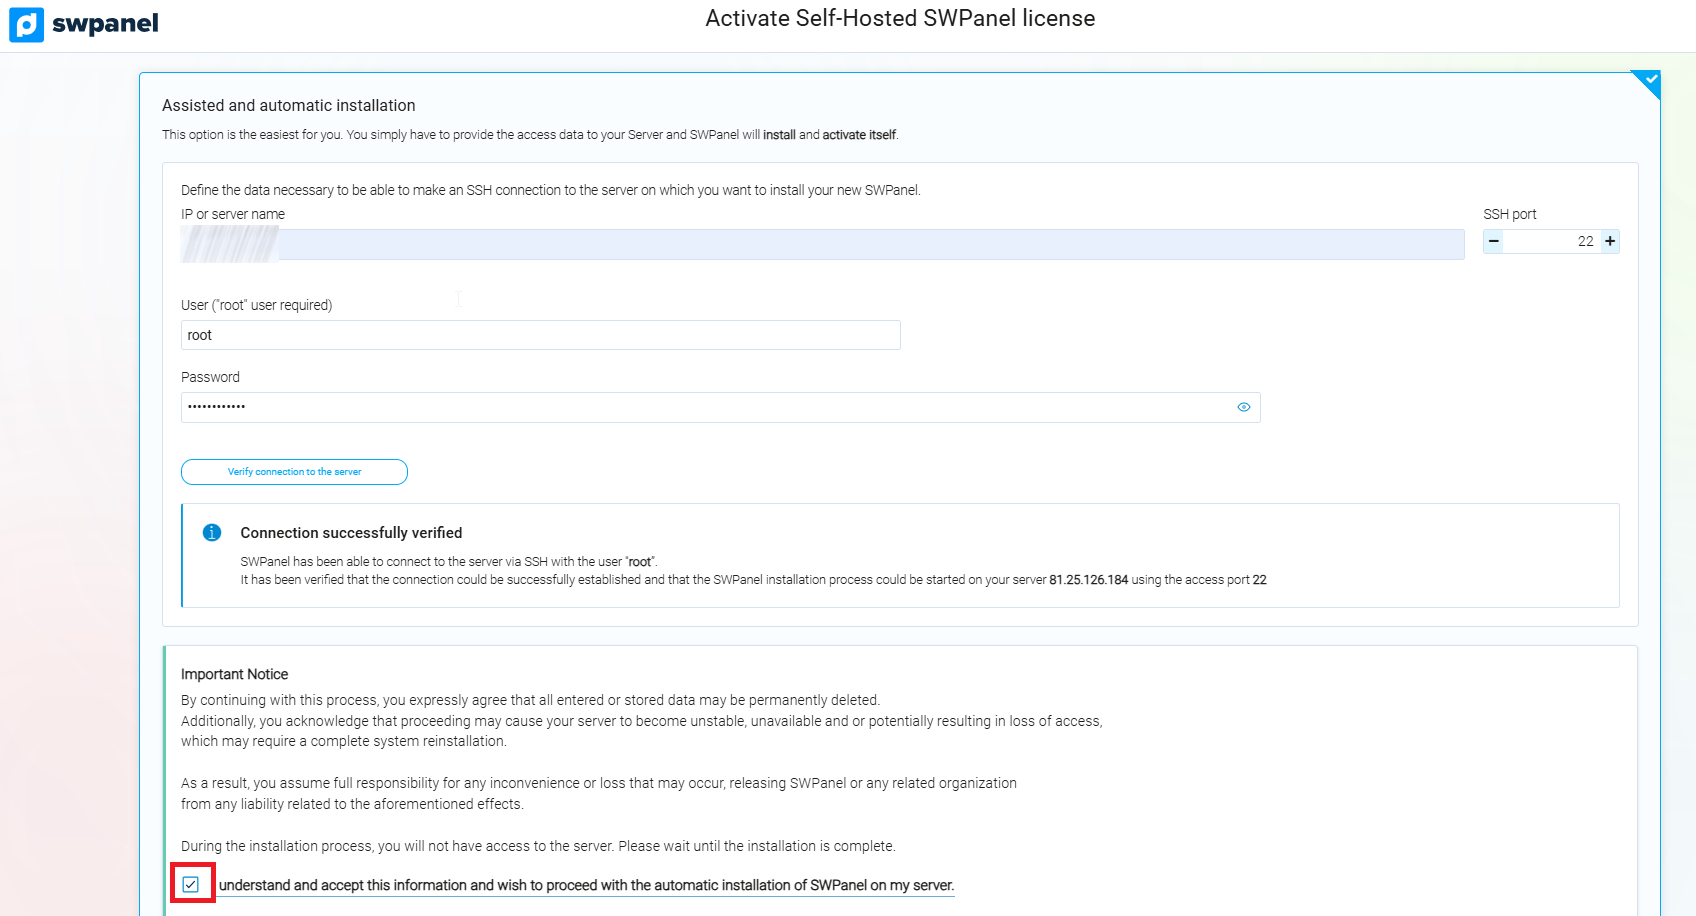
info_capture The screenshot is for guidance purposes. It was taken on version 2025.03.0003 dated 26/03/2025. It may differ from what the current version of SWPanel shows
- Once the connection has been verified and the disclaimer accepted, SWPanel will start the installation automatically, without any further user intervention.
3.2 Manual installation
Designed for advanced users with technical knowledge of server administration.
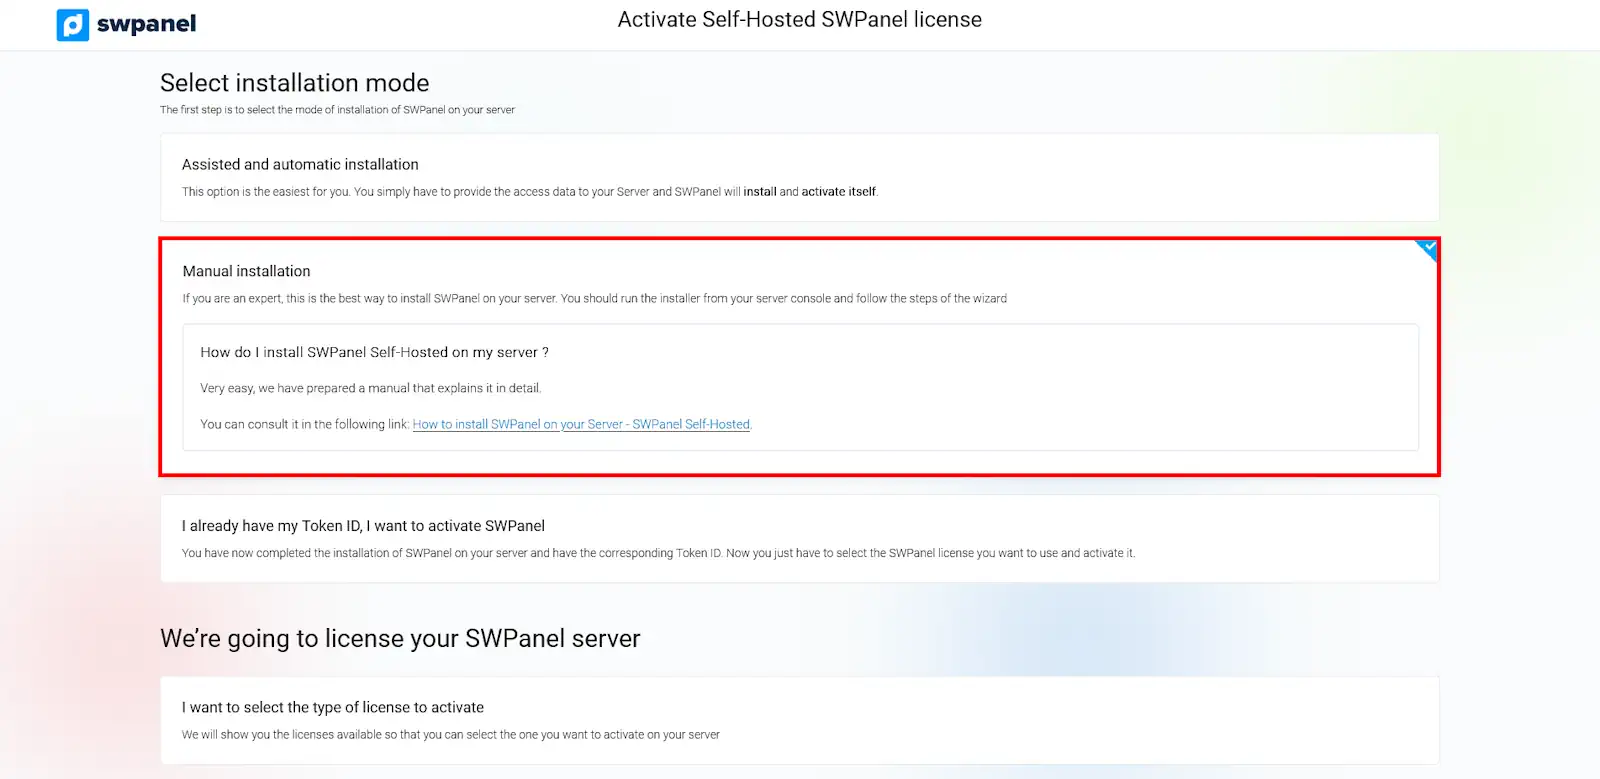
info_capture The screenshot is for guidance purposes. It was taken on version 2025.03.0003 dated 26/03/2025. It may differ from what the current version of SWPanel shows
Process:
- Access the server console.
- Manually run the SWPanel installer.
- Follow the steps in the installation wizard.
- Once finished, a Token ID will be generated.
This Token ID must be entered later in the SWPanel to complete the activation. See the detailed steps here: ? Handbuch: How to install SWPanel on your Server - SWPanel Self-Hosted
3.3 I already have my Token ID, I want to activate SWPanel
If you have already installed SWPanel manually and have the Token ID, proceed with activation from the panel. This Token ID allows you to correctly link your server with the Self-Hosted mode of SWPanel. It is compatible with servers using Debian 12 or higher, regardless of the Internet service provider, Cloud or VPS.
- Enter the Token ID in the corresponding field.
- Click on “Verify Token ID” to confirm validity.
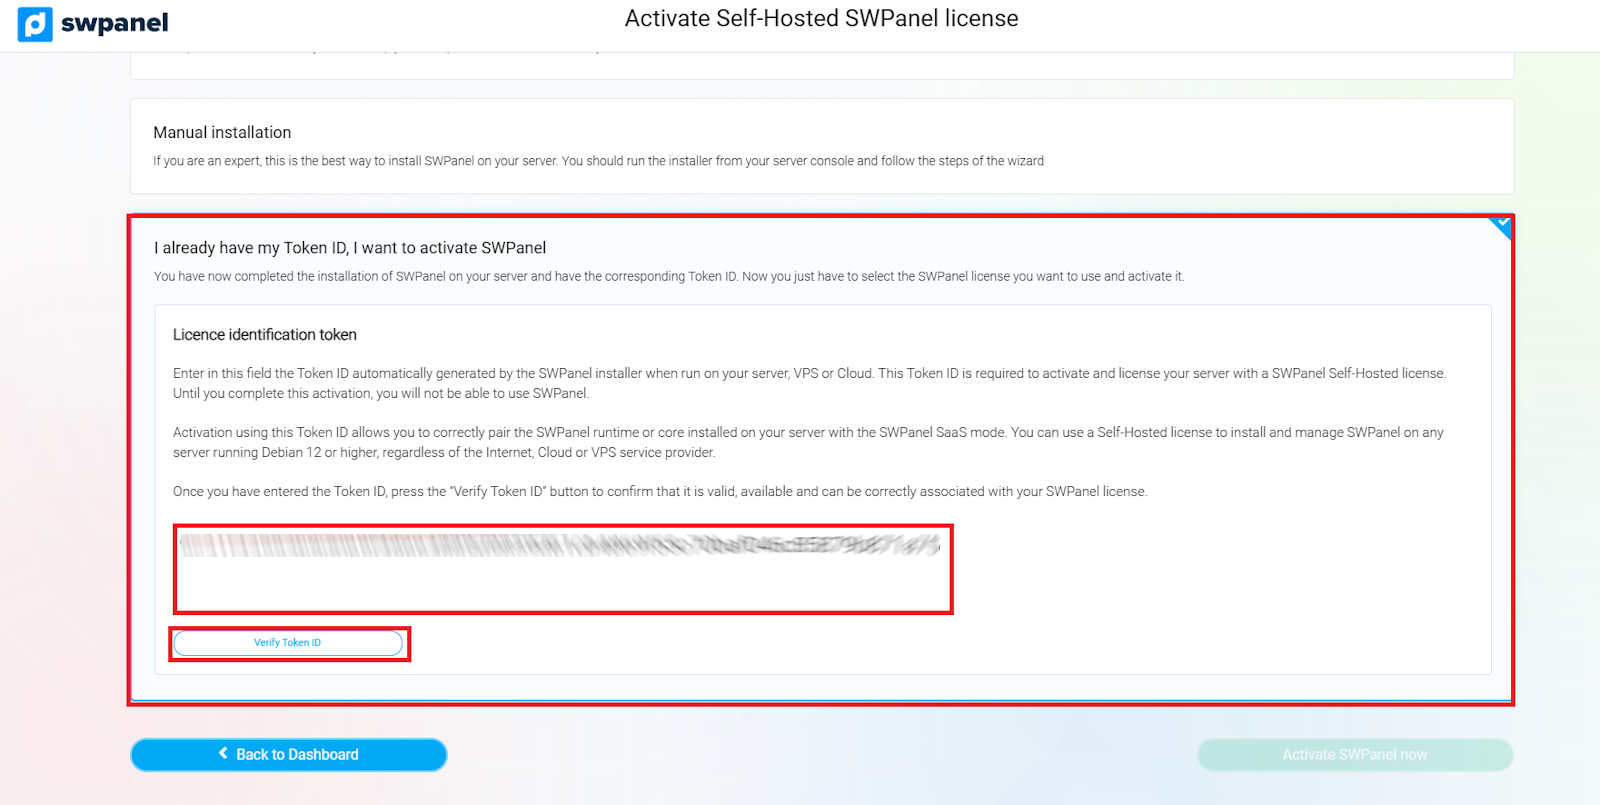
info_capture The screenshot is for guidance purposes. It was taken on version 2025.03.0003 dated 26/03/2025. It may differ from what the current version of SWPanel shows
4. Licensing the SWPanel server
Once the installation is complete, the next step is to license the server:
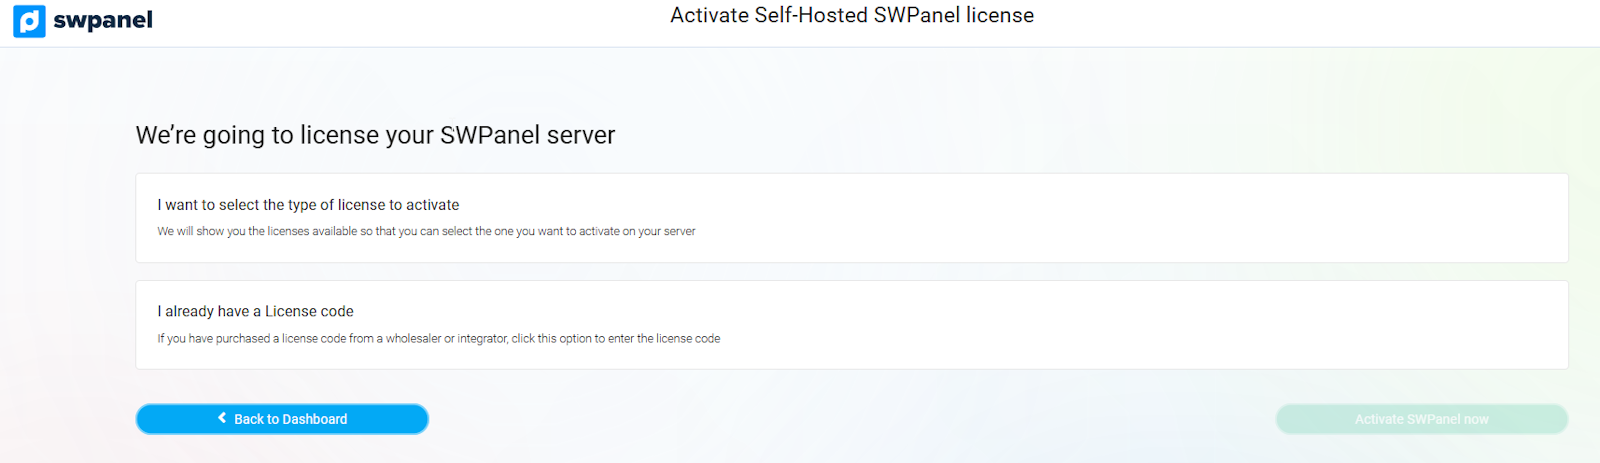
info_capture The screenshot is for guidance purposes. It was taken on version 2025.03.0003 dated 26/03/2025. It may differ from what the current version of SWPanel shows
4.1 Selecting the type of license
The system will allow you to select the type of license that best suits your needs.
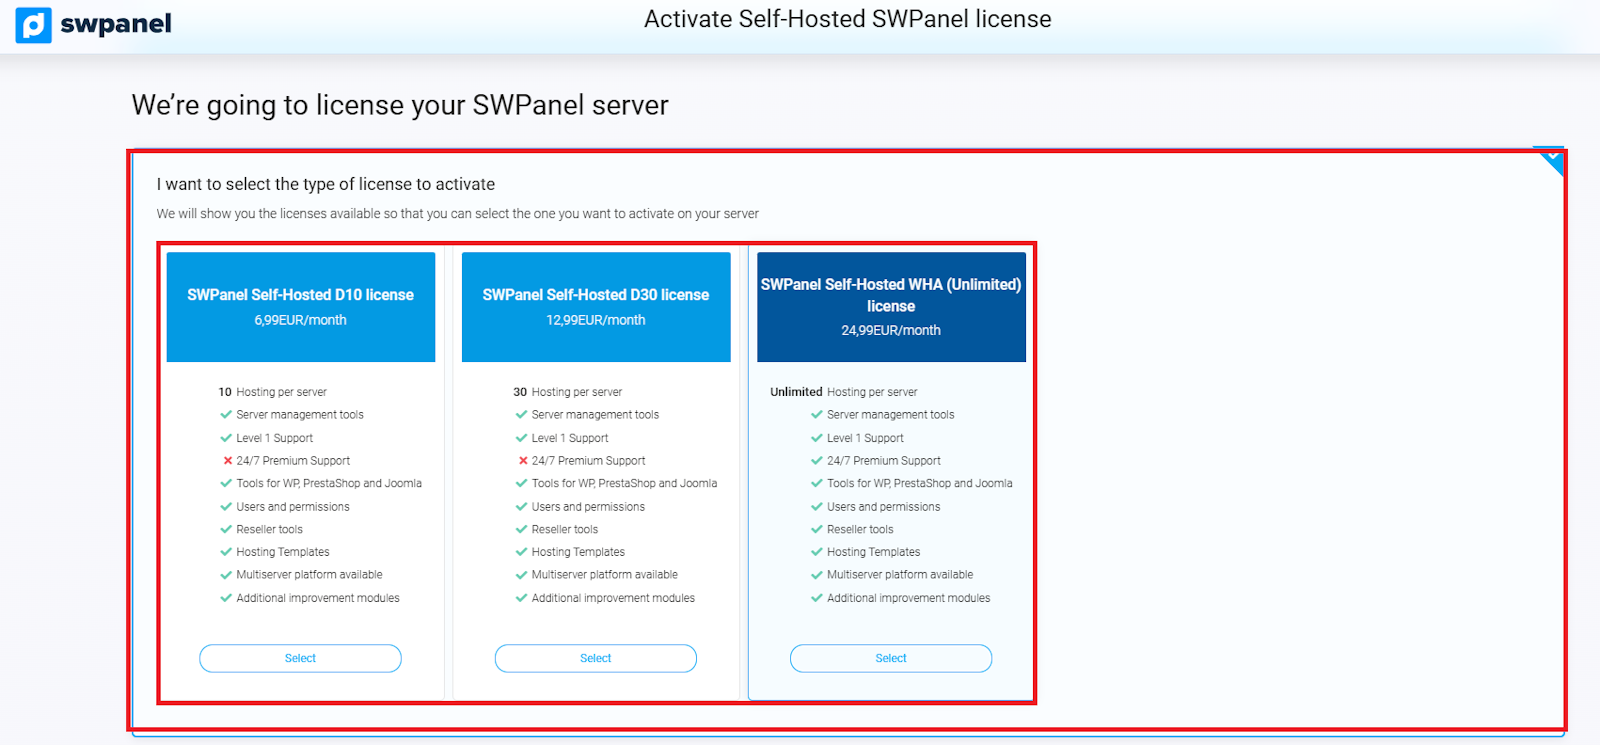
info_capture The screenshot is for guidance purposes. It was taken on version 2025.03.0003 dated 26/03/2025. It may differ from what the current version of SWPanel shows
4.2 Adding a license code
If you have already purchased a license through an authorized distributor or integrator, you can enter the code in this section:
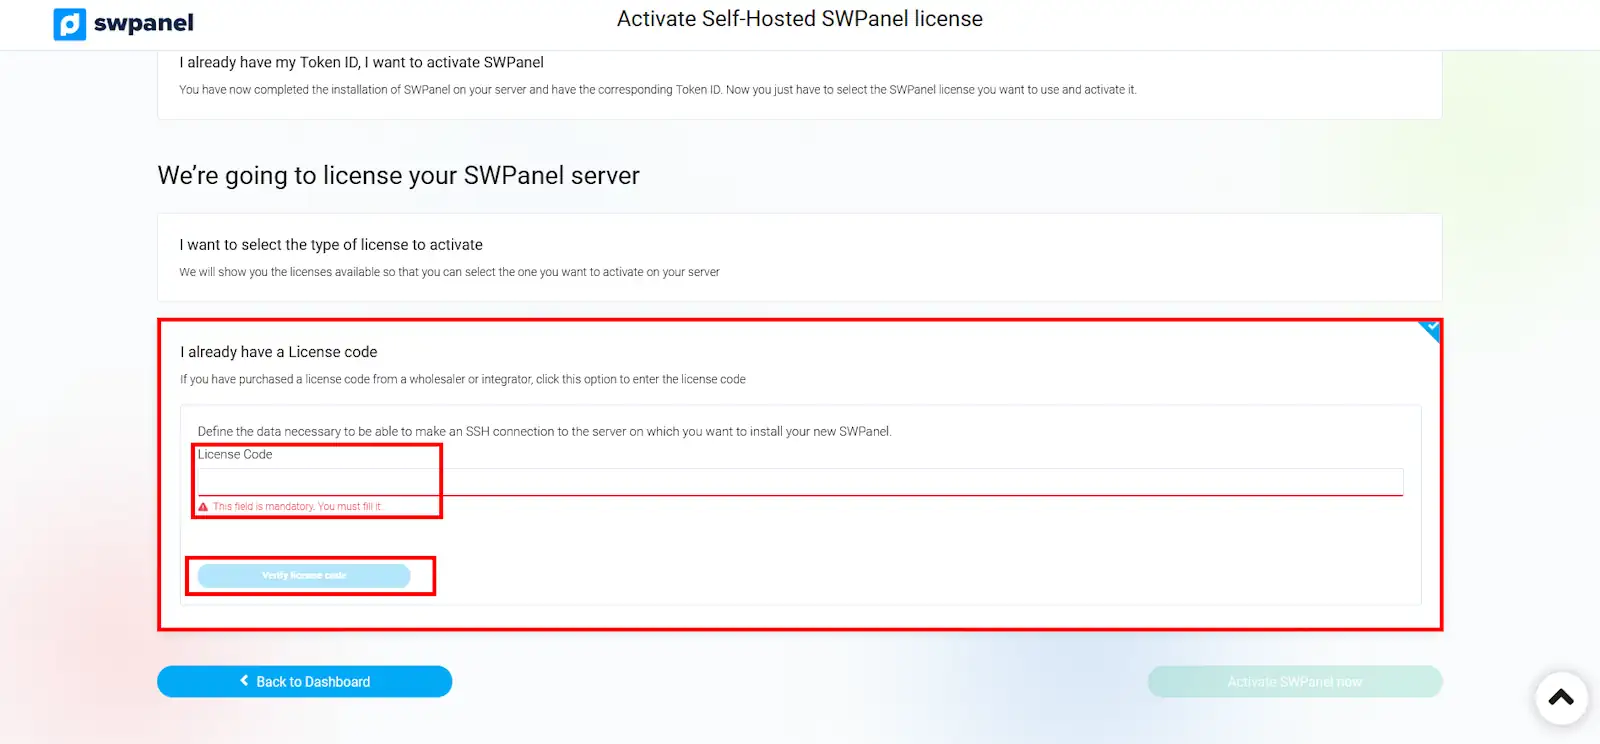
info_capture The screenshot is for guidance purposes. It was taken on version 2025.03.0003 dated 26/03/2025. It may differ from what the current version of SWPanel shows
5. Activate SWPanel Self-Hosted
To finalize the process, accept the legal conditions and press the button:
“Activate SWPanel now”
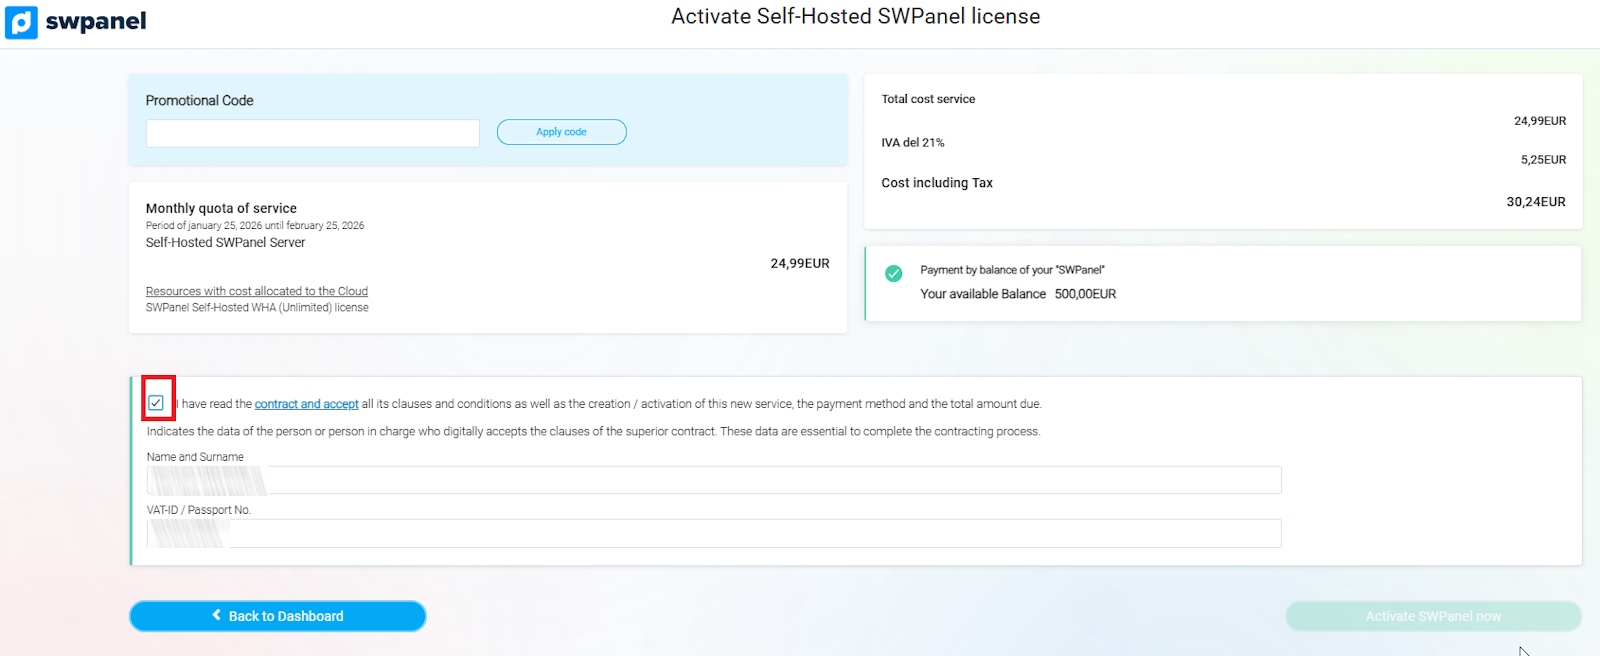
info_capture The screenshot is for guidance purposes. It was taken on version 2025.03.0003 dated 26/03/2025. It may differ from what the current version of SWPanel shows