Email account configuration
Email protocols
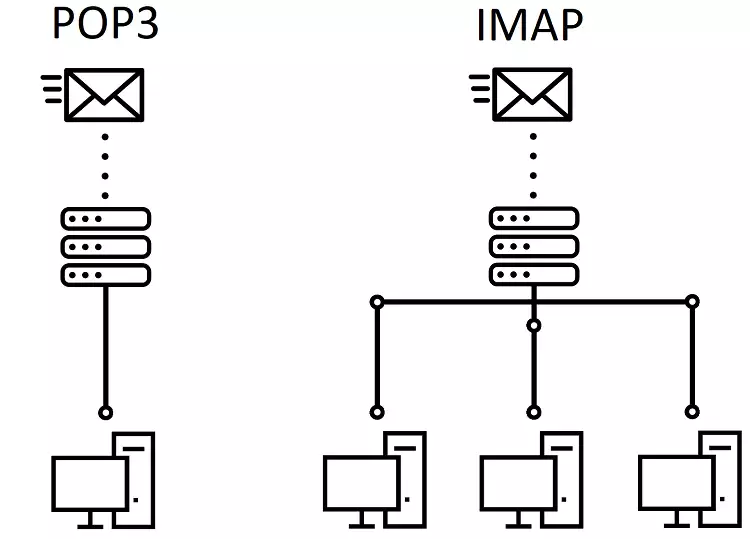
The email account can be configured according to two types of incoming protocols: IMAP or POP3. Outgoing email is always configured with the SMTP protocol.
Configuring our email account with the POP3 protocol allows us to download messages locally (on our equipment) instead of keeping them on the server, with the resulting space savings that this entails. Messages will be saved locally, so if accessed from another place or device, they will not be accessible.
Configuring our email account with the IMAP protocol allows us to check messages from any place and device because they always remain saved on the server, even preserving our folder distribution. Since the messages will be saved on the server, the use of server space will be greater. Likewise, we can configure the time that copies remain saved on the server.
Security protocols
When we send an email from any mail client, we can do it through the standard ports or the secured ports (at SWHosting we recommend the use of secured ports).
Secured ports
These are the ports through which encrypted mail is sent. When we activate the security protocols SSL/TLS by obtaining a Certificate for our domain, the email configuration can be done using the ports typically used for secure email.
- For sending email (SMTP protocol), Port 465 is used.
- To receive email, the ports used are Port 993 for the IMAP protocol and Port 995 for the POP3 protocol.
How to activate security protocols in my Hosting
By default, the Cloud comes without security protocols activated (SSL/TLS). To do so, we must activate them manually, with no activation or maintenance cost.
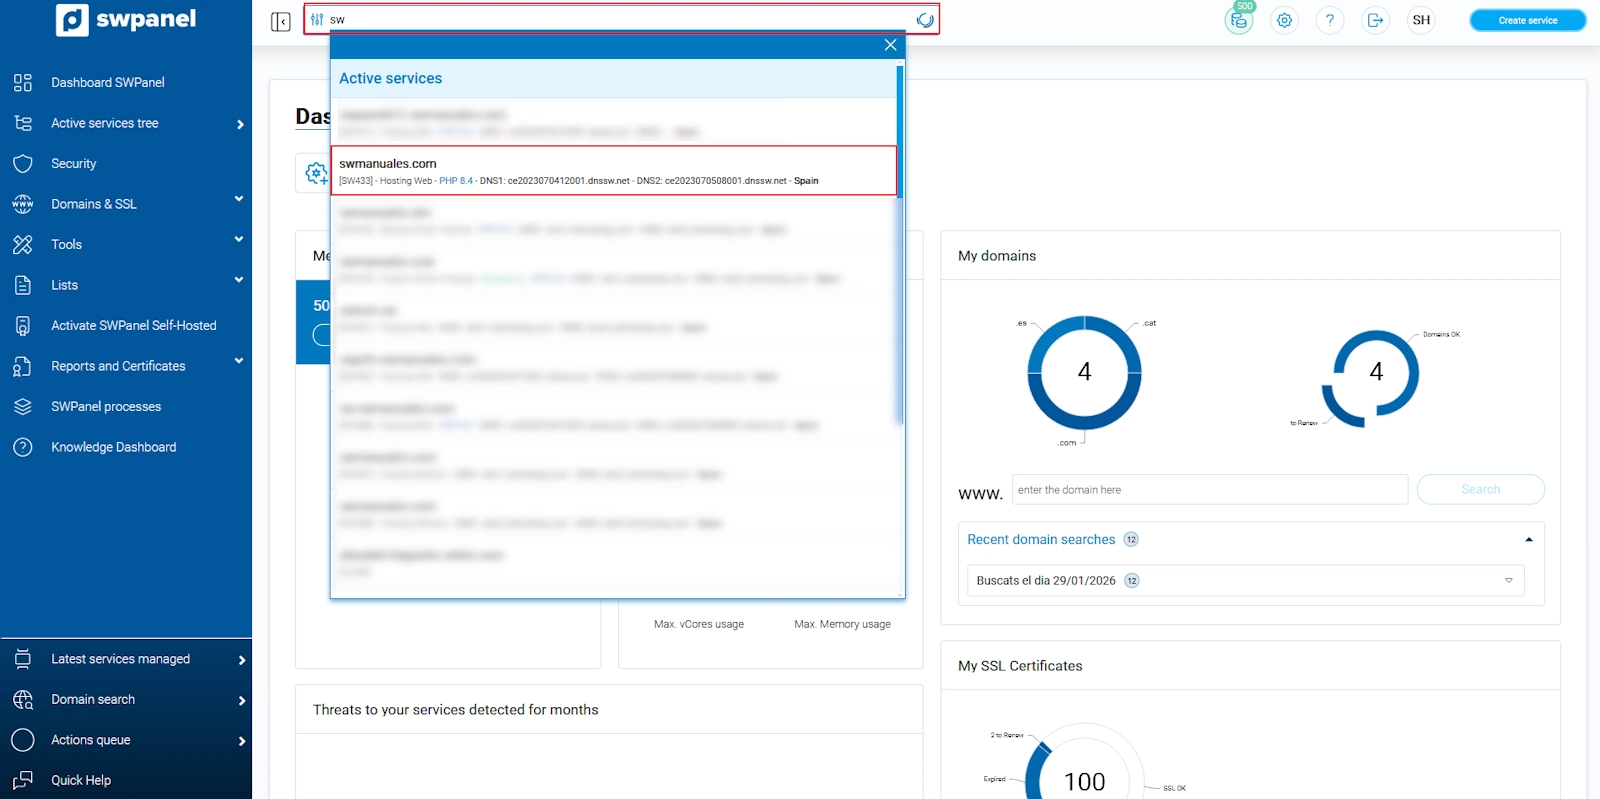
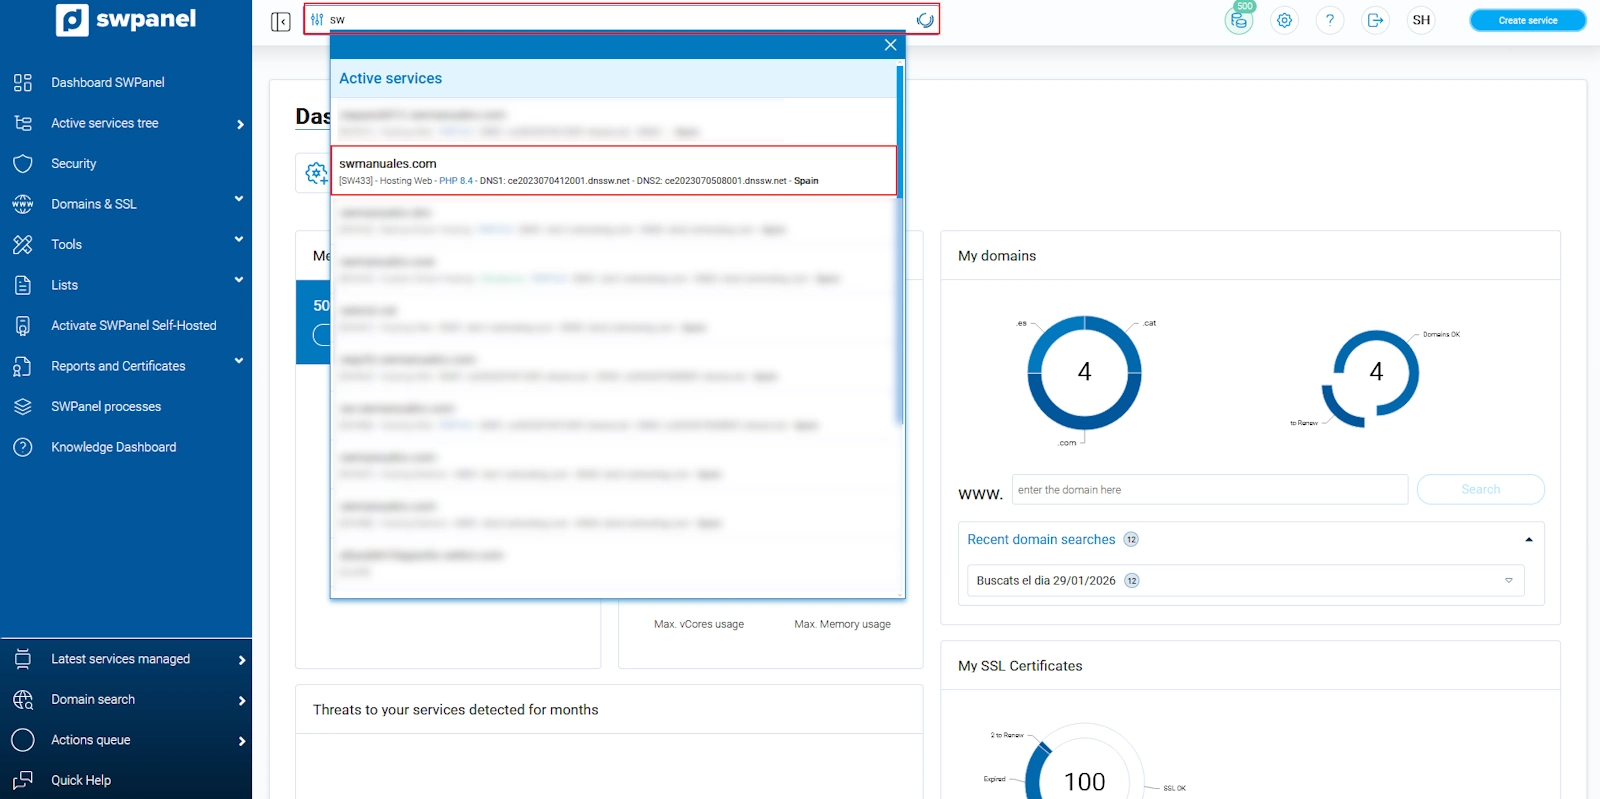
In the search bar at the top of the Panel, we enter the name of the Hosting service in which we want to activate the security protocols. Once it appears, we click on it to access the Dashboard:
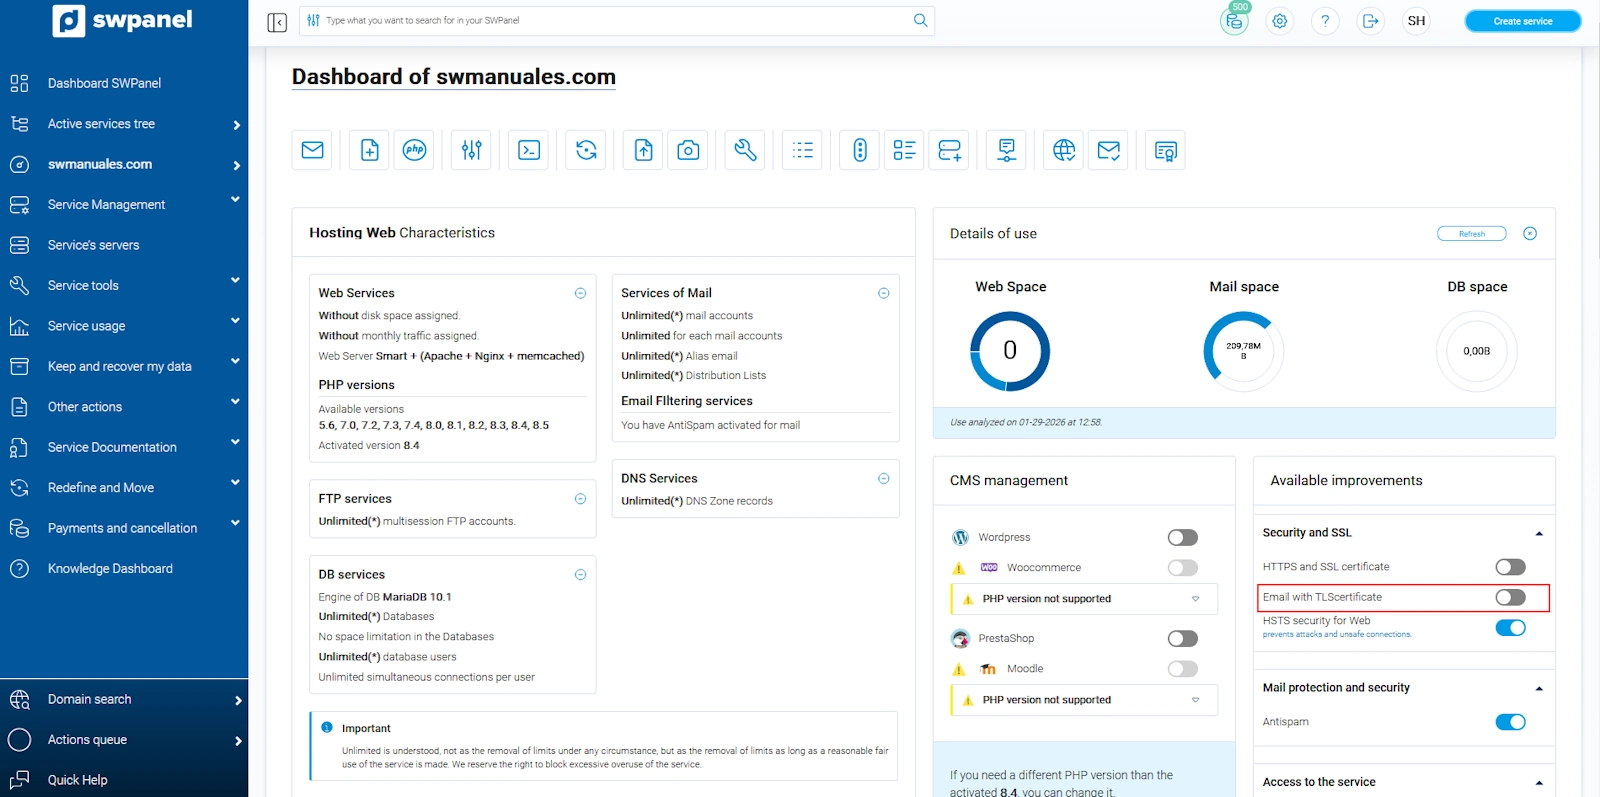
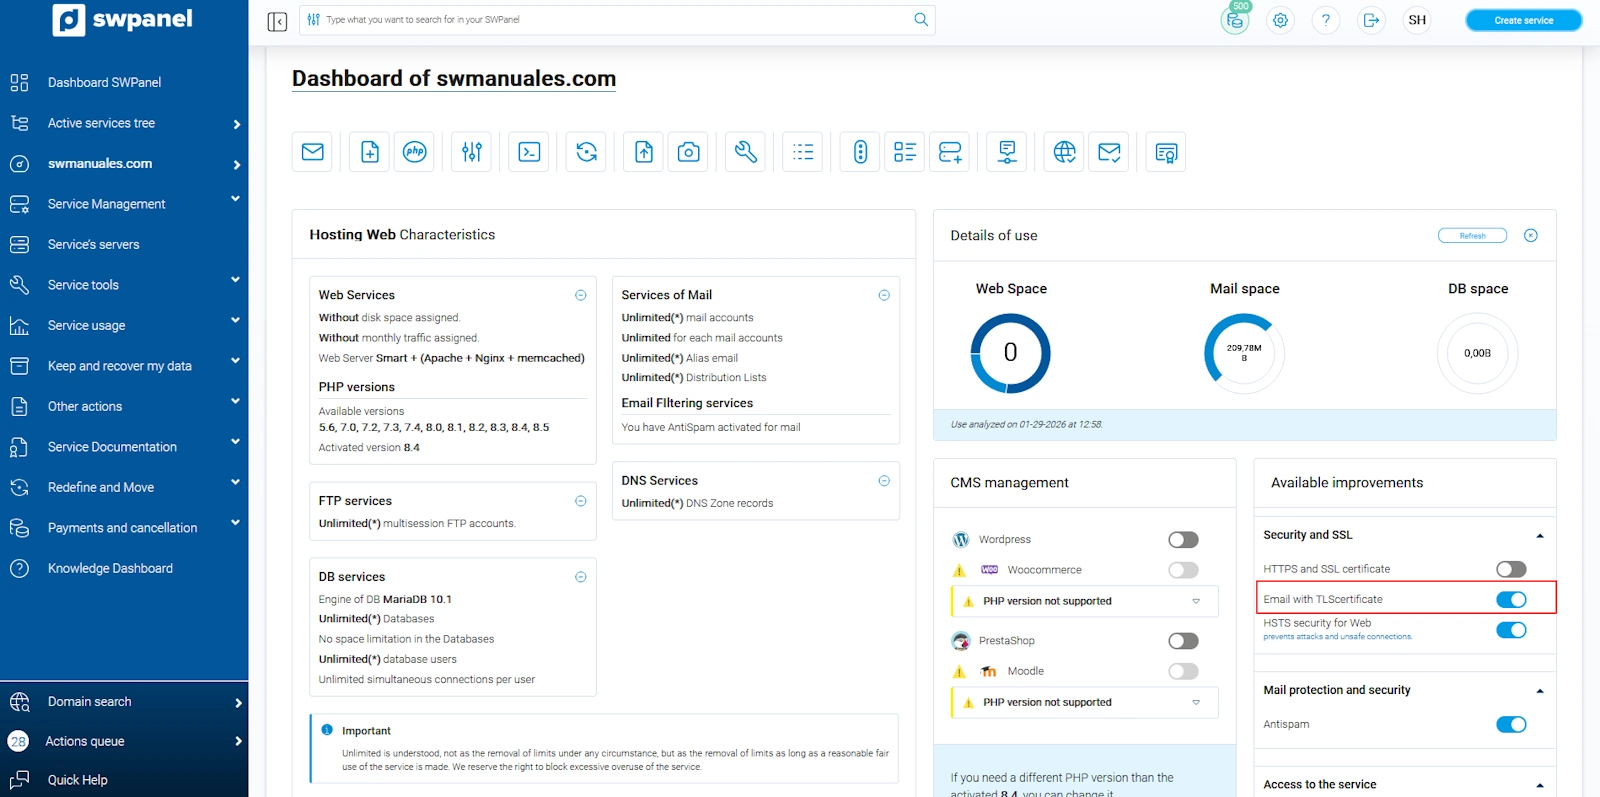
Inside the service Dashboard, click on the right box of 'Available improvements' and click on the button 'Email with TLS certificate'.
The TLS activation window will open. We check that the configuration is correct (Free Let's Encrypt Certificate) and click on 'Create SSL and activate TLS':
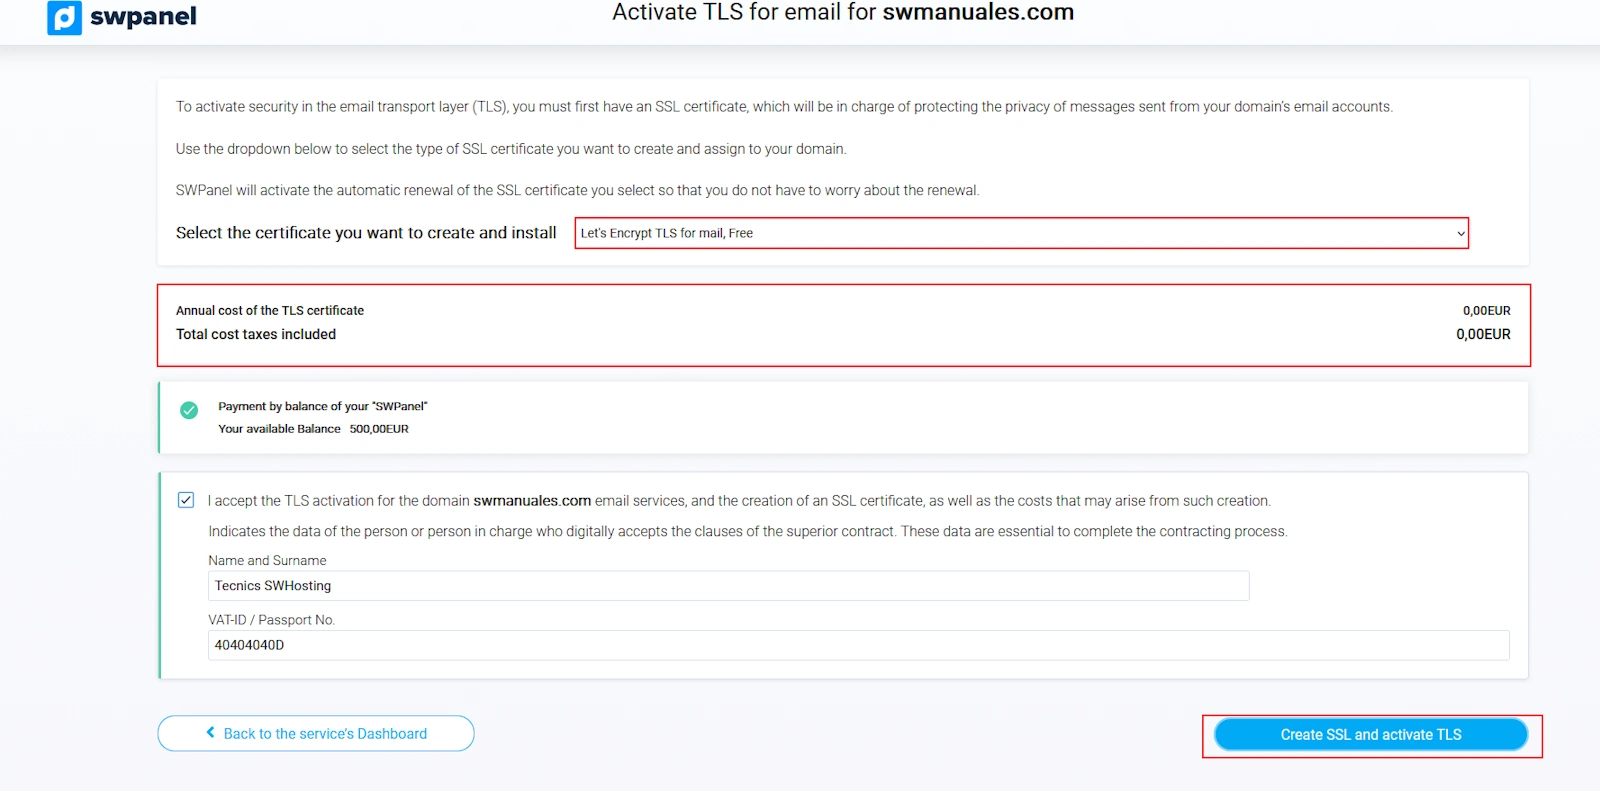
To be able to create the Let's Encrypt SSL certificate, its provider performs a verification of the web service on which it will be installed, and it must match the server defined in the domain's DNS zone. That is, we must keep in mind that the SSL certificate can only be installed if the IP of the assigned Web server and the one defined in the A record of the domain's DNS zone match; the domain must point correctly to our services.
If the parameters do not match, the system will not allow you to create the SSL.
Once the activation has been completed, the button 'Email with TLS certificate' will be blue (loading wheels will be seen while it is being created):
Email accounts
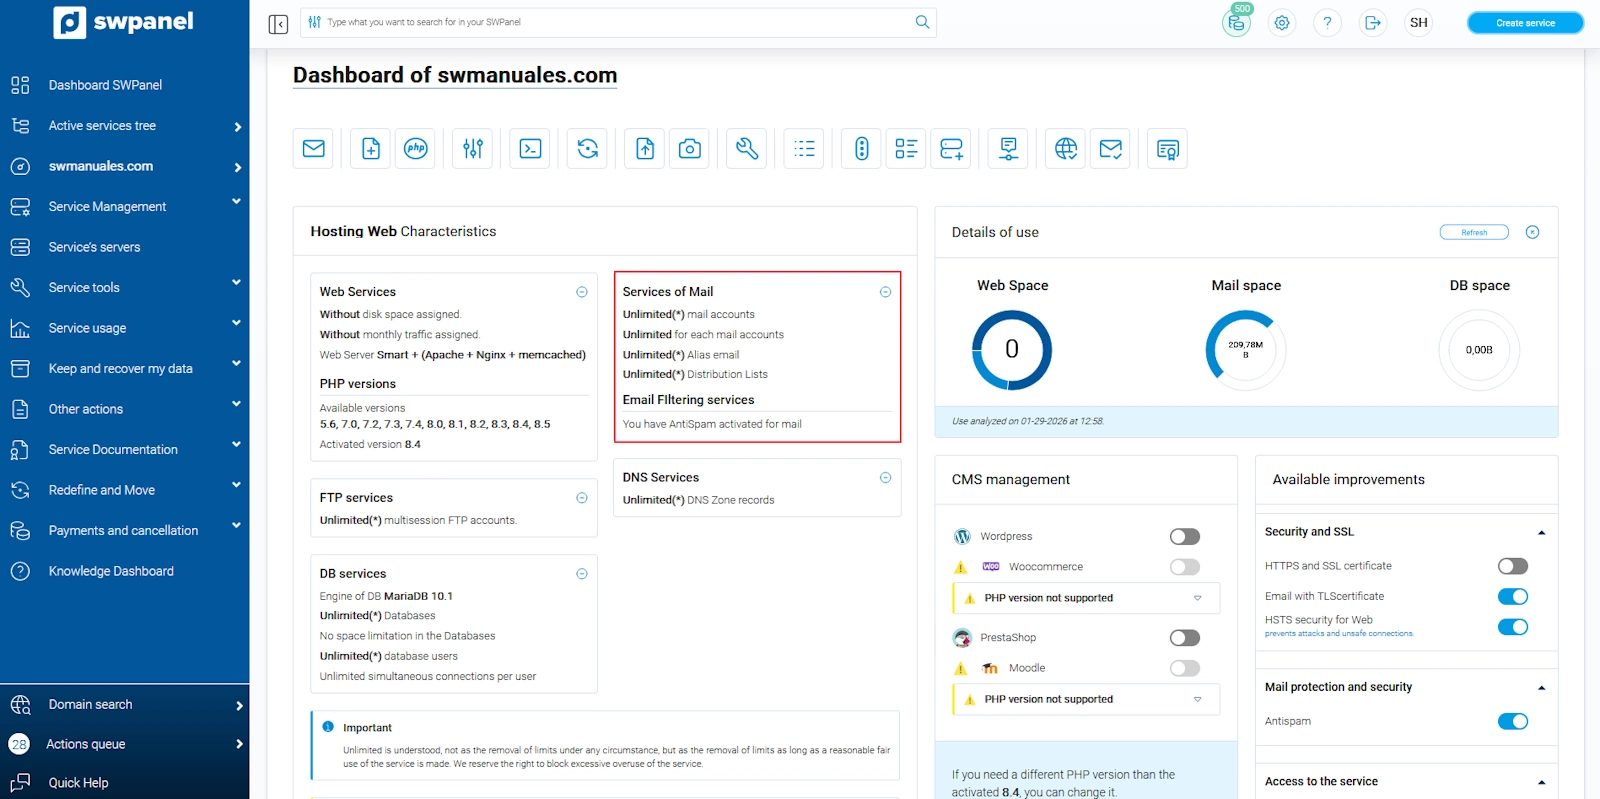
Within a Shared Hosting, you can have the number of email accounts specified at the time of contracting. You can see the number of email accounts that can be created in your service, in its dashboard, in the specifications box.
Create email accounts
To create our first email account, we access the service Dashboard.
In the search bar at the top of the Panel, we enter the name of the Hosting service in which we want to activate the security protocols. Once it appears, we click on it to access the Dashboard:
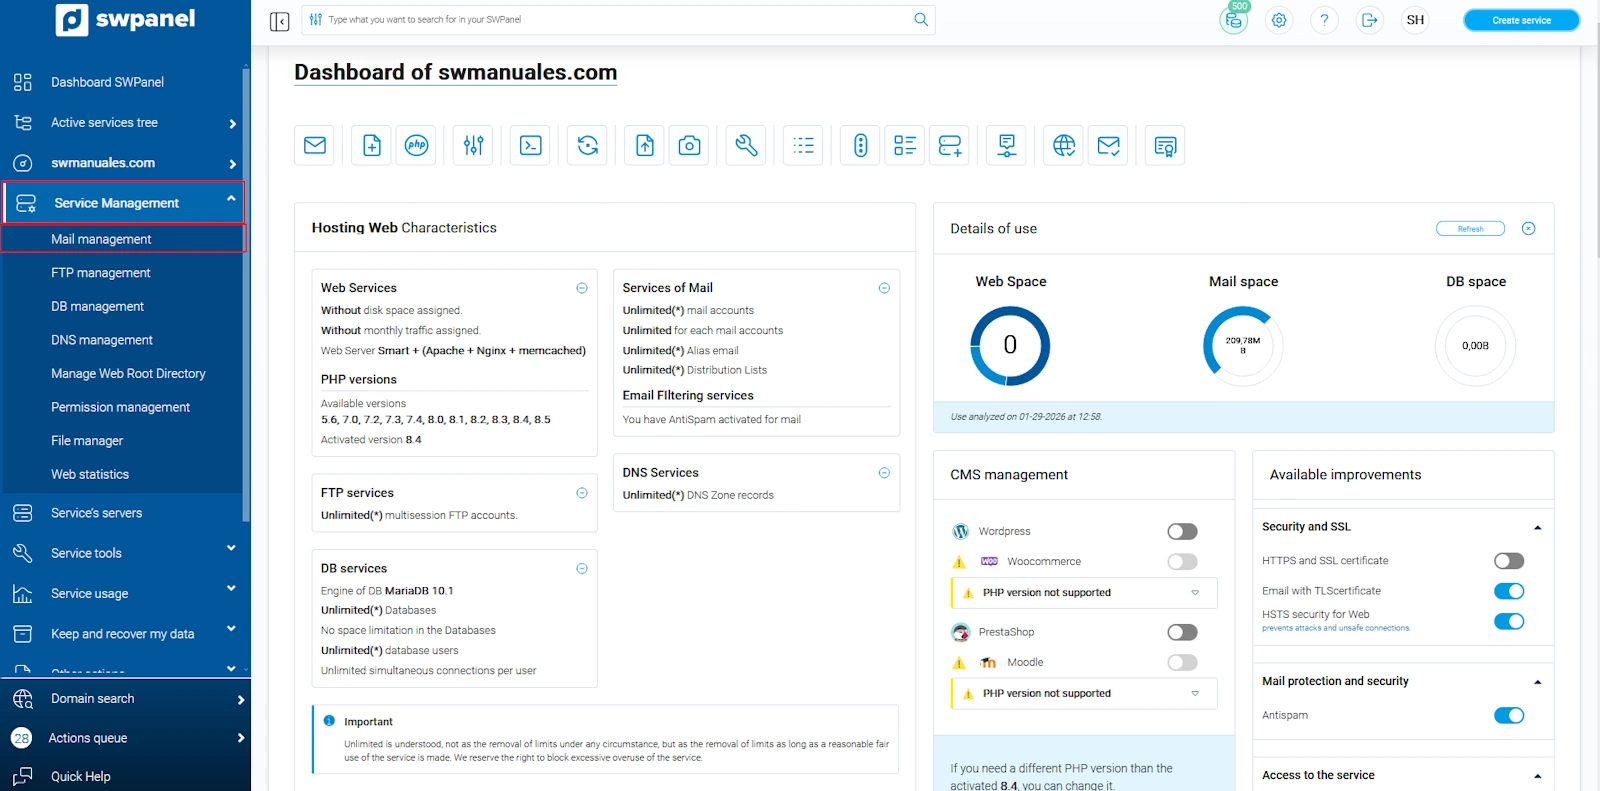
Inside the service Dashboard, in the left side menu, click on 'Service Management' and then click on 'Email Management':
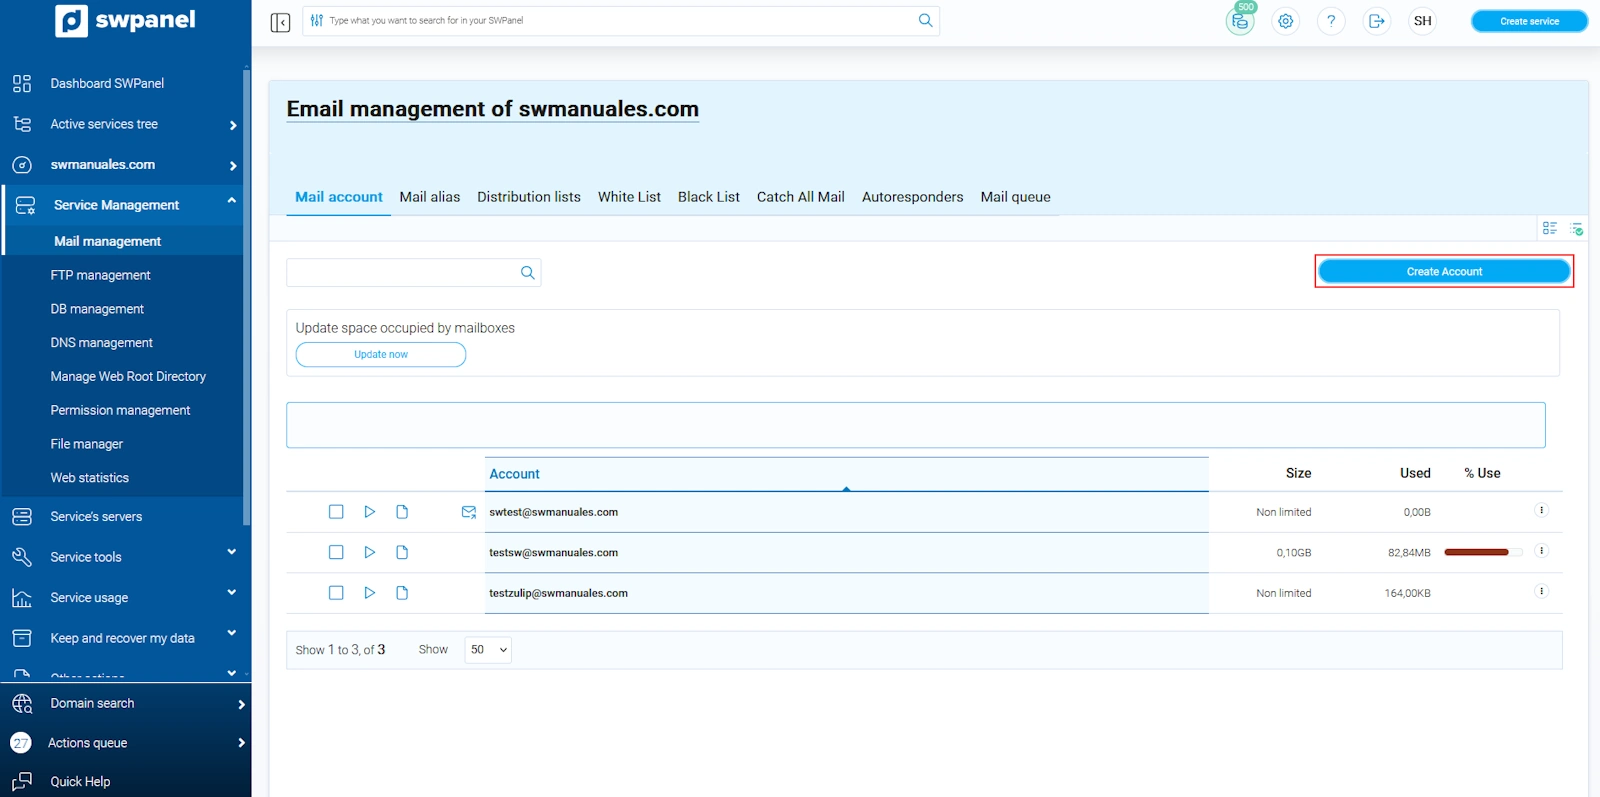
The email screen will open. If no email account has been created, we will see the example image. Within the screen, we click on 'Create your first email account' or on 'Create account':
The wizard for Creating an email account will open (it does not matter which path we take, the wizard will be the same). In the wizard, we can configure two elements: Account Data and Email Forwarding Customization.
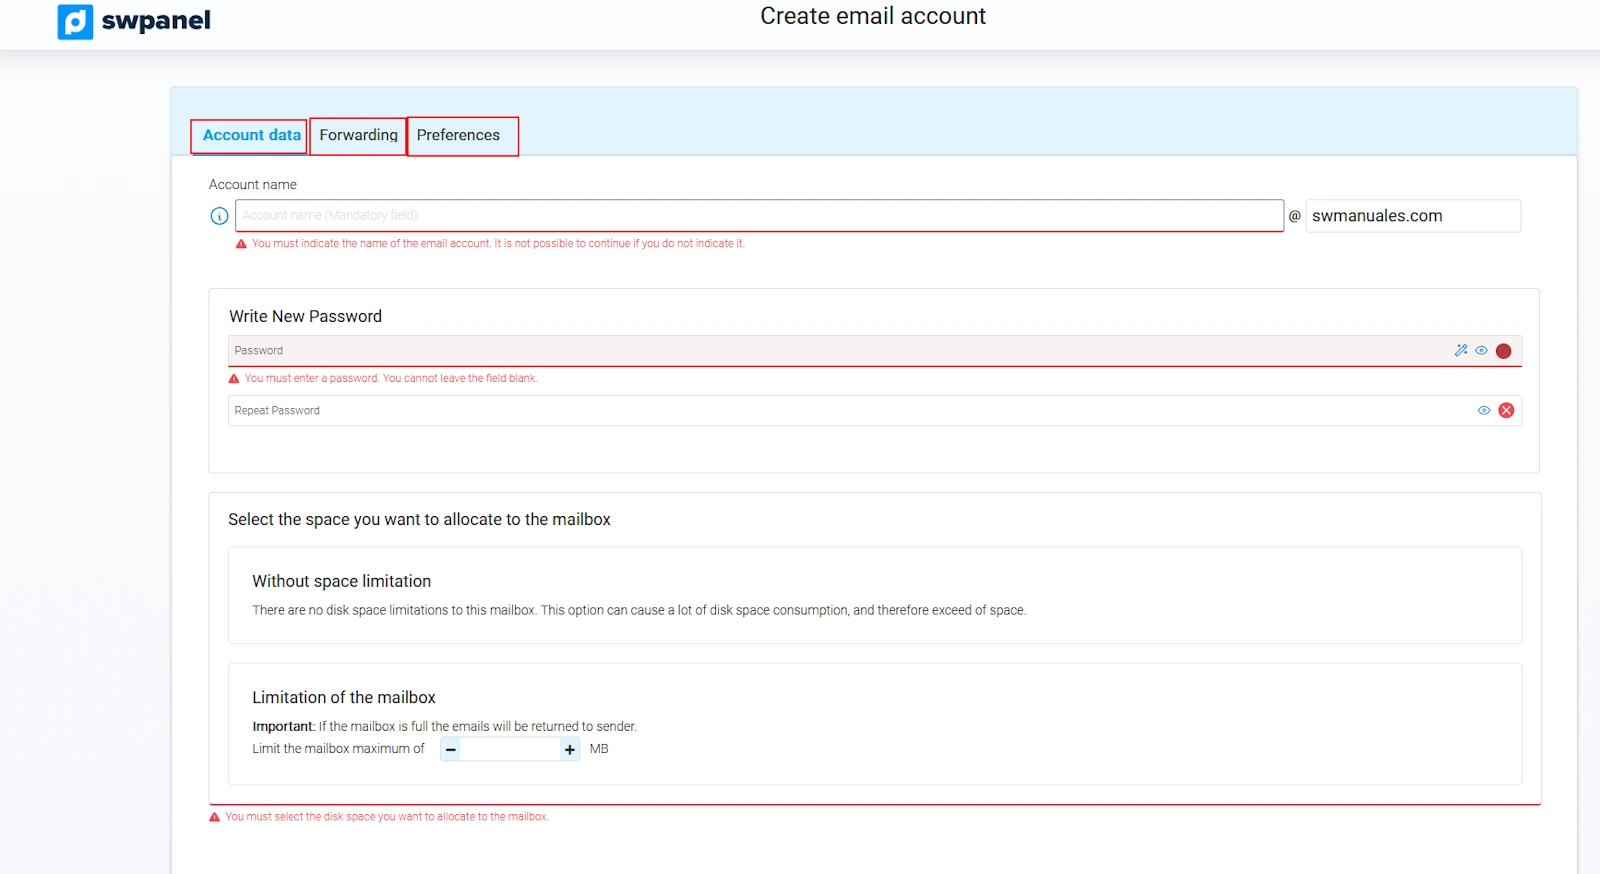
Account Data
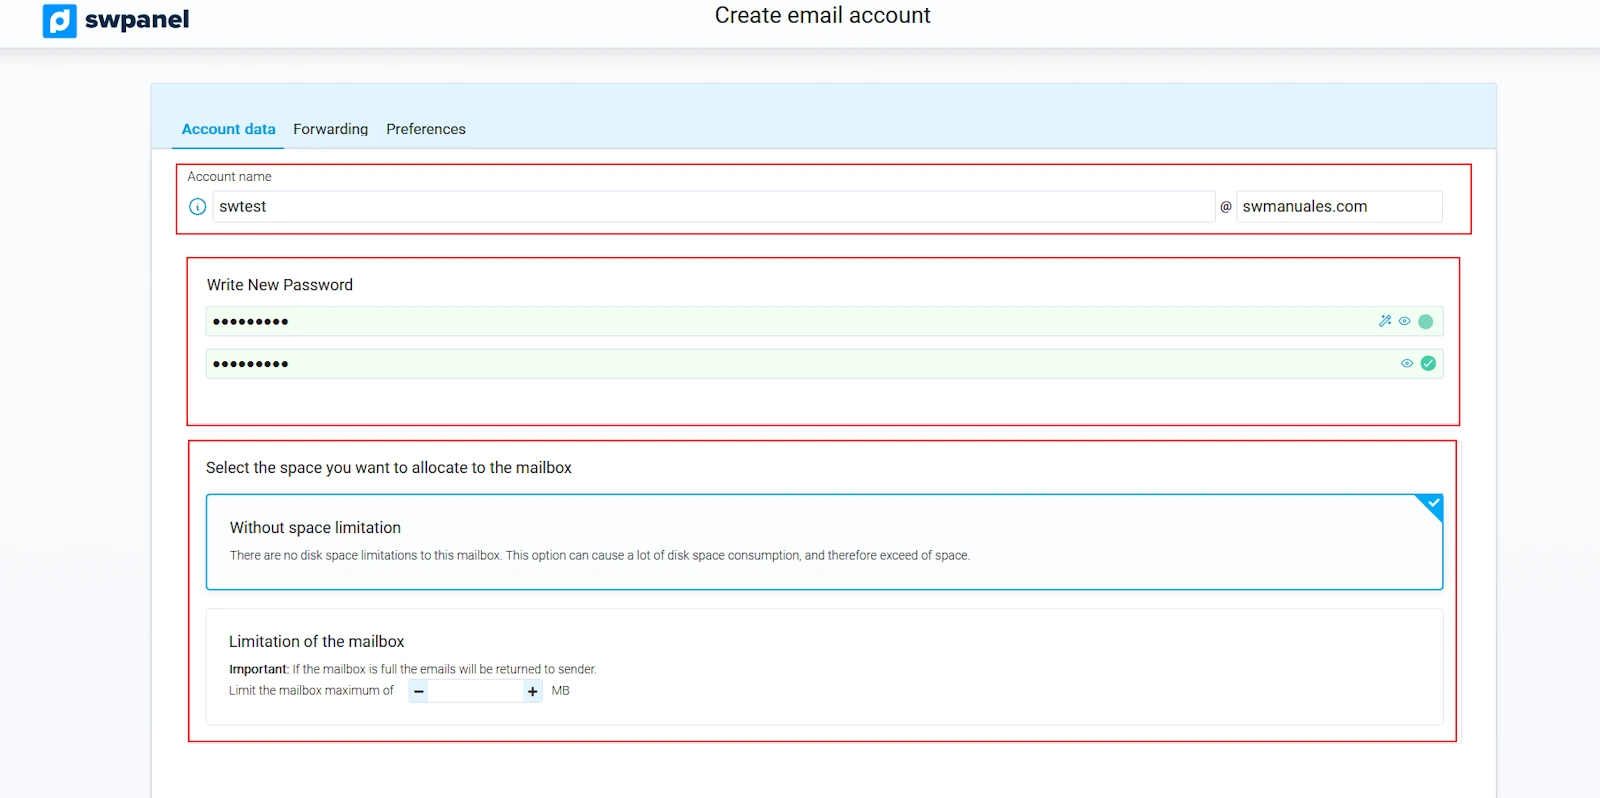
In this tab, we are going to customize:
-
Account Name: we specify what the account will be (for example: [email protected], [email protected], [email protected]).
-
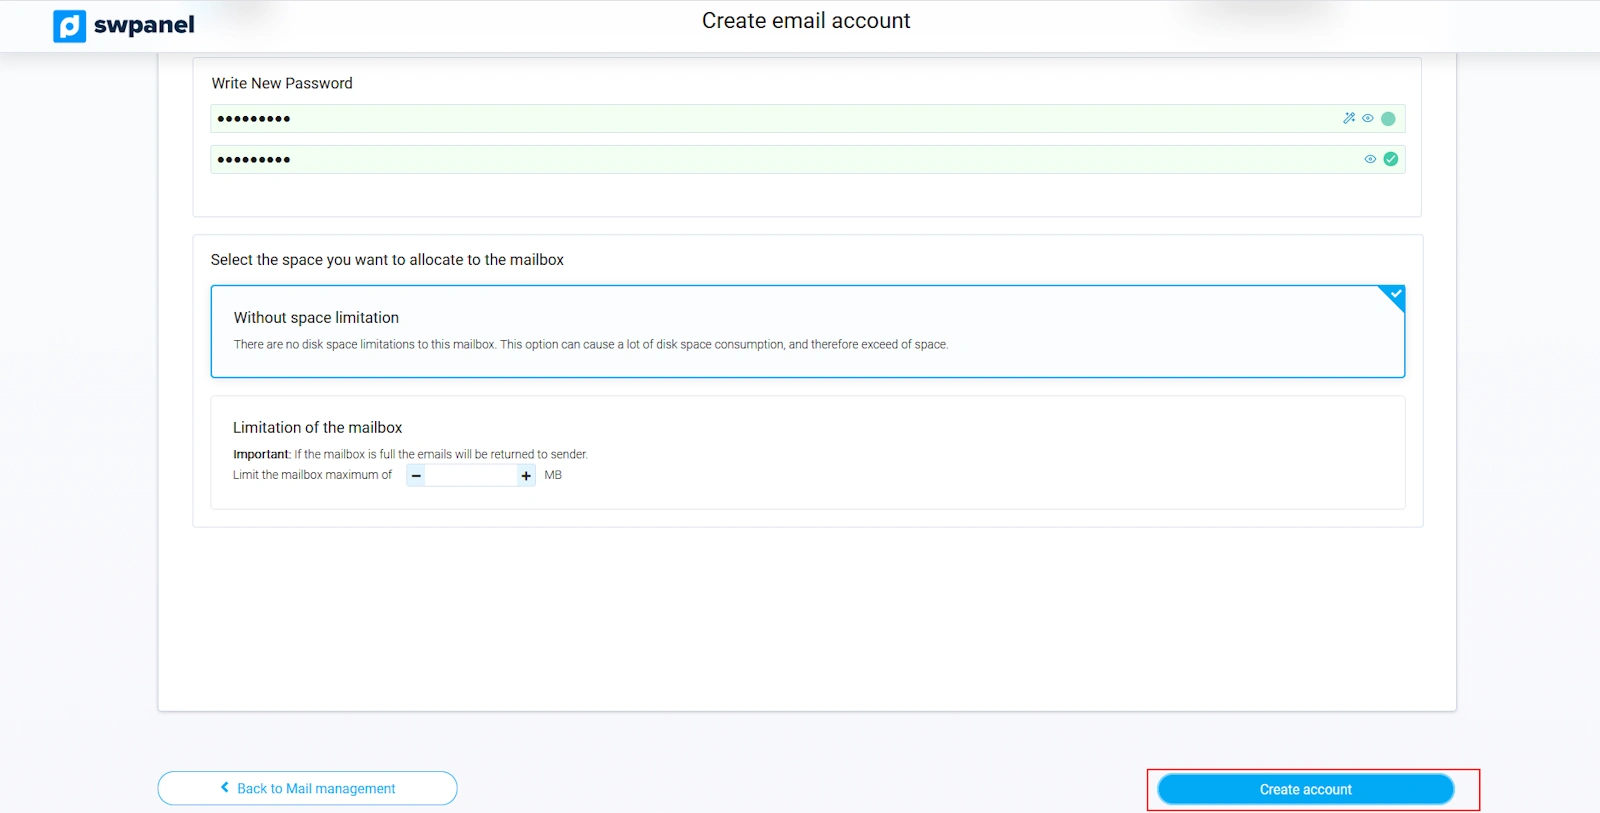
Password: we specify what the access key for the email account will be. In compliance with ISO 27001, LOPD and GDPR regulations, we do not store or provide personal keys, nor do we have access to email account keys, let alone provide them, so it is important to remember this key. In case of losing it, it can be modified later through SWPanel.
-
Mailbox Limit: to limit the mailbox space to the amount we choose within the maximum permitted parameters. If the mailbox space is limited and it becomes full, messages that cannot be delivered due to lack of space will be returned to the sender.
Forwarding
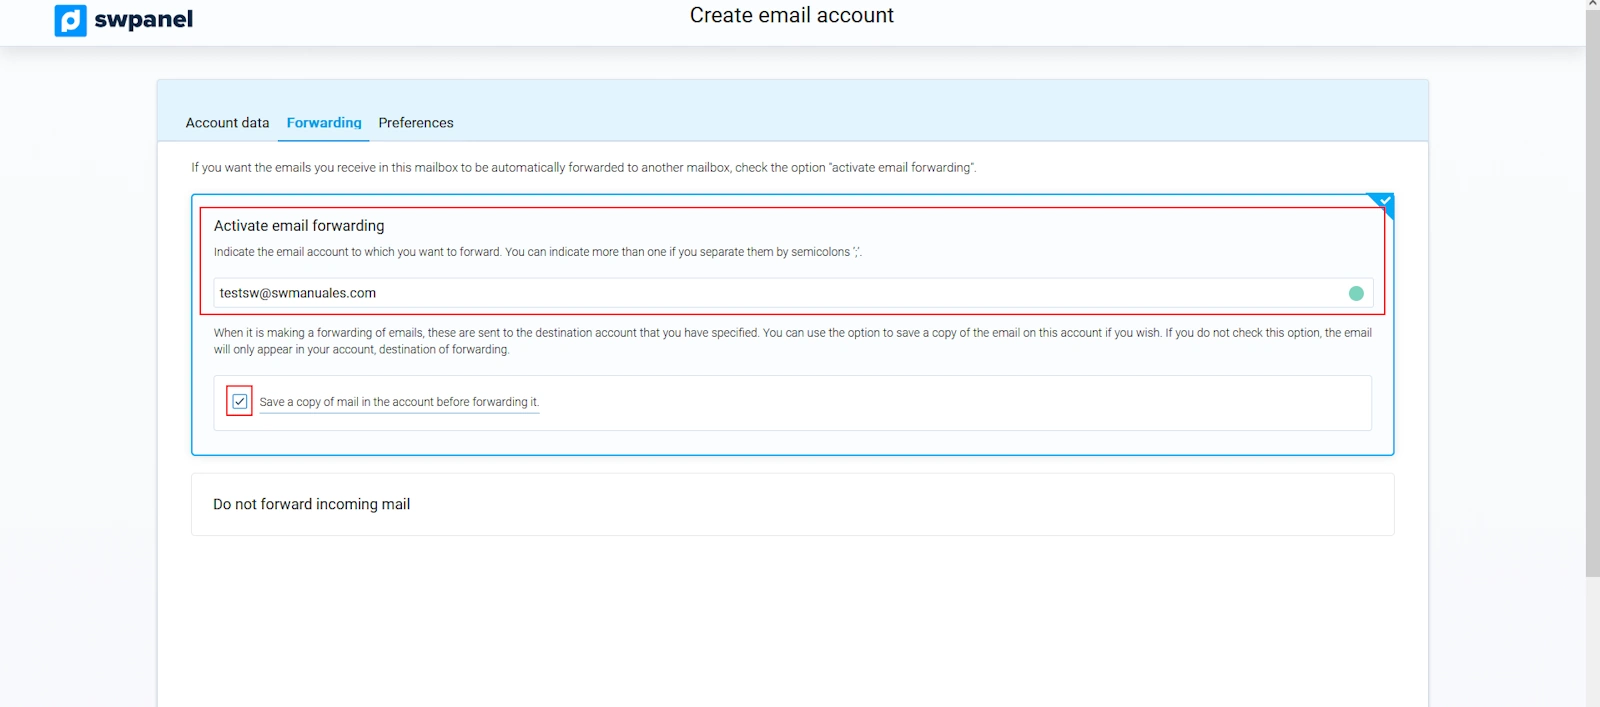
Optional. In this tab, we can specify whether we want the emails we receive in the mailbox we are creating to be forwarded to another account. We can specify several accounts to forward to, separating the different accounts with a semicolon (;).
We can also specify whether we want to Save a copy of the email in the account before forwarding it or not. Important: by checking the box, we select that we do want to save a copy of the email in the account. If it is not checked, the copy will not be saved.
Finally, we click on 'Create account'.
If we create multiple accounts, by default, it will not allow us to repeat any key.
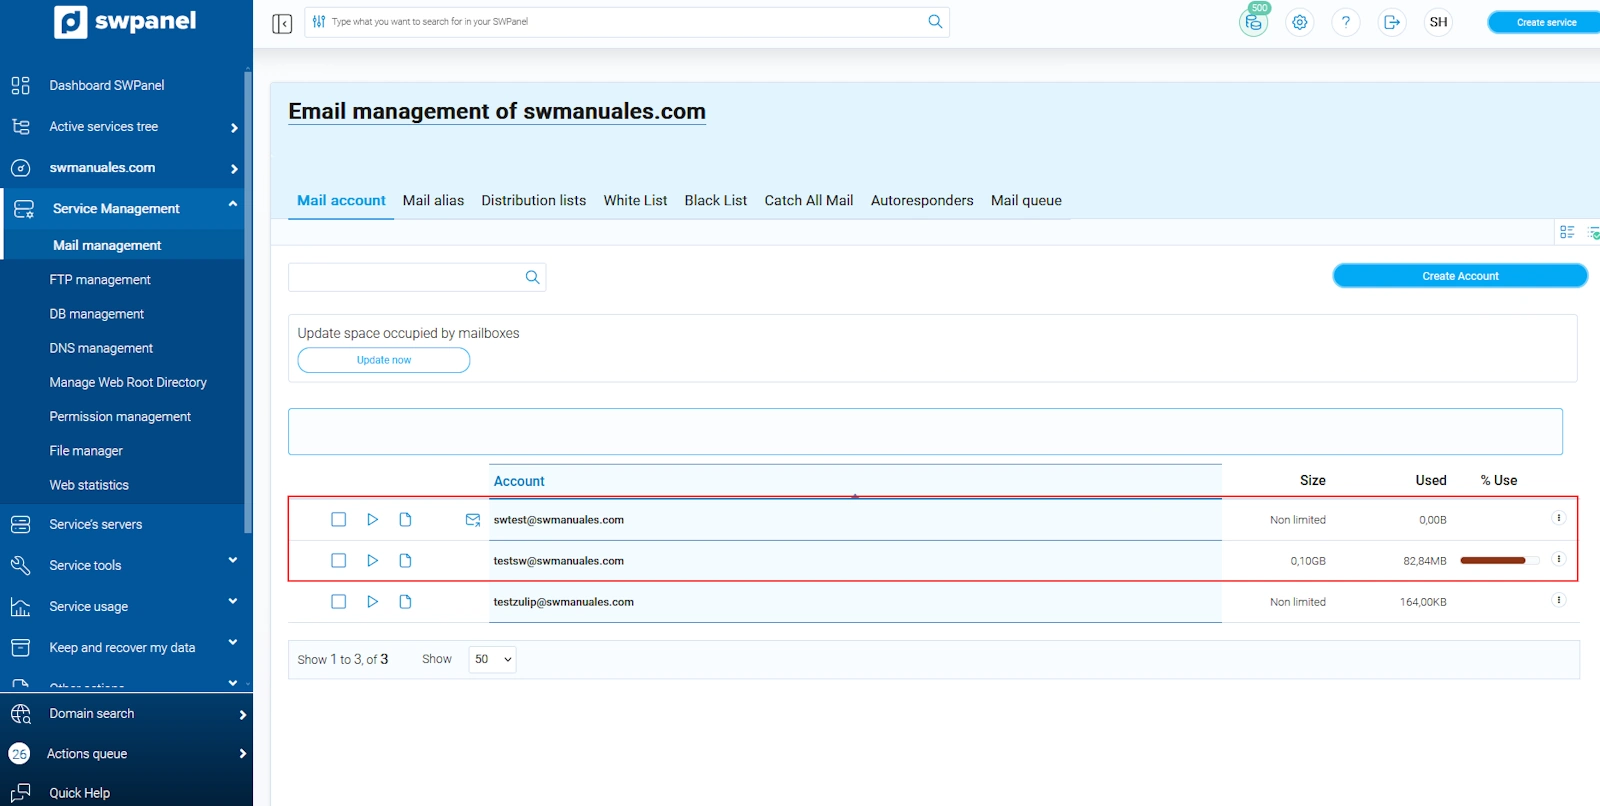
Once created, it will appear on the email management screen, with the characteristics we have configured, so that we can see all our accounts and their status at the same time:
info We must keep in mind that for the installation of WordPress, if it has been installed, we will need an administration email account (for example, [email protected]), therefore if we have a Smart Hosting Free, we will not be able to create more email accounts and will have to use that one.
First steps to configure your email account
To configure the email account we have just created (or any other we already have), we must first see its details.
We must keep in mind that each email client is configured differently, so in this manual you can see how to configure your email account with security and encryption protocols (SSL/TLS) in the following email clients:
-
? Manuale: Configure email accounts from my Hosting in Thunderbird
-
? Manuale: Configure email accounts from my Hosting in Microsoft Mail
-
? Manuale: Configure email accounts from my Hosting in Android Gmail
-
? Manuale: Configure email accounts from my Hosting in Outlook
-
? Manuale: Configure email accounts from my Hosting in Mail OSX
-
? Manuale: Configure email accounts from my Hosting in Apple iOS Mail
How can I see the email account details?
If we want to see the usage, redirections and automatic messages of our accounts, we must go to the email account details.
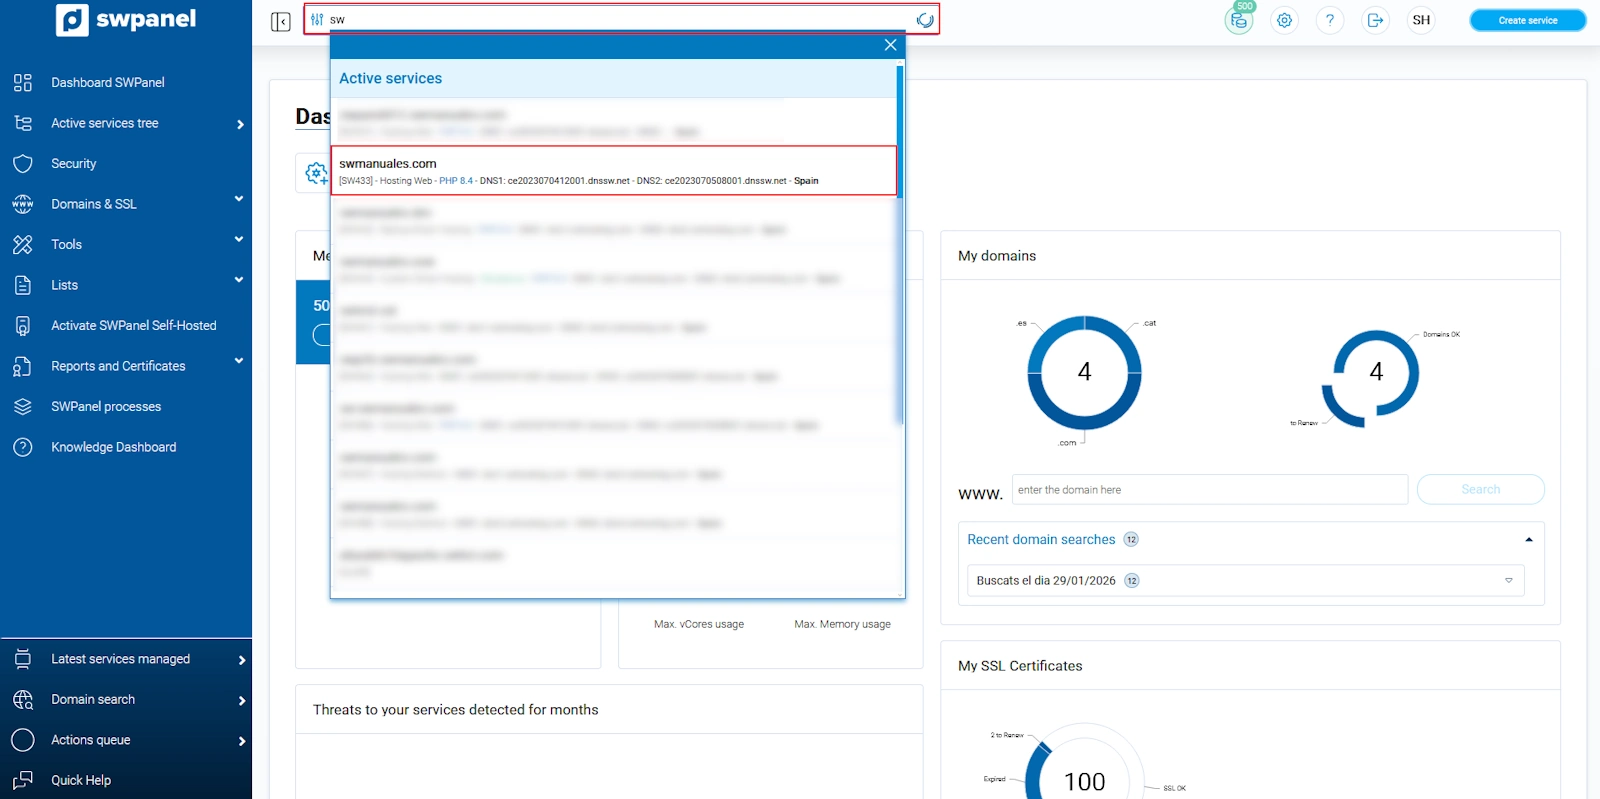
In the search bar at the top of the Panel, we enter the name of the Hosting service in which we want to activate the security protocols. Once it appears, we click on it to access the Dashboard:
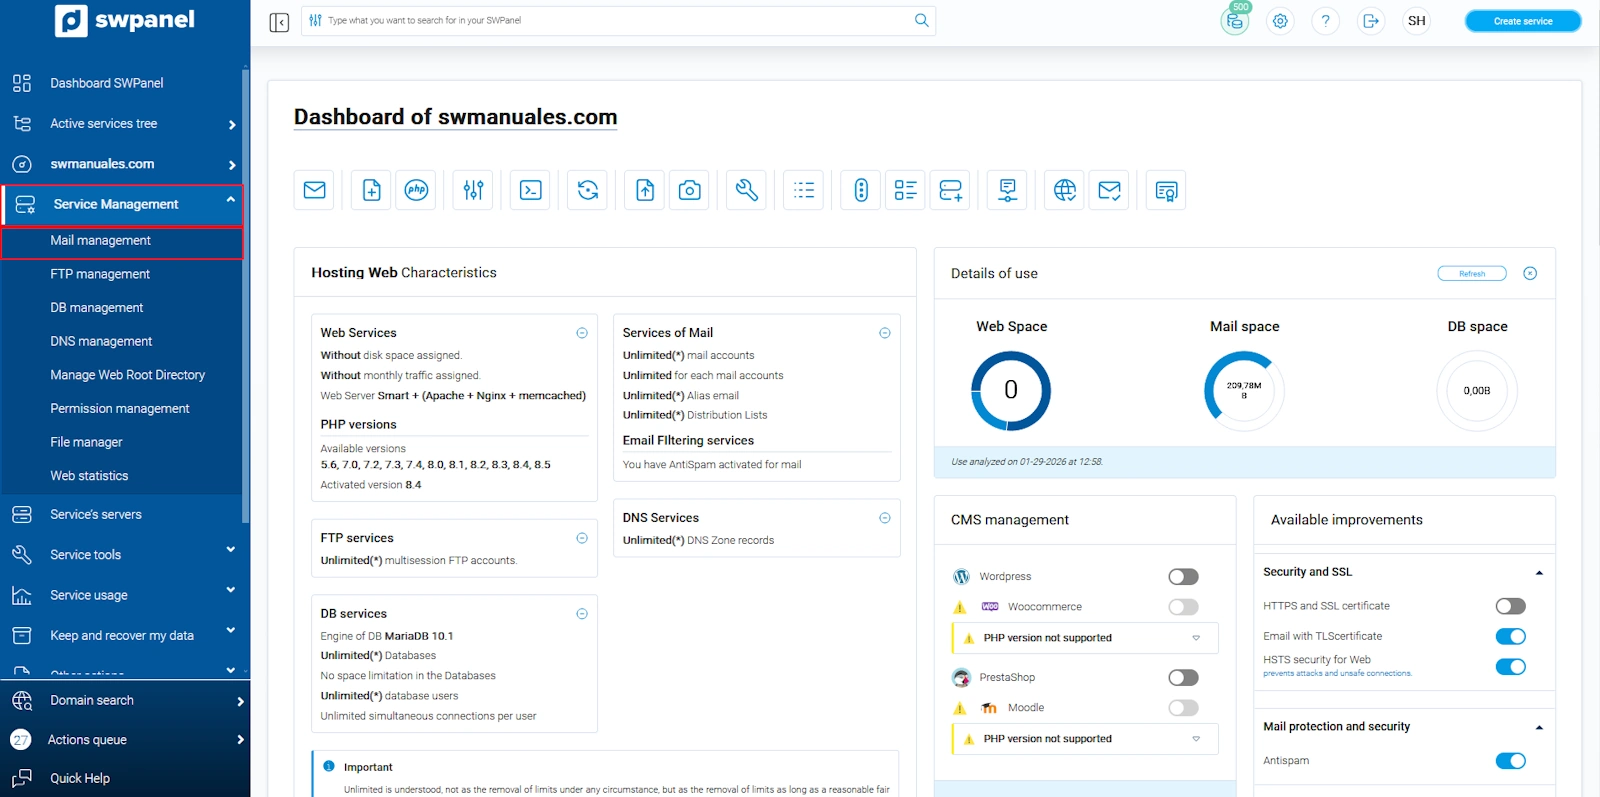
Inside the service Dashboard, in the left side menu, click on 'Service Management' and then click on 'Email Management':
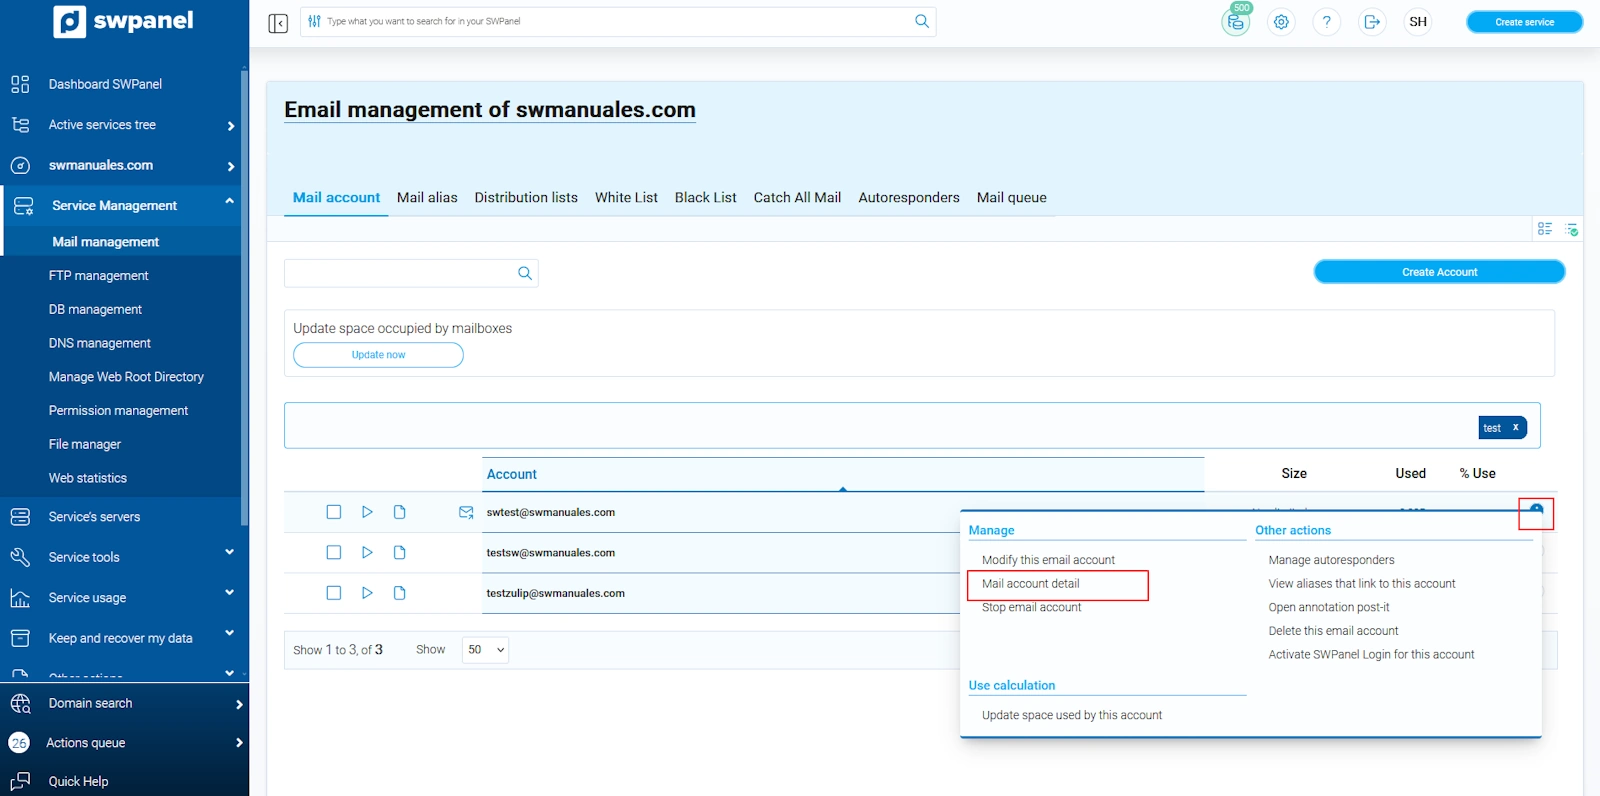
The email screen will open. We look for the email account we want to configure in the email client, open the dropdown to the right of the account [...] and click on 'Email account details':
Inside the email account details, we can see different information. Here we can only see information about the account, but we will not be able to configure anything:
-
Account name: the name of the email account.
-
Space usage information: a graph that informs about the total space assigned to the email account, the space that is occupied and the space that is available.
-
Email forwarding: detail of the email forwarding that the account performs.
-
Automatic reply: information on the automatic reply that the email account generates as soon as it receives a message in its mailbox.
Where do I find the email server for my account configuration?
To be able to configure the email account in any client, we must be clear about what the incoming and outgoing email server is. This data, in many cases, will be configured automatically, but the client might request that we fill in the data manually.
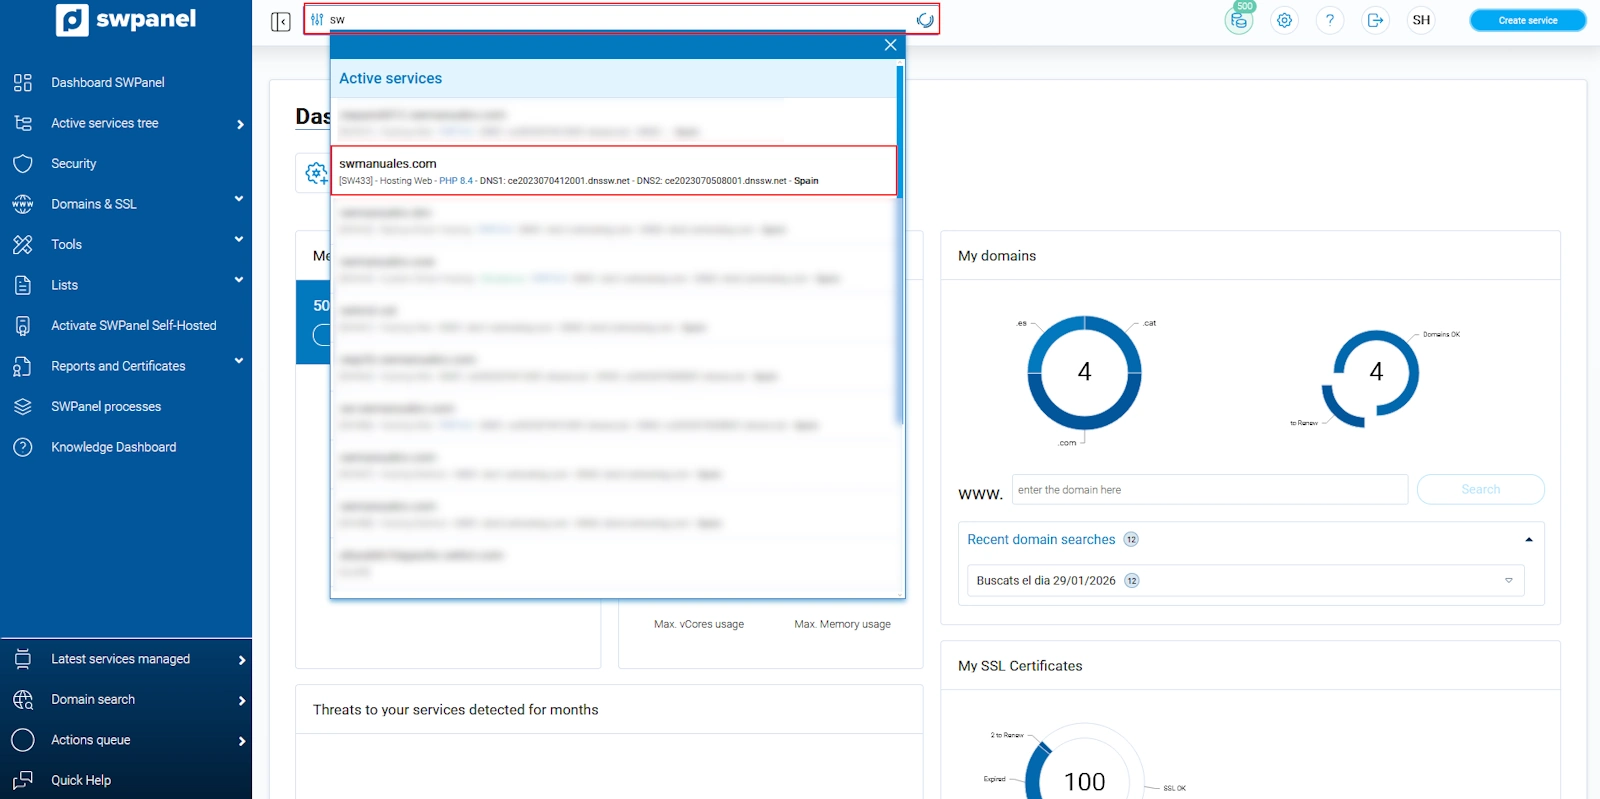
In the search bar at the top of the Panel, we enter the name of the Hosting service in which we want to activate the security protocols. Once it appears, we click on it to access the Dashboard:
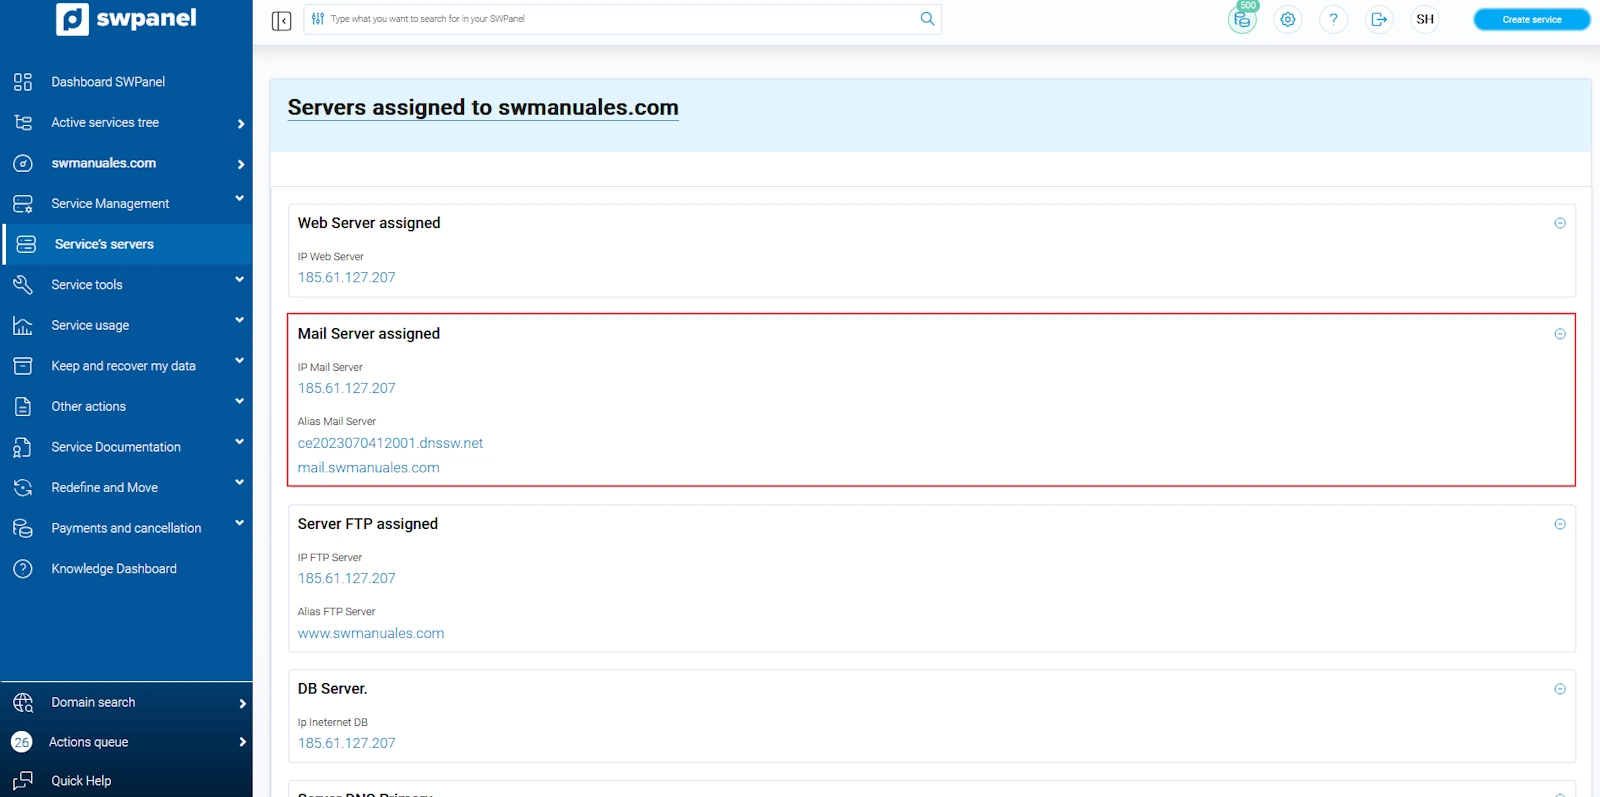
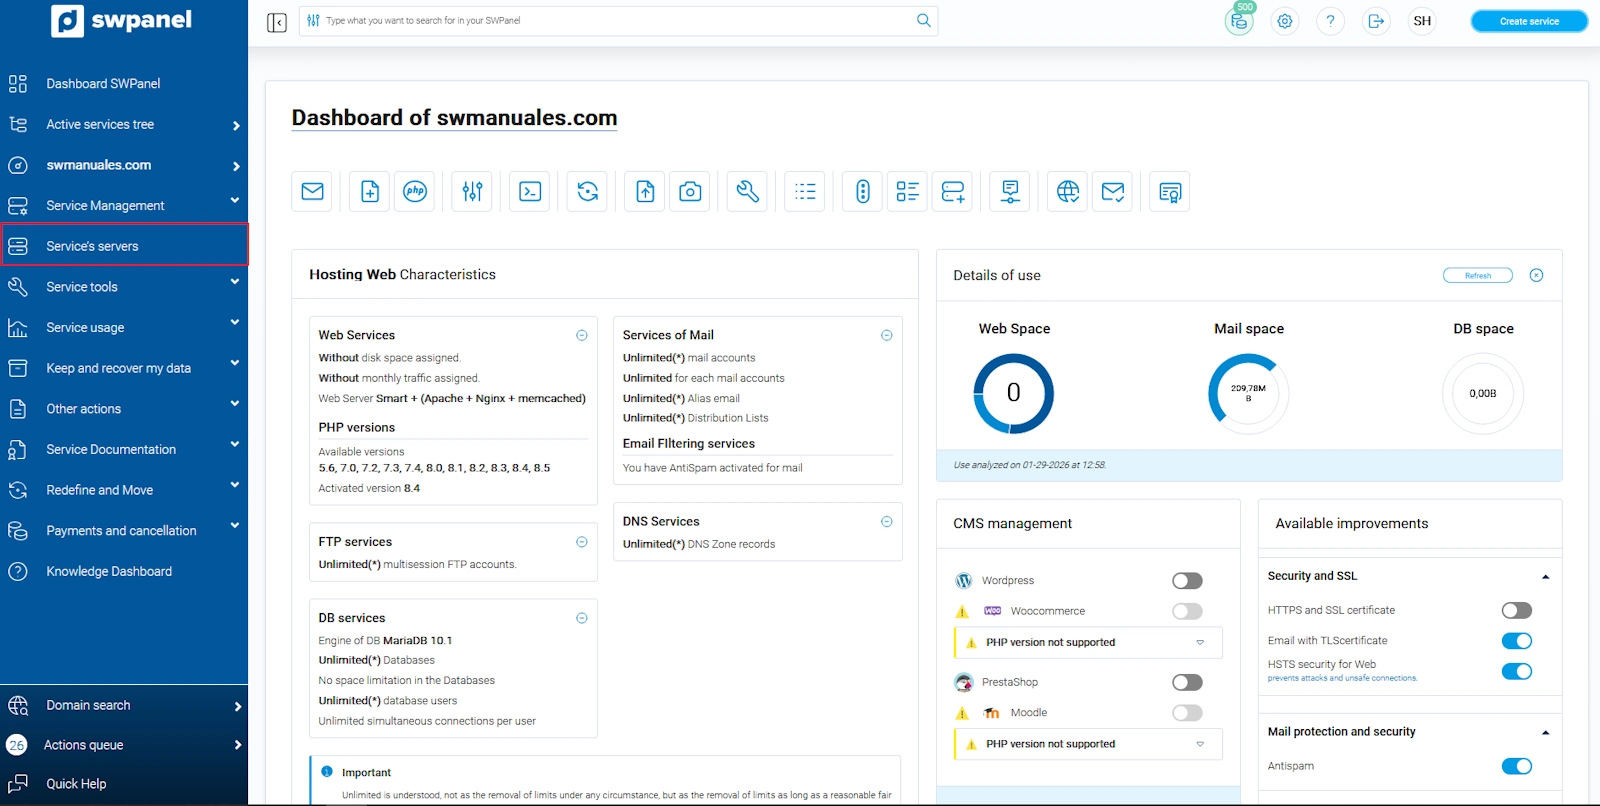
Once inside the service dashboard, in the blue side menu, we click on 'Service Servers':
Once inside, we will see the data corresponding to 'Assigned Email Server':