
Service migration in SW Hosting
A migration consists of a transfer of database content, FTP, and emails from your current server to another server, which may be from the same provider or another one.
Prerequisites
To avoid possible compatibility issues, you must take different points into account:
If your website is developed in PHP or HTML, you will need a LAMP platform (Linux, Apache, MySQL, and PHP). If, on the other hand, it is in ASP/.NET, you will need a Windows environment.
The language versions must match to avoid functionality problems or errors on the website. In any case, you must ensure they are compatible.
Before starting the migration, you must contract the Cloud server or Hosting that meets the necessary requirements for your website's operation, with sufficient resources and the necessary disk space to perform the migration. You can find more information on our website regarding the services we offer at www.swhosting.com.
Below, we will explain one by one all the necessary steps to complete the migration:
Step 1 : Gather all necessary data
You will need to collect from your current provider the access data for different functions:
1. FTP account data:
You can easily obtain the FTP data from your SWPanel, as explained in the FTP account management manual ? Manual: ##título##. If you cannot find them, you can always create a new additional FTP account.
You would also be interested in knowing the public folder of the service, normally it is www/htdocs/ or web/ . If you cannot find it, you can view it through our SWPanel.
2. Database data (DB):
To continue, you need the server, the DB name, username, and access password. Normally, access to phpMyAdmin is also provided to facilitate management.
3. POP or IMAP access data for your email:
You can find this data in the email section, as explained in manual ? Manual: ##título##, or you can request it from your current provider or through our Free Support.
The email server name usually has a nomenclature similar to 'pop3.yourdomain.com' or 'imap.yourdomain.com' depending on the protocol you are using. The username is usually the email account itself, for example, it could be '[email protected]'. On the other hand, if you do not remember the password, you can always generate a new one.
Step 2 : Download your website via FTP
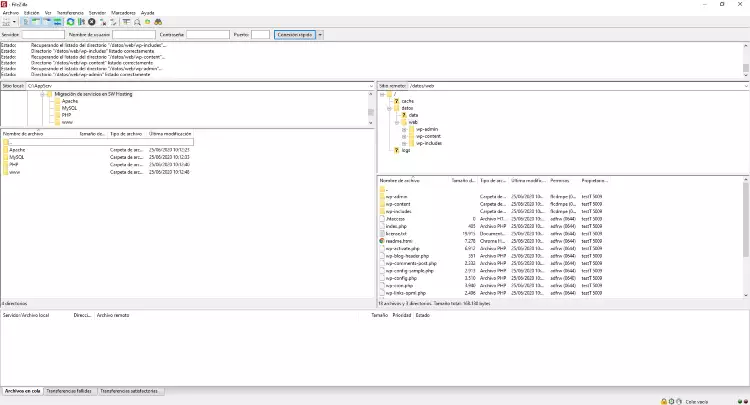
In this step, you must connect to your server using an FTP client such as FileZilla, indicating the server name, user, and password, as explained in the FTP account management manual ? Manual: ##título##. Once you have access, download all files and directories to your computer; this is normally accompanied by a logs folder.
Step 3 : Export your MySQL databases
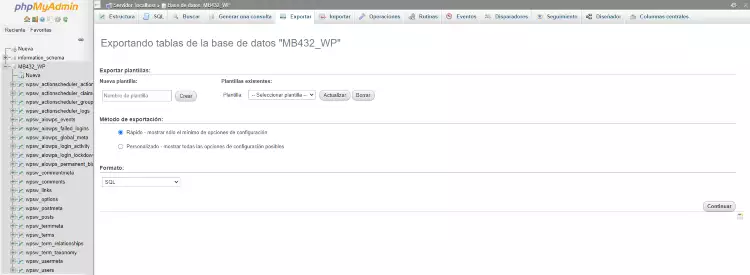
Access the database server. Use the phpMyAdmin address and indicate the server name, user, and password. Select the database you want to export and download into a SQL file (.sql) to then upload it to the new server.
Step 4 : Download your emails
Make sure that all your emails are downloaded using the POP3 protocol with an email client such as Outlook, Thunderbird, or Mail. This way, you will have a copy of all your emails received to date.
Step 5 : Activate the new services
In this step, you must register the new services in your SWPanel. This includes creating the FTP account, the new database, and the creation of all email accounts.
You can search our manuals or contact our Support team for any questions regarding FTP account configuration, creation of emails or databases, and their associated users. ? Manual: ##título##
Step 6 : Upload the website and the DB to the new server
1:
Connect with the new FTP account and upload the files and directories of your website that you had previously downloaded.
2:
Access phpMyAdmin and import the database .sql file. You may need to modify the configuration file on your website with the new connection data.
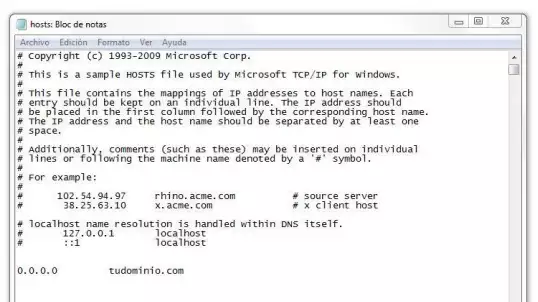
To verify its correct operation, you can modify your computer's host file so that it points to the new server IP. In Windows, you can find it in a line following the format, with the new server IP and the domain. This way you can ensure that everything is working correctly.
Step 7 : Review and implementation
If the website's operation is as expected, you only need to modify your domain's DNS to the DNS provided to you by SWHosting.
DNS propagation can take between 24/48 hours. During the process, email will work with the previous data until the DNS propagation is effective. At this point, emails will be received in the new created account, and you must modify your email client with the new data.