How to install SWPanel on your Server - SWPanel Self-Hosted
SWPanel is a control panel designed for managing web hosting servers. It is distributed under a proprietary licence and is specially optimised for Debian Linux servers.
This panel offers an intuitive and dynamic web interface, allowing you to centrally manage:
- Websites and content management systems (CMS)
- Email accounts
- Databases
- MariaDB
- FTP access
- DNS records
The interface is accessible from the web at https://go.swpanel.com and is available in SaaS mode.
Administration in SWPanel is organised through different levels of access and privileges, each with specific permissions that are configured through customised access profiles, adapted to the functions of each user. The main levels are:
- Administrator: Full control of the panel and services.
- User: Limited access according to assigned permissions.
- Up to 10 levels of depth and nesting: Allows you to structure complex hierarchies of users and roles.
- RHA Client: Access to specific contracted services.
- Access by service: Allows you to assign permissions to specific resources, such as:
- Hosting plans
- Servers
- Other contracted services
- Email user: Exclusive management of your mailbox and email settings.
- VPN user: Limited access to private network features.
Main Features of SWPanel
-
Centralised management: Allows you to manage all server resources from a single simplified panel, optimising time and efficiency.
-
Automation: Facilitates recurring tasks, such as installing content management systems (WordPress, Joomla), managing SSL certificates, and creating email accounts.
-
Monitoring and alerts: Provides real-time monitoring of service security, availability, and performance, with automatic notifications in the event of any incident.
-
Advanced security: Includes own firewall, protection against DDoS attacks, efficient backup management and advanced access controls to ensure data protection.
-
Multi-user and reseller support: Ideal for agencies, developers and hosting providers that require multiple access levels and differentiated user management.
-
Detailed reporting and statistics: Generates comprehensive reports on performance, resource usage, traffic and consumption, facilitating more informed decision-making.
After learning what SWPanel is and its potential, the next step is to install a working version on your server. This manual will guide you step by step so that you can complete the installation safely and efficiently.
There are two main methods for installing the Self-Hosted version of SWPanel:
-
Manual installation from the server console This method is recommended for advanced users or experienced system administrators, as it requires executing commands directly from the server terminal.
-
Assisted or automatic installation from the web Available at https://go.swpanel.com, this option is the easiest and most convenient. All you need is:
- The IP address of your server
- The password for the “root” user
When you enter this information on the installation page, the process will be carried out automatically, without the need to execute commands manually.
Below, we will detail step by step how to install SWPanel on your server, using both available methods.
SWPanel Manual Installation
Step 1: Prepare the System
The system update and SWPanel installation must be performed with the root user.
Note on commands:
- Commands beginning with
$must be executed as a user without privileges.- Commands beginning with
#must be executed as the root user.
Para acceder como root desde un usuario sin privilegios, ejecuta:
$ sudo su -
⚠️ Important: This command grants access to the root user and loads their entire environment, which is necessary for installing SWPanel.
Before linking the licence and proceeding with the installation, ensure that you meet the following prerequisites and checks:
-
Active server and Internet connection: Run the following command to check connectivity:
$ ping -c 4 google.comIf you receive a response, the server is active and connected to the Internet.
-
Port 3203 available: Before installing SWPanel, port 3203 will appear closed, as the service is not yet running. The important thing is that the port is free so that SWPanel can use it.
To verify this, run:
# ss -tulnp | grep 3203
- If nothing appears, the port is free and ready for use.
- If any services appear, identify their PID and stop the process before continuing:
# kill PID_DEL_PROCESO
-
Network with NAT (if applicable): If the server is behind NAT, ensure that port 3203 is forwarded to the server.
-
Firewall and security: No security system should block requests from SWPanel; the IP addresses making these requests are 81.25.112.X.
Step 2: Install SWPanel
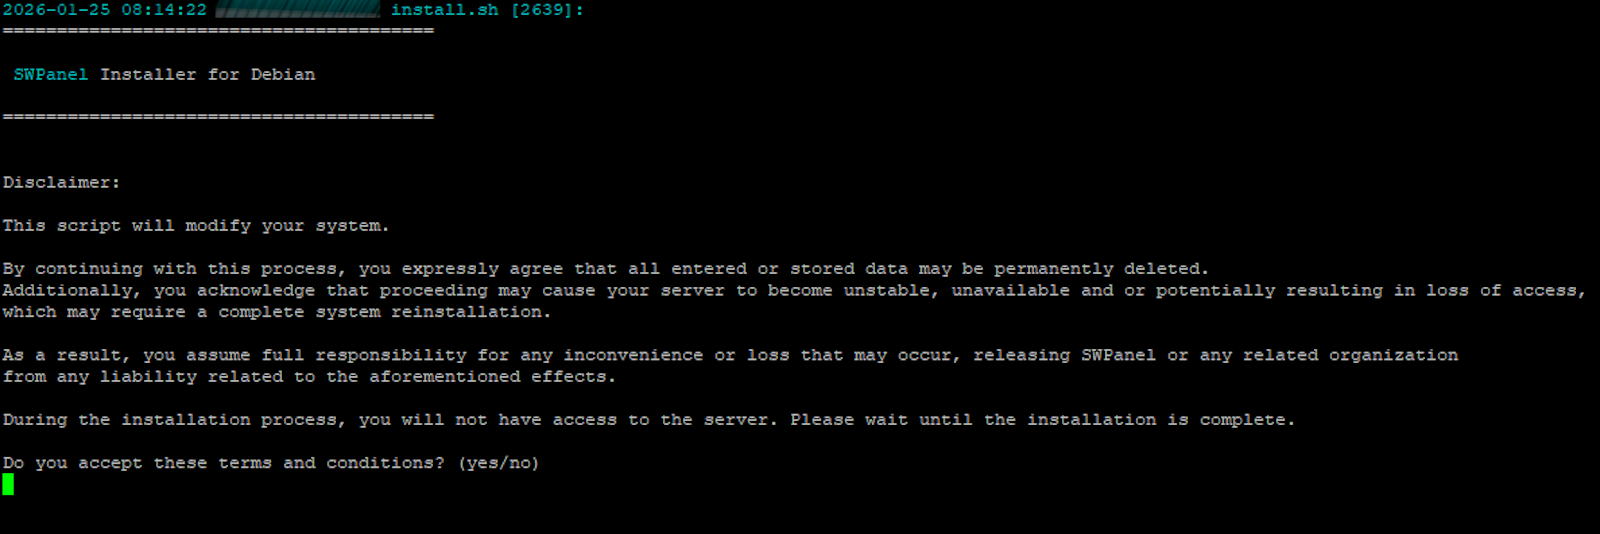
To install SWPanel, access the command line of your Linux server and run the following command to download and execute the installation script:
# wget -qO - https://deployment.swpanel.com/install.sh | bash
When you run the script, a warning will appear on the screen. You must type yes and press Enter to continue.
⚠️ If you do not type
yes, the process will be cancelled and no changes will be made to your server.
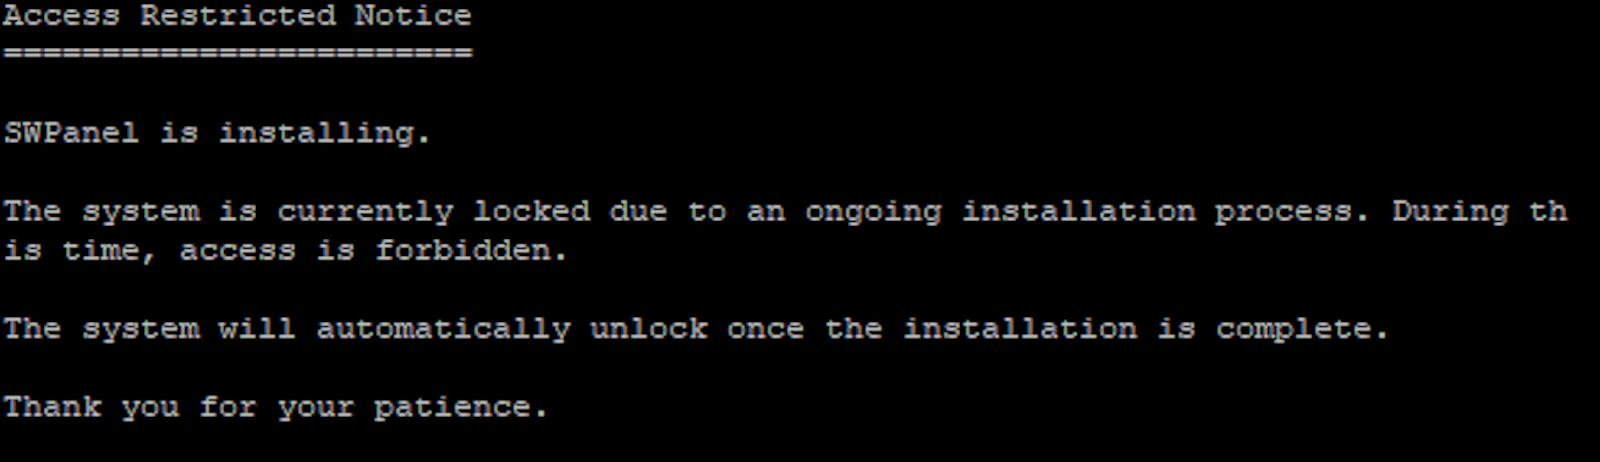
After confirming, the system will temporarily end your session and block access to the server to allow SWPanel to be installed. Once the process is complete, the system will automatically unlock itself.
⚠️ During installation, if you attempt to access the server, you will receive a message indicating that the process is in progress. After a 10-second countdown, you will be able to view the installation logs.
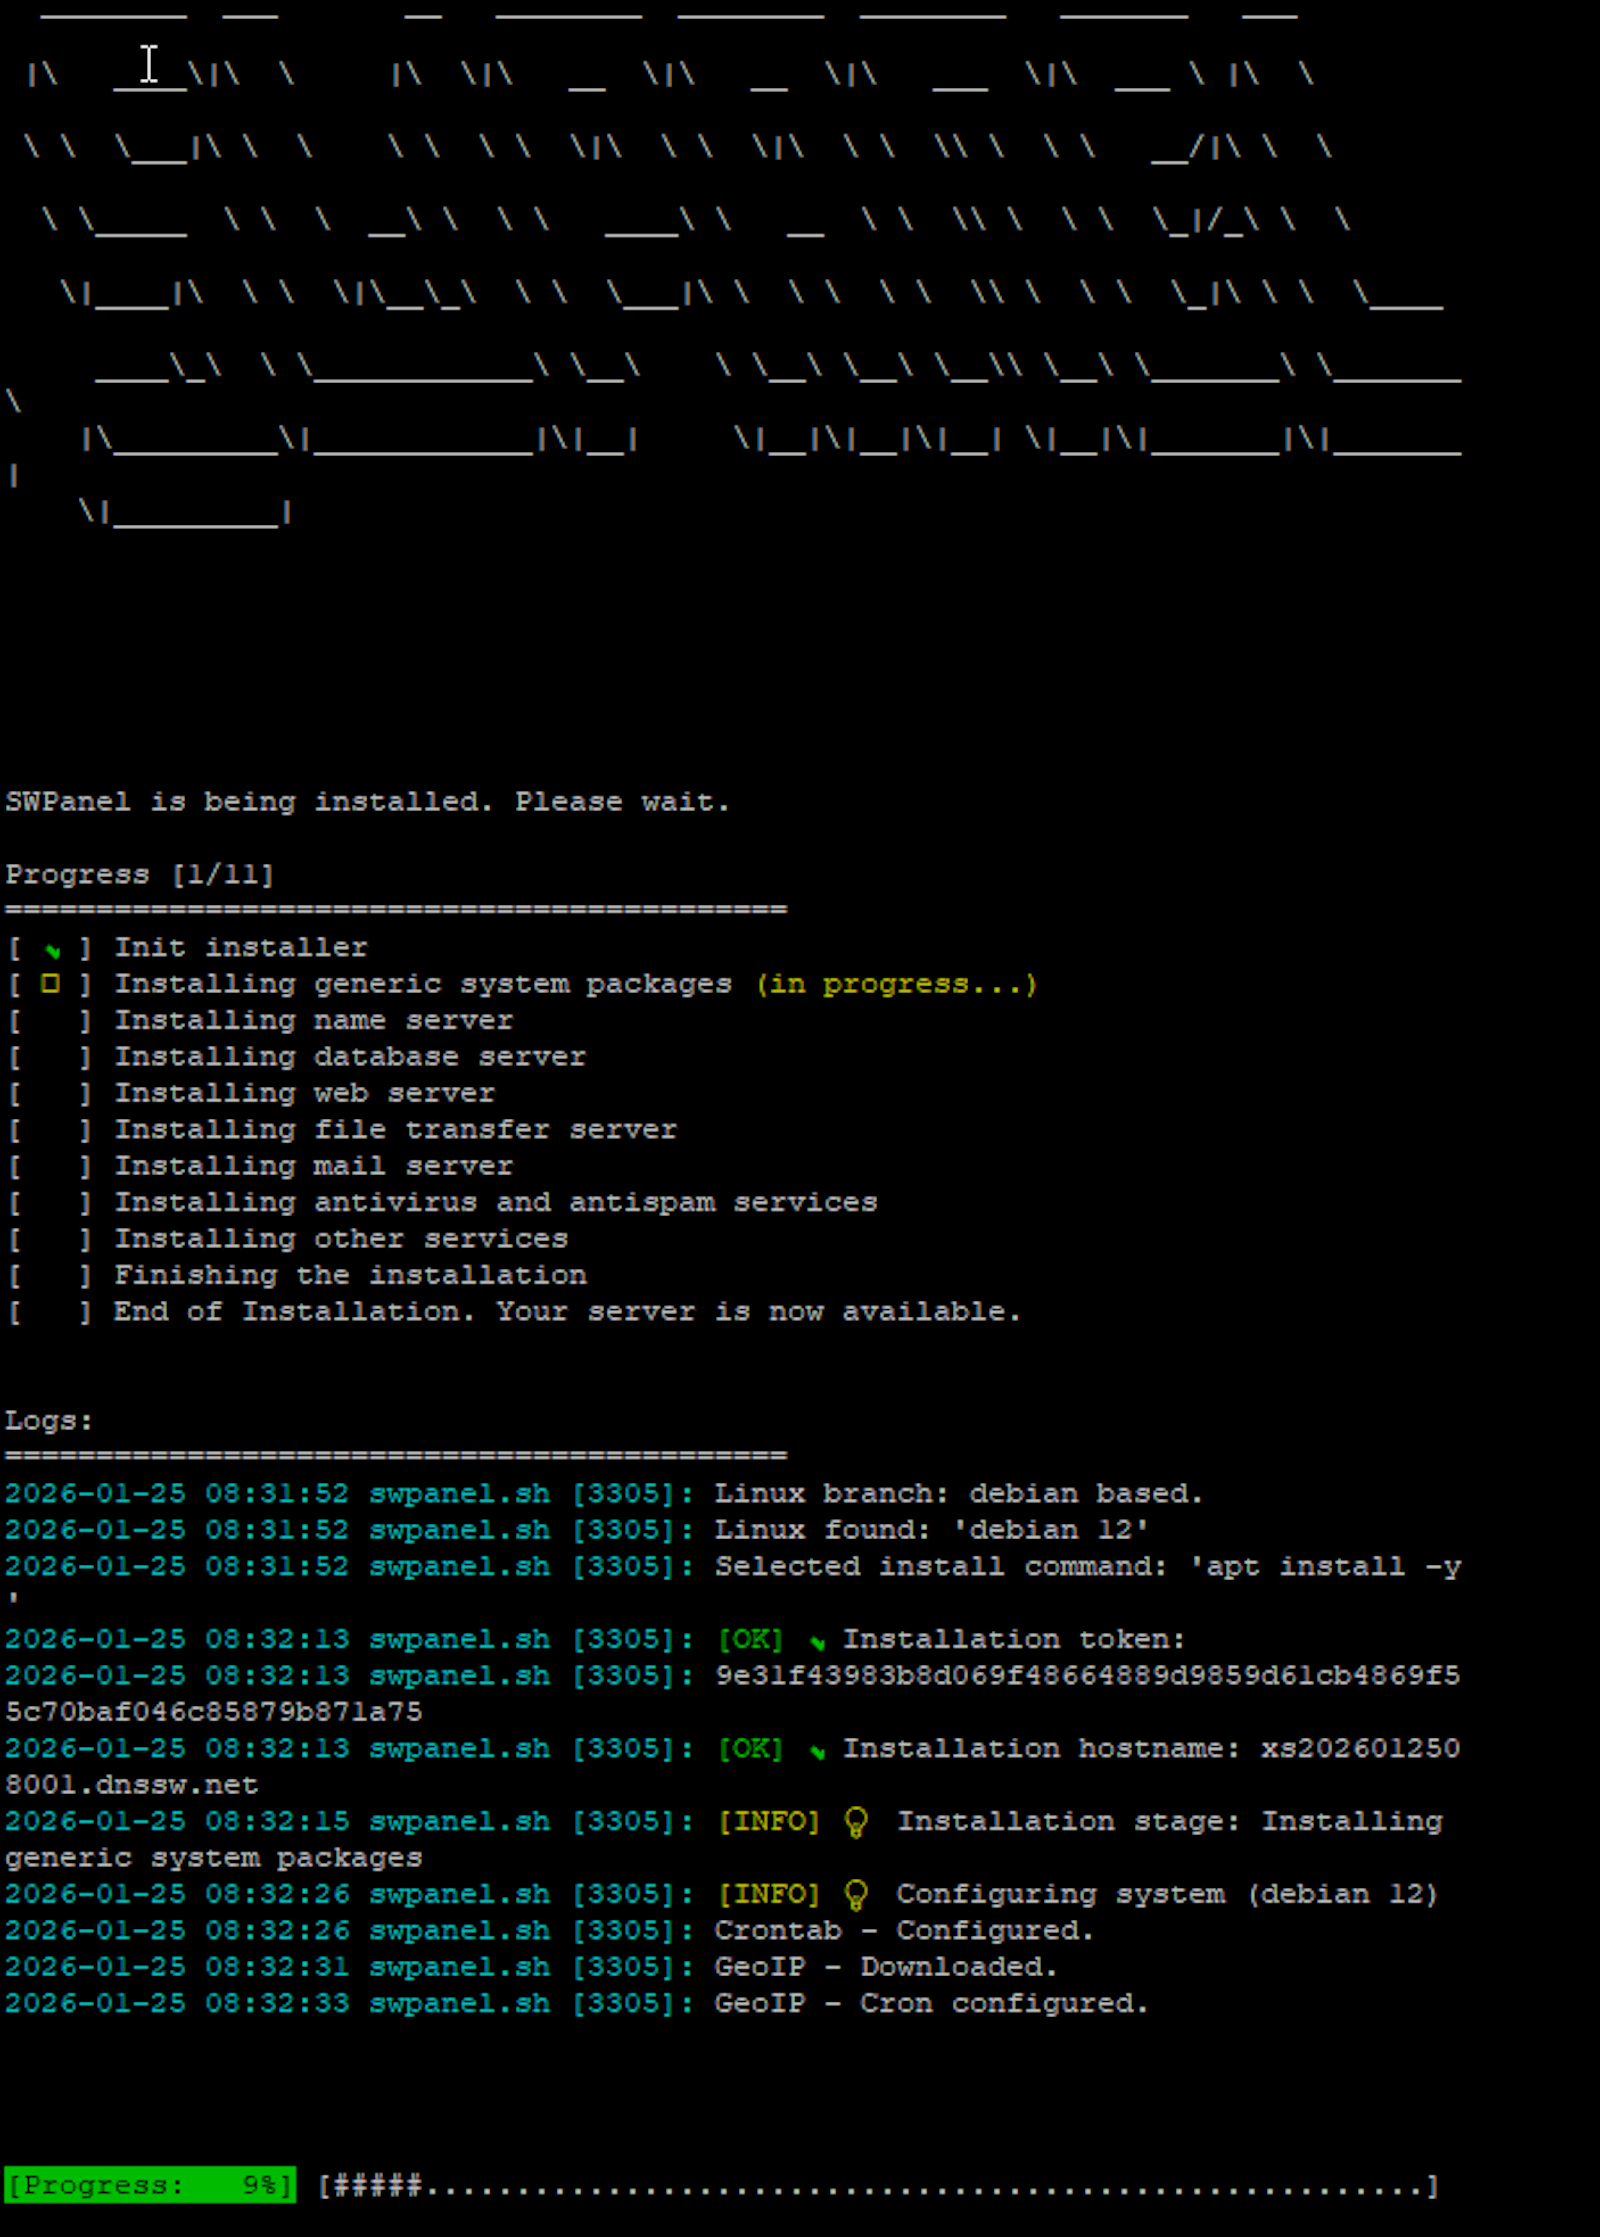
Once the installation is complete, the server will restart automatically. When you reconnect to the console, you will see the following message:
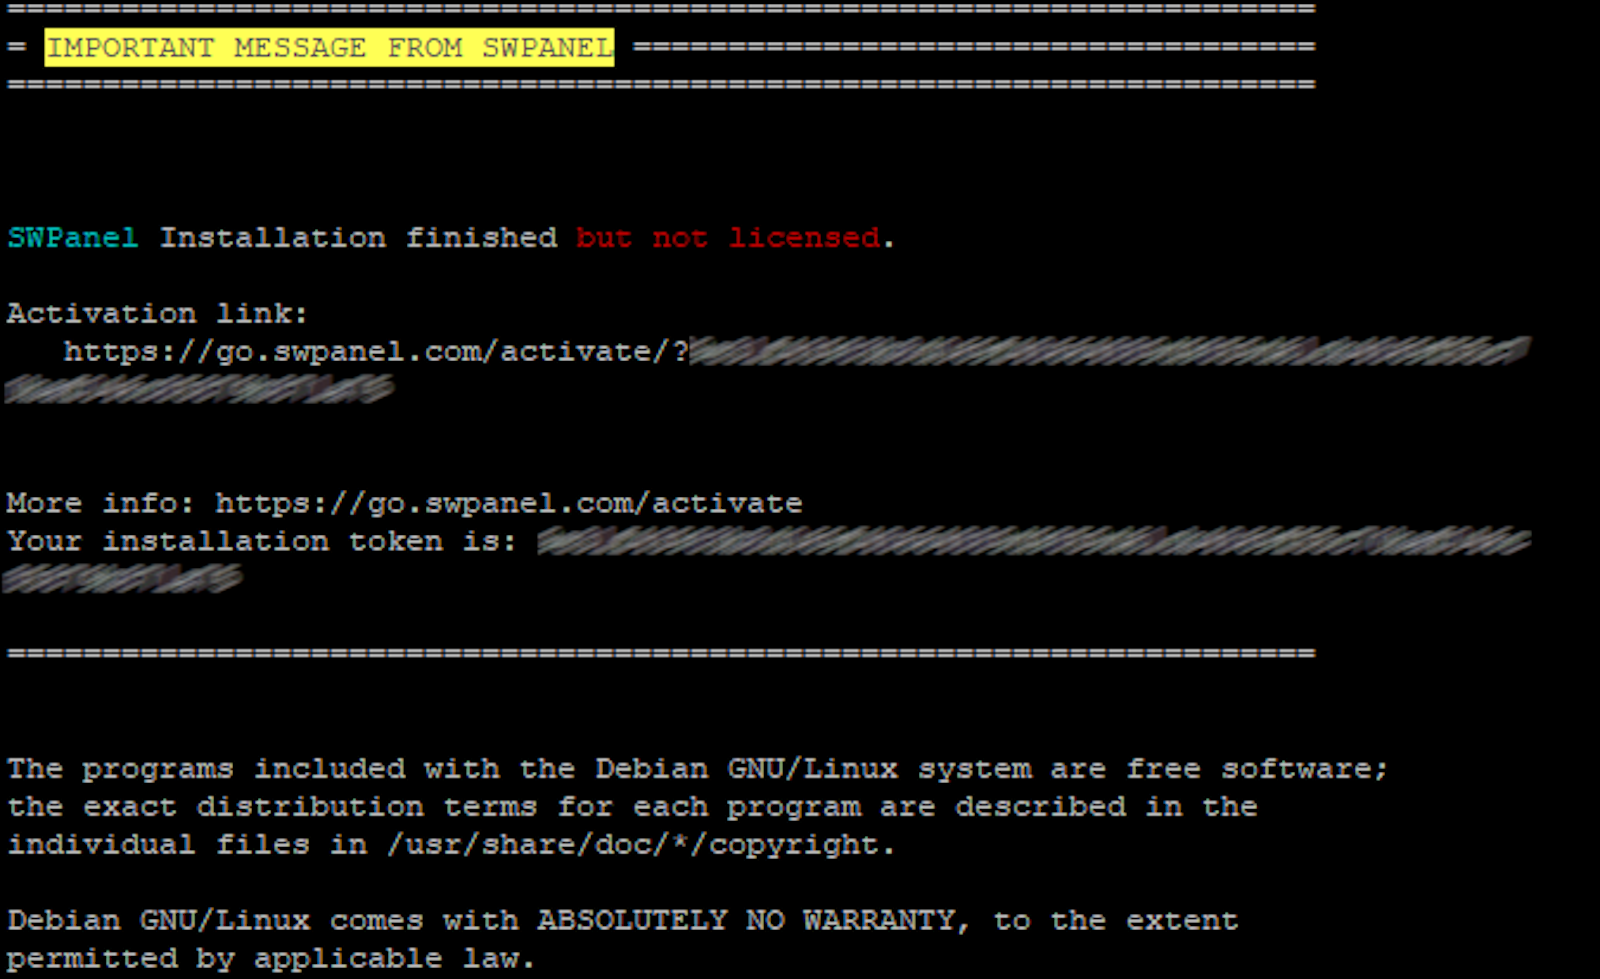
At this point, the installation of SWPanel will be complete and your installation token will be generated.
🔑 Important: Save this token, as it will be required for the next configuration step.
Once the installation is complete, you must start the licence activation process for your server to work correctly with SWPanel.
Step 1: Create a SWPanel user account
If you already have an account, you can skip directly to Step 2.
To use SWPanel, it is essential to have an active user account.
- If you do not yet have an account, you must create one before continuing.
- For more details on how to register, please refer to the following manual:
📃 Manual: How to register with SWPanel
Step 2: Activate your Installation Token
Once you have a user account, access the system via the following link: https://go.swpanel.com/activate/
Log in with your SWPanel user account. Once logged in, you will access the SWPanel Self-Hosted licence activation section.
Selecting the installation mode
SWPanel offers three installation options. In this case, you must select:
- ”I already have my Token ID, I want to activate SWPanel”
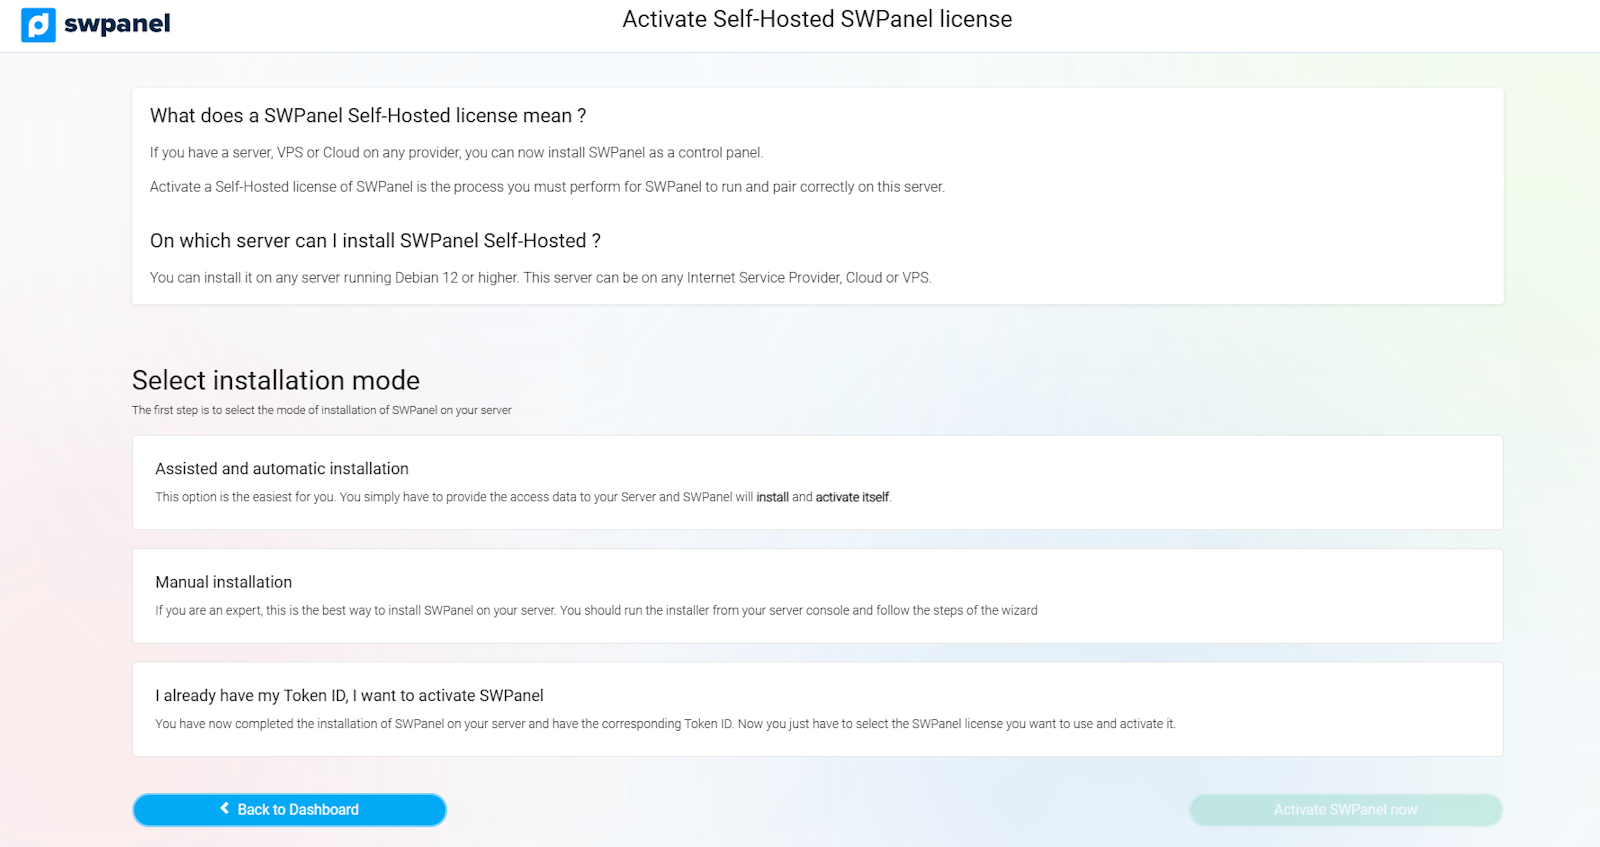
info_capture ℹ️ Note: The screenshot is for guidance only, taken from version 2026.000.0001 dated 26/01/2026. It may differ from the current version of SWPanel.
Token Activation
- Enter your Installation Token (Token ID) in the corresponding field.
- Click on ‘Verify Token ID’ to confirm its validity.
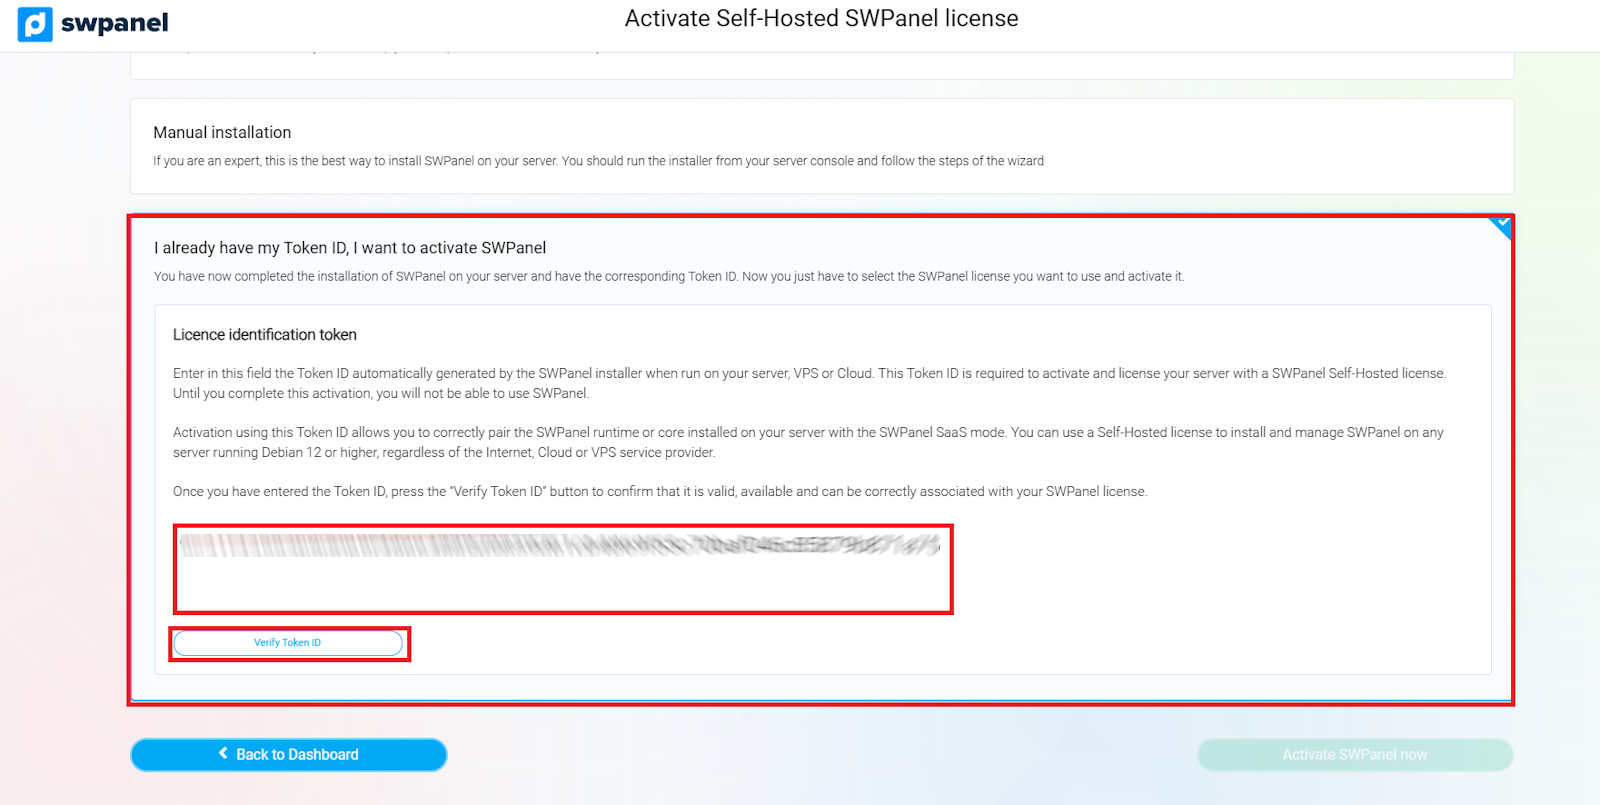
info_capture ℹ️ Note: The screenshot is for guidance only, taken from version 2026.000.0001 dated 26/01/2026. It may differ from the current version of SWPanel.
Step 3: Licence your server with SWPanel
In this step, you must select the type of licence you wish to use on your server. SWPanel offers two main options:
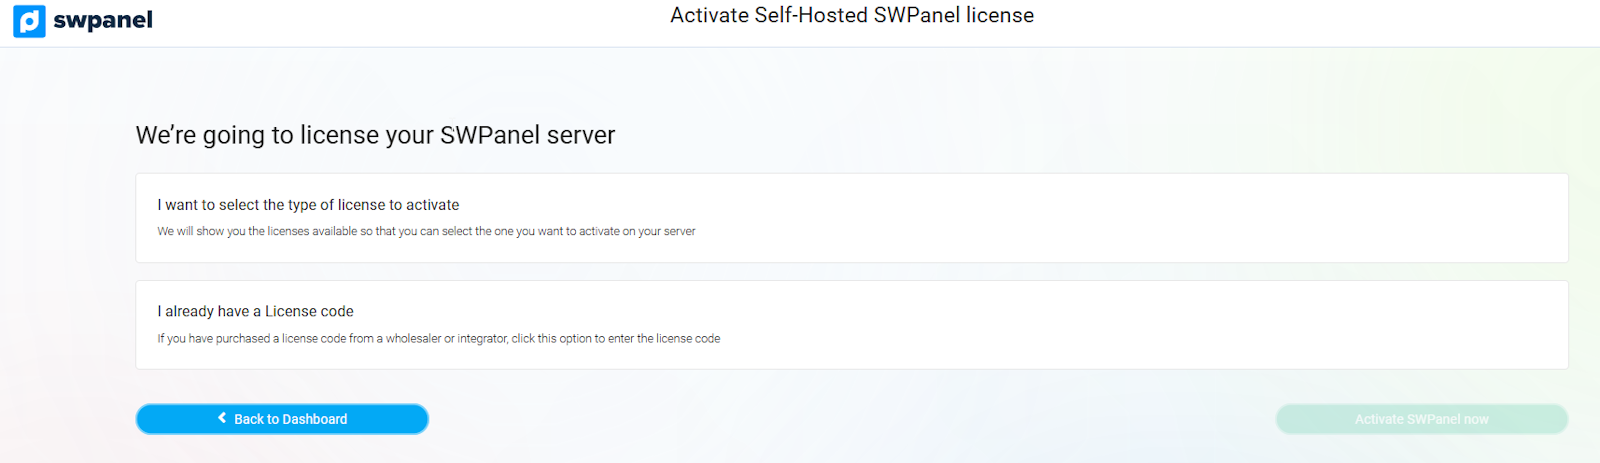
info_capture ℹ️ Note: The screenshot is for guidance only, taken from version 2026.000.0001 dated 26/01/2026. It may differ from the current version of SWPanel.
1. Select the type of licence to activate
The system will allow you to choose the most suitable licence type according to your needs.
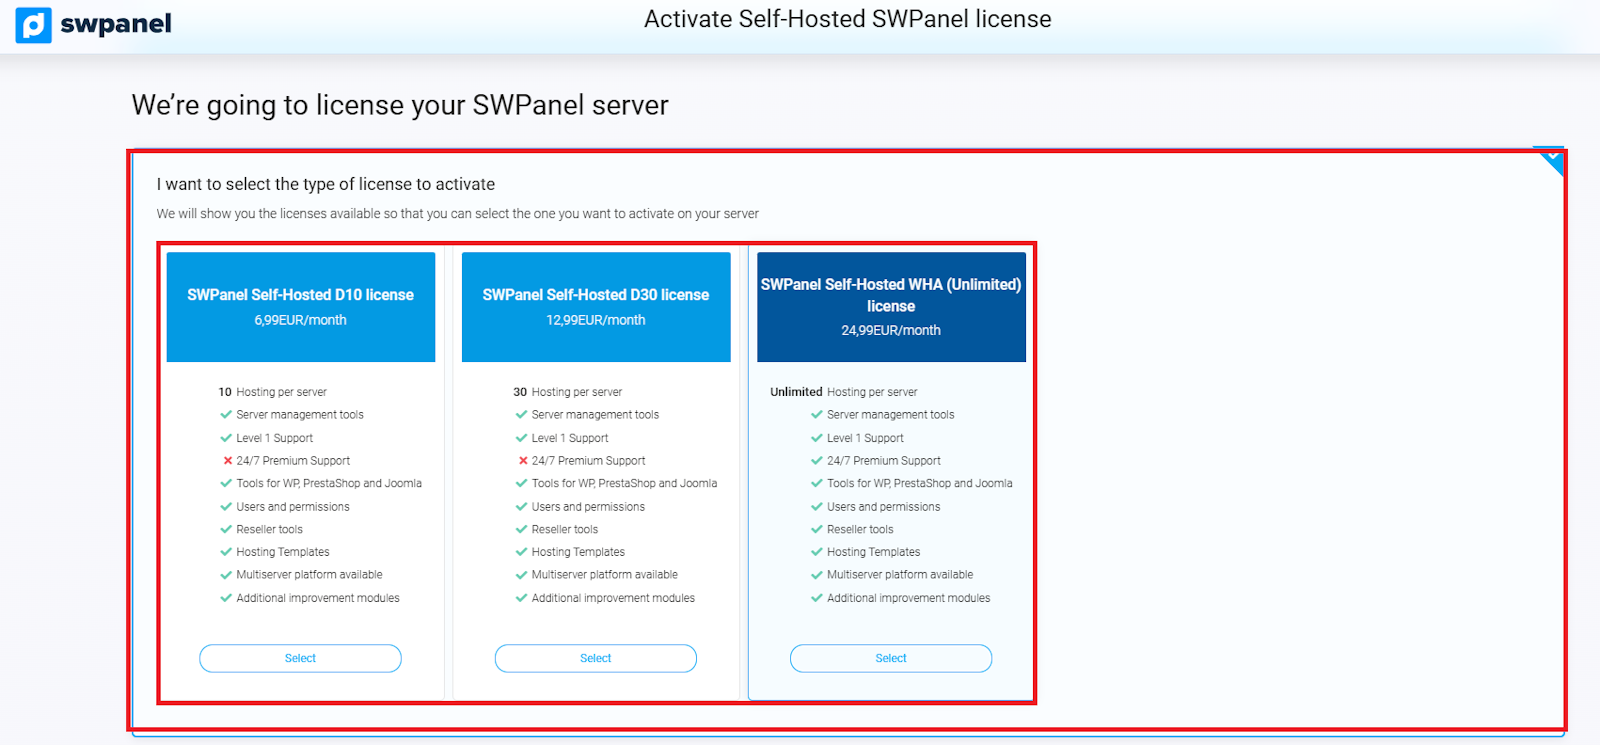
info_capture ℹ️ Note: The screenshot is for guidance only, taken from version 2026.000.0001 dated 26/01/2026. It may differ from the current version of SWPanel.
2. I already have a licence code
If you have already purchased a SWPanel licence through a wholesaler or integrator, select this option and enter your licence code.
Once you have entered the code, click on ‘Verify licence code’ to confirm its validity and proceed with activation on your server.
Step 4: Licence Activation and Payment
In this final step, you must pay the amount for the licence you selected and accept the SWPanel contract and/or user agreement.
Once you have completed these steps, the process is complete and you can begin activation by clicking on the button:
- "Activate SWPanel now"
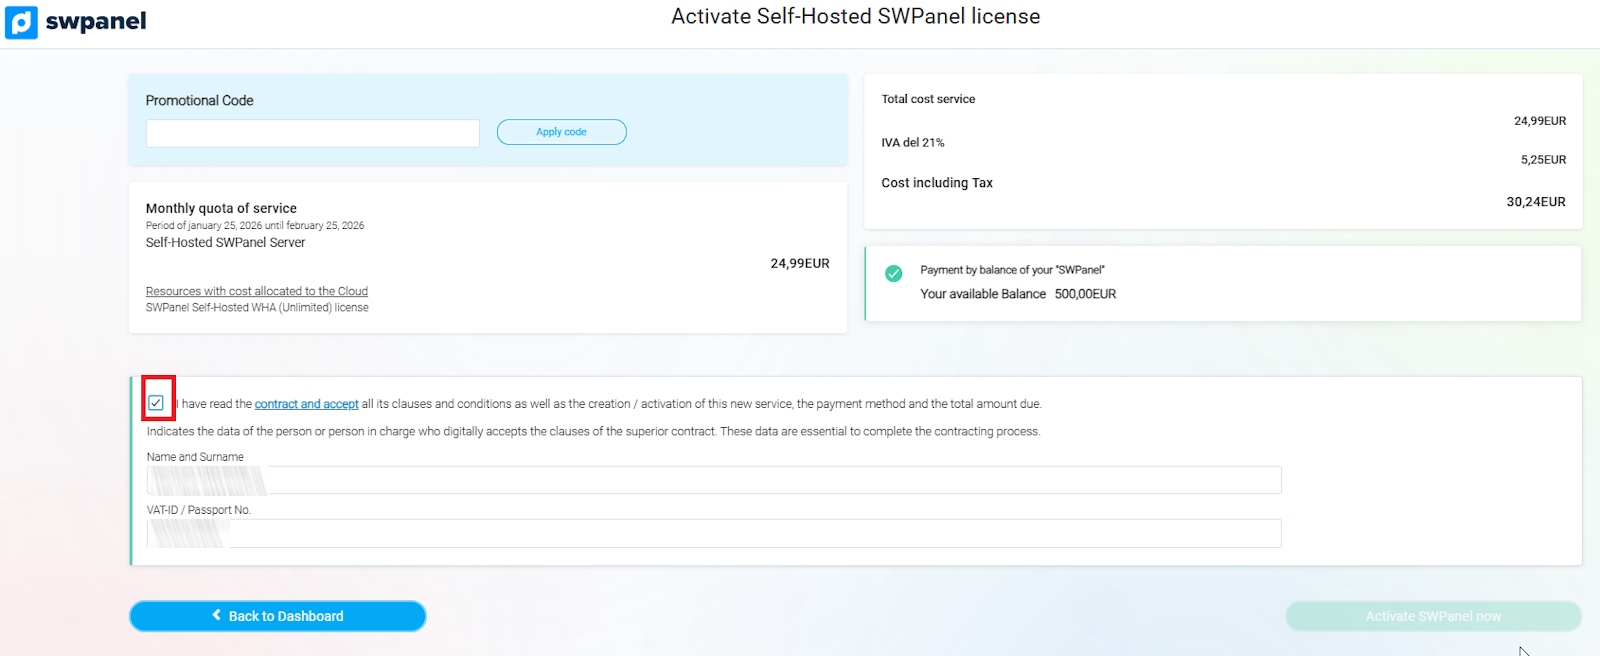
info_capture ℹ️ Note: The screenshot is for guidance only, taken from version 2026.000.0001 dated 26/01/2026. It may differ from the current version of SWPanel. ✅ After this step, your server will be fully licensed and ready to use SWPanel Self-Hosted.
Assisted or Automatic Installation of SWPanel
This method is the easiest way to install SWPanel on your server.
⚠️ Before you begin, you must have an active SWPanel user account.
Consult the following manual to create your account: 📃 Manual: How to register with SWPanel
As long as your user account is created and active, you can start the automatic and remote installation process on your server, without having to execute commands manually.
Step 1: Access SWPanel
Access the activation panel via the following link: https://go.swpanel.com/activate/
Once inside the Dashboard (main panel), go to the blue side menu and click on:
- Activate SWPanel Self-Hosted

info_capture ℹ️ Note: The screenshot is for guidance only, taken from version 2026.000.0001 dated 26/01/2026. It may differ from the current version of SWPanel.
Step 2: Selecting the SWPanel Self-Hosted Installation Mode
After accessing the activation section, three available methods for installing SWPanel will be displayed:
info_capture ℹ️ Note: The screenshot is for guidance only, taken from version 2026.000.0001 dated 26/01/2026. It may differ from the current version of SWPanel.
Select the option that applies to your situation:
- For users who already have a Token ID, choose ‘I already have my Token ID, I want to activate SWPanel’.
- For new installations or tests, there are guided or automatic activation options that the system will indicate.
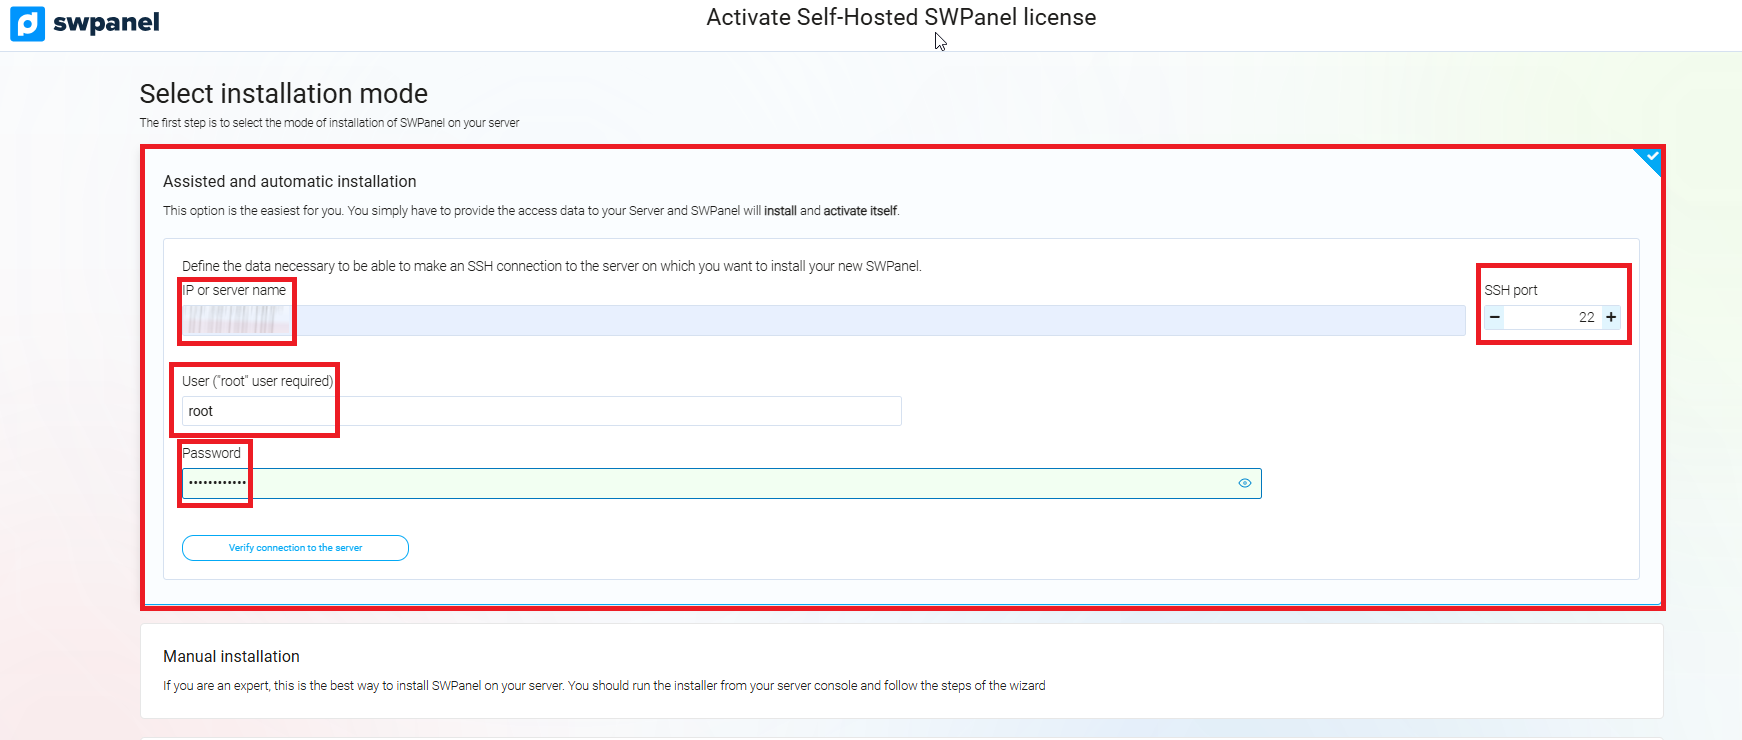
Step 3: Assisted and Automatic Installation
This method is recommended for users without advanced technical knowledge, as it automates the entire installation process.
Prerequisites
Before you begin, ensure you have:
- The server's public IP address.
- The SSH port (usually 22 by default).
- The root user password.
info_capture ℹ️ Note: The screenshot is for guidance only, taken from version 2026.000.0001 dated 26/01/2026. It may differ from the current version of SWPanel.
Installation steps
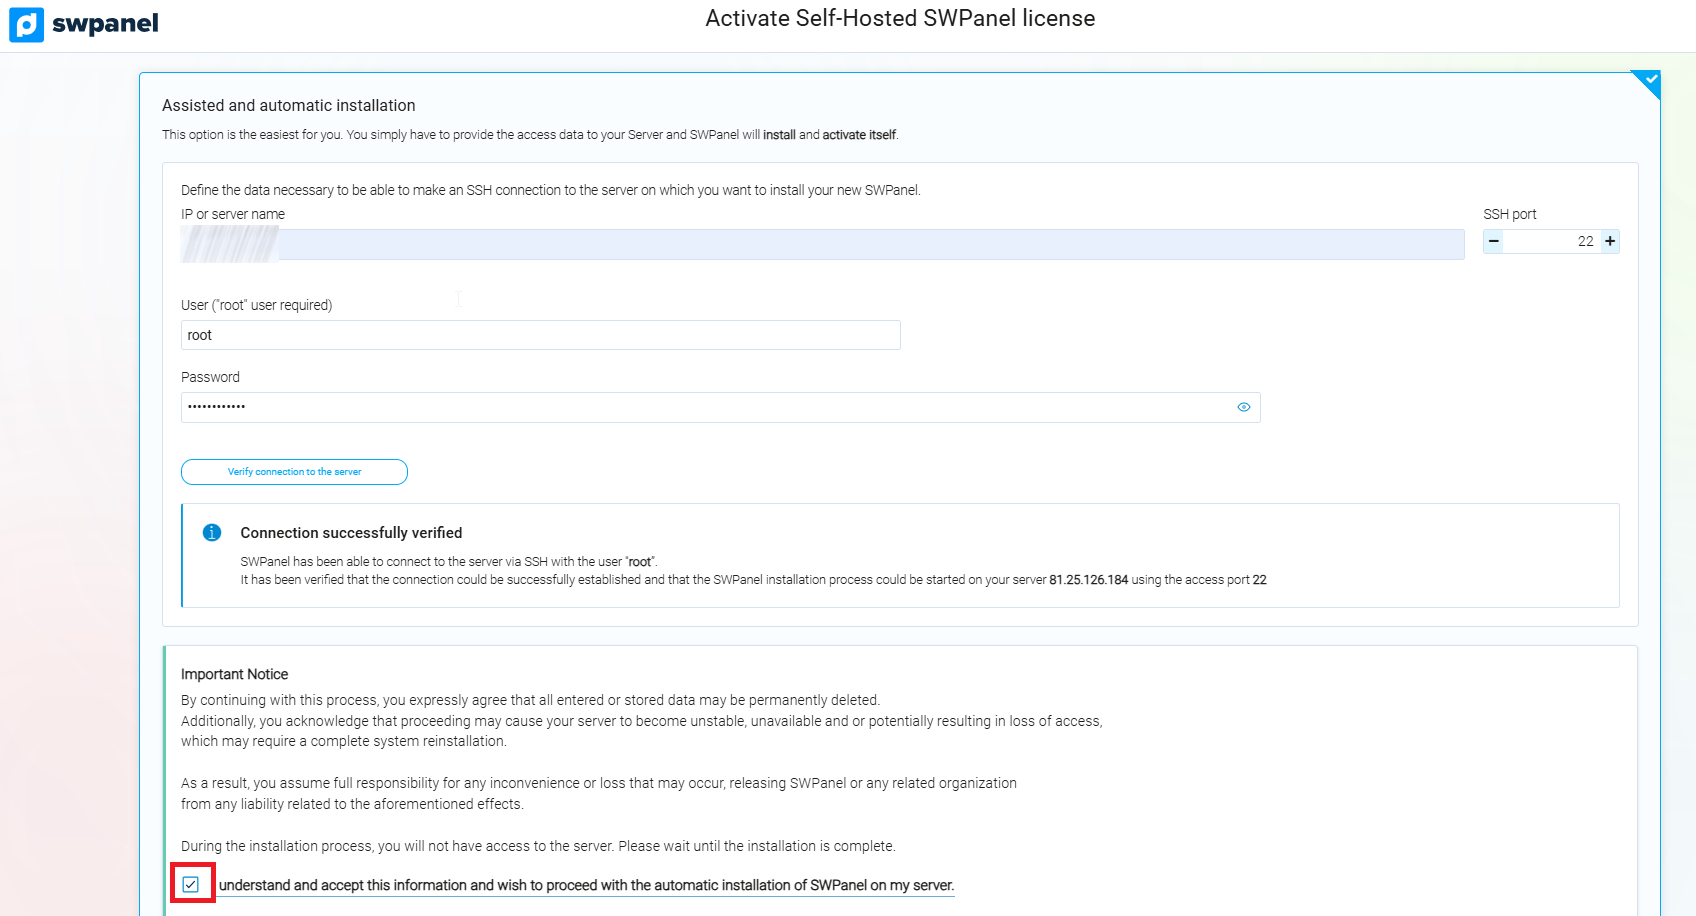
- Enter the server IP, SSH port, and root user password.
- Click ‘Verify server connection’ to check that the panel can communicate correctly with the server.
- Accept the liability notice by ticking the corresponding box:
info_capture ℹ️ Note: The screenshot is for guidance only, taken from version 2026.000.0001 dated 26/01/2026. It may differ from the current version of SWPanel.
- Once the connection has been verified and the liability clause accepted, SWPanel will automatically start the installation, without the need for further intervention by the user.
Step 4: Selecting the Licence Type
In this step, you must choose the type of licence you wish to use on your server. SWPanel offers two main options:
info_capture ℹ️ Note: The screenshot is for guidance only, taken from version 2026.000.0001 dated 26/01/2026. It may differ from the current version of SWPanel.
1. Select the type of licence to activate
The system will allow you to choose the most suitable licence type according to your needs.
info_capture ℹ️ Note: The screenshot is for guidance only, taken from version 2026.000.0001 dated 26/01/2026. It may differ from the current version of SWPanel.
2. I already have a licence code
If you have purchased a SWPanel licence through a wholesaler or integrator, select this option and enter your licence code.
Then, click on ”Verify licence code” to confirm its validity and proceed with activation on your server.
Step 5: Licence Activation and Payment
In this final step, you must pay the amount for the licence you selected and accept the SWPanel contract and/or user agreement.
Once you have completed these steps, the process is finished and you can start the activation by clicking on the button:
- "Activate SWPanel now"
info_capture ℹ️ Note: The screenshot is for guidance only, taken from version 2026.000.0001 dated 26/01/2026. It may differ from the current version of SWPanel.
✅ After completing this step, your server will be fully licensed and ready to use SWPanel Self-Hosted.